メインコンテンツにスキップ

LeapFrog LeapPad Platinum Motherboard Replacement

必要な工具と部品

  1. LeapFrog LeapPad Platinum Motherboard Replacement, Battery: 手順 1、 1の画像 1
    • Place your tablet on a flat surface with the screen facing down.

  2. LeapFrog LeapPad Platinum Motherboard Replacement: 手順 2、 2の画像 1 LeapFrog LeapPad Platinum Motherboard Replacement: 手順 2、 2の画像 2
    • Using a plastic opening tool, pry off the plastic border by inserting it in the space between the green bumper and the white plastic on the edge of the tablet.

    • The border snaps into place, so don't be too worried if you hear a cracking noise while prying it off.

  3. LeapFrog LeapPad Platinum Motherboard Replacement: 手順 3、 2の画像 1 LeapFrog LeapPad Platinum Motherboard Replacement: 手順 3、 2の画像 2
    • Remove the 11 Phillips screws (8.0 mm) located around the edge of the back cover with a Phillips screwdriver.

  4. LeapFrog LeapPad Platinum Motherboard Replacement: 手順 4、 1の画像 1
    • Pull the back cover off of your device.

  5. LeapFrog LeapPad Platinum Motherboard Replacement: 手順 5、 3の画像 1 LeapFrog LeapPad Platinum Motherboard Replacement: 手順 5、 3の画像 2 LeapFrog LeapPad Platinum Motherboard Replacement: 手順 5、 3の画像 3
    • Wedge a plastic opening tool underneath the battery and lift the battery up.

    • The battery is held in place by an adhesive strip, so it can be difficult to pry off.

  6. LeapFrog LeapPad Platinum Motherboard Replacement: 手順 6、 1の画像 1
    • The battery has red, black, and white wires that are all connected to the motherboard through a plastic clip. Unplug this plastic clip to fully remove the battery from your device.

  7. LeapFrog LeapPad Platinum Motherboard Replacement, Motherboard: 手順 7、 2の画像 1 LeapFrog LeapPad Platinum Motherboard Replacement, Motherboard: 手順 7、 2の画像 2
    • Locate the white ribbon cable connected to the motherboard.

    • Disconnect the cable by flipping up the metal tab on the connector and sliding the cable out.

  8. LeapFrog LeapPad Platinum Motherboard Replacement: 手順 8、 2の画像 1 LeapFrog LeapPad Platinum Motherboard Replacement: 手順 8、 2の画像 2
    • Locate the black ribbon cable which is connected to the motherboard.

    • Disconnect the cable by flipping up the metal tab on the connector and sliding the cable out.

  9. LeapFrog LeapPad Platinum Motherboard Replacement: 手順 9、 2の画像 1 LeapFrog LeapPad Platinum Motherboard Replacement: 手順 9、 2の画像 2
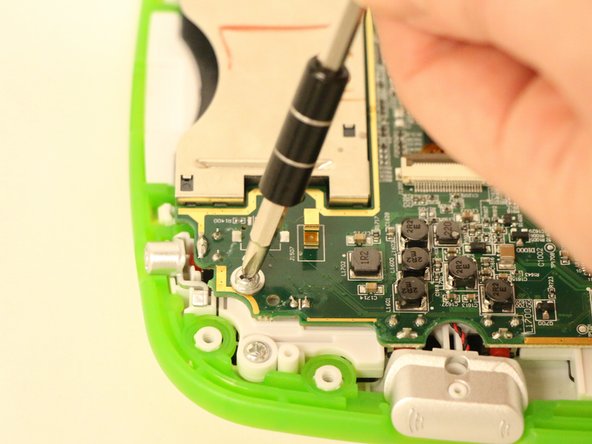
    • Remove the three 4.0 mm Phillips screws located in the corners of the motherboard.

  10. LeapFrog LeapPad Platinum Motherboard Replacement: 手順 10、 1の画像 1
    • Lift up the front edge of the motherboard.

    • Lift the volume-control button out of the device and set it aside.

  11. LeapFrog LeapPad Platinum Motherboard Replacement: 手順 11、 1の画像 1
    • Gently tug upwards on the red and black twisted wires located near the button you just removed to release the black rubber base they are connected to from the device.

    • This does not take much force, so it is likely that this piece will pop out of place when initially lifting the motherboard.

  12. LeapFrog LeapPad Platinum Motherboard Replacement: 手順 12、 2の画像 1 LeapFrog LeapPad Platinum Motherboard Replacement: 手順 12、 2の画像 2
    • Rotate your device 180 degrees so the the motherboard is on your right-hand side and gently lift the front edge of the motherboard to reveal an orange sheet of plastic.

    • Disconnect the orange sheet from the motherboard by lifting the metal tab on the connector (as you did for the cables in steps 1 and 2), and lift the motherboard completely out of the device.

終わりに

To reassemble your device, follow these instructions in reverse order.

作成者

2人の作成者と共同で作成されました。

Kaitlyn Kinerk

メンバー登録日: 01/26/16

263 ポイント

1ガイドが承認済み

チーム

UW Tacoma, Team 1-5, Rose Winter 2016 UW Tacoma, Team 1-5, Rose Winter 2016人のメンバー

UWT-ROSE-W16S1G5

4 メンバー

8のガイドは作成済み

0 件のコメント

コメントを追加

統計データ:

過去 24時間: 0

過去 7 日: 0

過去 30 日: 2

今までの合計 2,077