メインコンテンツにスキップ
リペアコミュニティに参加 - アカウントの作成

Lamp Pull Chain Replacement

必要な工具と部品

  1. Lamp Pull Chain Replacement, Lamp Pull Chain: 手順 1、 1の画像 1
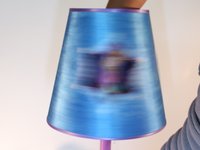
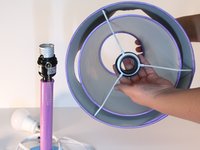
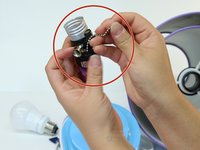
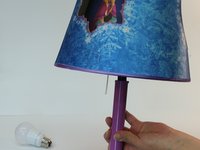
    • Unplug the broken lamp and ensure you have all of the parts necessary for the repair.

    FixBotに聞いてみる

    コメントを追加

  2. Lamp Pull Chain Replacement: 手順 2、 2の画像 1 Lamp Pull Chain Replacement: 手順 2、 2の画像 2
    • Remove the light bulb from the lamp.

    FixBotに聞いてみる

    コメントを追加

  3. Lamp Pull Chain Replacement: 手順 3、 2の画像 1 Lamp Pull Chain Replacement: 手順 3、 2の画像 2
    • Unscrew the lamp shade from the base by turning it counter-clockwise.

    FixBotに聞いてみる

    コメントを追加

  4. Lamp Pull Chain Replacement: 手順 4、 1の画像 1
    • Gently pull the socket from the base to expose the broken chain section.

    FixBotに聞いてみる

    コメントを追加

  5. Lamp Pull Chain Replacement: 手順 5、 2の画像 1 Lamp Pull Chain Replacement: 手順 5、 2の画像 2
    • Attach the chain connector to the extra chain.

    FixBotに聞いてみる

    コメントを追加

  6. Lamp Pull Chain Replacement: 手順 6、 2の画像 1 Lamp Pull Chain Replacement: 手順 6、 2の画像 2
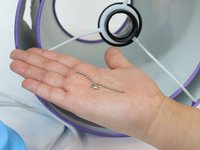
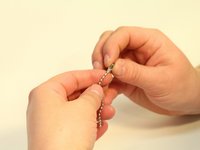
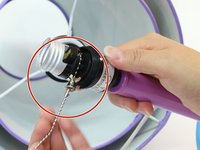
    • Connect the chain with the chain connector to the broken chain on the lamp base.

    FixBotに聞いてみる

    コメントを追加

  7. Lamp Pull Chain Replacement: 手順 7、 3の画像 1 Lamp Pull Chain Replacement: 手順 7、 3の画像 2 Lamp Pull Chain Replacement: 手順 7、 3の画像 3
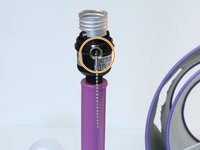
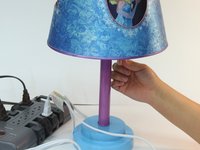
    • Tilting the lamp in one hand, use your other hand to guide the chain into the hole that leads from inside of the socket to outside of the lamp.

    • The chain will go down through this hole.

    FixBotに聞いてみる

    コメントを追加

  8. Lamp Pull Chain Replacement: 手順 8、 1の画像 1
    • Gently push the socket back into place.

    FixBotに聞いてみる

    コメントを追加

  9. Lamp Pull Chain Replacement: 手順 9、 2の画像 1 Lamp Pull Chain Replacement: 手順 9、 2の画像 2
    • Screw the lamp shade back onto the base of the lamp by turning it clockwise.

    FixBotに聞いてみる

    コメントを追加

  10. Lamp Pull Chain Replacement: 手順 10、 1の画像 1
    • Replace the light bulb into the lamp socket.

    FixBotに聞いてみる

    コメントを追加

  11. Lamp Pull Chain Replacement: 手順 11、 2の画像 1 Lamp Pull Chain Replacement: 手順 11、 2の画像 2
    • Plug your lamp into an outlet and turn it on!

    • You will pull down on the chain to do this.

    FixBotに聞いてみる

    コメントを追加

  12. Lamp Pull Chain Replacement: 手順 12、 1の画像 1
    • Congratulations! You have fixed your lamp.

    FixBotに聞いてみる

    コメントを追加

終わりに

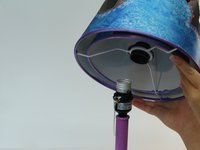
Congratulations on fixing your lamp!

キャンセル: このガイドを終了できませんでした。

6 の人々がこのガイドを完成させました。

作成者

2人の作成者と共同で作成されました。

Anna Rill

メンバー登録日: 11/07/18

385 ポイント

1ガイドが承認済み

チーム

Idaho State University, Team S1-G1, Watkins Fall 2018 Idaho State University, Team S1-G1, Watkins Fall 2018人のメンバー

ISU-WATKINS-F18S1G1

4 メンバー

3のガイドは作成済み

4件のガイドコメント

You saved my lamp! Thank you for this simple to follow guide.

Erica Chiovarou - 返信 共有

All well and good, but isn’t it more likely that the break will be in the string which runs from the chain into the switch? This can be fixed by disassembling the switch itself - but where can one buy the right string?

gregg.horne - 返信 共有

On my lamp, the problem was not the chain but in the switch itself. This made it necessary to replace the entire socket since the switch was riveted to its base. I made this video which shows how to replace the socket and switch:https://youtu.be/0fLnUPWzLeI

Scott Clark - 返信 共有

Excellent, Thank you!

mtrujillo88@hotmail.com - 返信 共有

コメントを追加

統計データ:

過去 24時間: 18

過去 7 日: 138

過去 30 日: 610

今までの合計 45,604