メインコンテンツにスキップ

この修理ガイドは変更されています。最新の未承認バージョンに切り替えます。

LG V20 Vibration Motor Replacement

必要な工具と部品

  1. LG V20 Vibration Motor Replacement, Back Cover: 手順 1、 3の画像 1 LG V20 Vibration Motor Replacement, Back Cover: 手順 1、 3の画像 2 LG V20 Vibration Motor Replacement, Back Cover: 手順 1、 3の画像 3
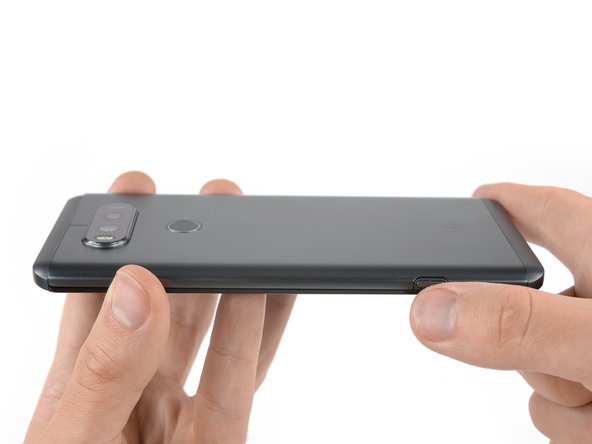
    • Press the button on the lower right side of the LG V20 to open the clamp that holds the back cover on the back side of the phone.

    • Remove the back cover.

  2. LG V20 Vibration Motor Replacement, Battery: 手順 2、 3の画像 1 LG V20 Vibration Motor Replacement, Battery: 手順 2、 3の画像 2 LG V20 Vibration Motor Replacement, Battery: 手順 2、 3の画像 3
    • Before disassembling your phone, discharge the battery below 25%. A charged lithium-ion battery can catch fire and/or explode if accidentally punctured.

    • Insert a spudger or your fingernail under the battery at the small recess on the lower edge.

    • Be careful not to deform or puncture the battery.

    • Pry up and remove the battery.

  3. LG V20 Vibration Motor Replacement, Midframe Assembly: 手順 3、 1の画像 1
    • Remove the sixteen 4mm Phillips #00 screws attaching the back cover to the motherboard.

  4. LG V20 Vibration Motor Replacement: 手順 4、 2の画像 1 LG V20 Vibration Motor Replacement: 手順 4、 2の画像 2
    • The top and bottom frame section hold very tight to the mid frame. It is possible to pull them off with your hands. If you're not able to do so, use the following removal procedure:

    • Use the flat end of a spudger and apply pressure to one of the corners of the frame section until you create a small gap.

  5. LG V20 Vibration Motor Replacement: 手順 5、 2の画像 1 LG V20 Vibration Motor Replacement: 手順 5、 2の画像 2
    • Flip the phone and insert an opening pick in the gap you created.

    • Slide the opening pick along the gap until the frame section pops out of its plastic clamps.

  6. LG V20 Vibration Motor Replacement: 手順 6、 1の画像 1
    • Remove the frame section.

    • Repeat this procedure with the frame section on the other end of the phone.

    • Within the top frame section there's a small silver grating that covers the speaker. This may fall out, so be careful not to lose it.

  7. LG V20 Vibration Motor Replacement: 手順 7、 2の画像 1 LG V20 Vibration Motor Replacement: 手順 7、 2の画像 2
    • The loudspeaker is attached to the cover of the motherboard. Use an opening pick to pry it up.

  8. LG V20 Vibration Motor Replacement: 手順 8、 2の画像 1 LG V20 Vibration Motor Replacement: 手順 8、 2の画像 2
    • The cover of the motherboard is held in its place by several plastic clamps.

    • Use an opening pick to pry up the motherboard cover at the right corner at the bottom of your phone until it pops out of the plastic clamp.

  9. LG V20 Vibration Motor Replacement: 手順 9、 2の画像 1 LG V20 Vibration Motor Replacement: 手順 9、 2の画像 2
    • Slide the opening pick along the mid frame and flip it sideways to open the plastic clamps holding the motherboard cover in its place.

  10. LG V20 Vibration Motor Replacement: 手順 10、 1の画像 1
    • Remove the motherboard cover.

  11. LG V20 Vibration Motor Replacement, Front-Facing Camera: 手順 11、 2の画像 1 LG V20 Vibration Motor Replacement, Front-Facing Camera: 手順 11、 2の画像 2
    • Use the flat end of a spudger to disconnect the front camera flex cable.

    • If you want to go on and remove the motherboard assembly, there is no need to remove the front facing camera after disconnecting it. However if you feel uncertain, carefully remove it with a pair of tweezers.

    • Use a pair of tweezers to carefully remove the front facing camera. Be careful to only grip the body of the camera, as the top is the sensor pcb and is only held on with glue (removal will ruin the sensor).

  12. LG V20 Vibration Motor Replacement, Motherboard Assembly: 手順 12、 1の画像 1
    • Use the flat end of a spudger to disconnect the flex cable of the left rear camera.

    • The second rear camera will come out with the motherboard since it is connected on the other side.

    • You can leave the front facing camera in its place as long as you're careful while removing the motherboard assembly. However if you feel uncertain, carefully remove it with a pair of tweezers.

  13. LG V20 Vibration Motor Replacement: 手順 13、 1の画像 1
    • Disconnect the display flex cable with the flat end of a spudger.

  14. LG V20 Vibration Motor Replacement: 手順 14、 2の画像 1 LG V20 Vibration Motor Replacement: 手順 14、 2の画像 2
    • Use the pointed end of a spudger to lift up the motherboard assembly until you can get a good grip.

    • Carefully lift up the motherboard assembly and remove it.

  15. LG V20 Vibration Motor Replacement, Vibration Motor: 手順 15、 1の画像 1
    • Use a pair of tweezers to remove the vibration motor.

    • If the vibration motor is glued in too tight, you can use an iOpener to loosen the adhesive beneath it and try again.

終わりに

To reassemble your device, follow these instructions in reverse order.

4 の人々がこのガイドを完成させました。

作成者

1人の作成者と共同作成されました。

Dominik Schnabelrauch

メンバー登録日: 11/23/16

202,758 ポイント

682のガイドは作成済み

チーム

iFixit iFixit人のメンバー

Staff

135 メンバー

16,732のガイドは作成済み

2 件のコメント

When I dug down to the motor, I found it wasn’t going to be that easy to pull it out.

Instead, I checked that it actually worked by touching its contacts carefully to a 1.5v AA battery. It turns out that the spring contacts on the motor were a little too compressed, so I stretched them with tweezers, and didn’t need to replace the motor: all works.

Alexander Pruss - 返信

my motor also stopped working. after taking it apart i noticed the gold contacts on the PCB were hardly rubbed. connected a 2.5 v PSU to the motor. works! also just ended up stretching the spring. Also added some NT-H1 thermal paste to the area with the thermal pad and the other can beside it. Thermal throttling was reduced significantly.

Marvin Mallari -

コメントを追加

統計データ:

過去 24時間: 0

過去 7 日: 0

過去 30 日: 2

今までの合計 2,004