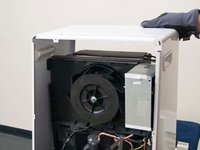
メインコンテンツにスキップ

LG UD501KOJ5 Dehumidifier Sensor Replacement

必要な工具と部品

  1. LG UD501KOJ5 Dehumidifier Sensor Replacement, Humidity Sensor: 手順 1、 2の画像 1 LG UD501KOJ5 Dehumidifier Sensor Replacement, Humidity Sensor: 手順 1、 2の画像 2
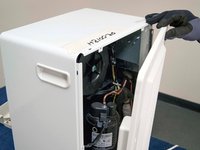
    • Unplug the dehumidifier then put on work gloves to protect your hands.

    • Remove the water collection bucket and set it aside.

    • Remove the air filter from the bottom of the front grille.

  2. LG UD501KOJ5 Dehumidifier Sensor Replacement: 手順 2、 2の画像 1 LG UD501KOJ5 Dehumidifier Sensor Replacement: 手順 2、 2の画像 2
    • Using your Phillips #0 screwdriver, remove the two screws which are attached at the bottom of the front grille.

    • Lift the front grille up and off the front of the frame, carefully set it in front of the dehumidifier.

    • The control board wire harness is still attached to the back of the front grille.

  3. LG UD501KOJ5 Dehumidifier Sensor Replacement: 手順 3、 3の画像 1 LG UD501KOJ5 Dehumidifier Sensor Replacement: 手順 3、 3の画像 2 LG UD501KOJ5 Dehumidifier Sensor Replacement: 手順 3、 3の画像 3
    • Remove the screws that secure the back panel to the dehumidifier.

    • Carefully remove the back panel from the dehumidifier.

    • Remove the screws at the side.

  4. LG UD501KOJ5 Dehumidifier Sensor Replacement: 手順 4、 3の画像 1 LG UD501KOJ5 Dehumidifier Sensor Replacement: 手順 4、 3の画像 2 LG UD501KOJ5 Dehumidifier Sensor Replacement: 手順 4、 3の画像 3
    • Remove the screws located at both sides of the back panel.

    • Remove the screws on the top left and top right which are connected to the control box.

    • Carefully remove the outer case.

  5. LG UD501KOJ5 Dehumidifier Sensor Replacement: 手順 5、 3の画像 1 LG UD501KOJ5 Dehumidifier Sensor Replacement: 手順 5、 3の画像 2 LG UD501KOJ5 Dehumidifier Sensor Replacement: 手順 5、 3の画像 3
    • Disconnect the sensor wire harness from the electronic control board.

    • Disconnect the wire harness from the collection bucket float switch.

    • Pull the evaporator thermistor out of the copper sleeve on the side of the evaporator coil.

  6. LG UD501KOJ5 Dehumidifier Sensor Replacement: 手順 6、 2の画像 1 LG UD501KOJ5 Dehumidifier Sensor Replacement: 手順 6、 2の画像 2
    • Remove the humidity sensor from the evaporator fins.

    • Pull the sensor assembly out of the dehumidifier.

    • Remove any dust build-up with a dry cloth.

    • Push the new humidity sensor in place on the front of the evaporator fins.

終わりに

To reassemble your device, follow these instructions in reverse order.

作成者

1人の作成者と共同作成されました。

Gabrielle Campbell

メンバー登録日: 05/12/21

133 ポイント

1ガイドが承認済み

チーム

York University, Team S1-G3, O'Regan Summer 2021 York University, Team S1-G3, O'Regan Summer 2021人のメンバー

YORK-O'REGAN-SU21S1G3

1 メンバー

1のガイドは作成済み

コメント 1 件

コメントを追加

統計データ:

過去 24時間: 6

過去 7 日: 15

過去 30 日: 48

今までの合計 1,872