メインコンテンツにスキップ

LG Optimus T Screen Replacement

必要な工具と部品

  1. LG Optimus T Screen Replacement, Screen: 手順 1、 3の画像 1 LG Optimus T Screen Replacement, Screen: 手順 1、 3の画像 2 LG Optimus T Screen Replacement, Screen: 手順 1、 3の画像 3
    • Working on your device while it is turned on may result in electric shock. Make sure to shut down and unplug your device before you begin.

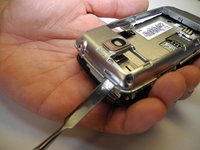
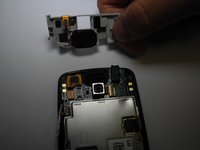
    • Using the plastic opening tool to remove the phone’s back cover. At the top of the phone, there’s an indentation to put the tool into to pop the case off.

  2. LG Optimus T Screen Replacement: 手順 2、 1の画像 1
    • Remove the battery. There’s an indentation to the left of the camera lens.

  3. LG Optimus T Screen Replacement: 手順 3、 1の画像 1
    • Remove the six (6), J0 Phillip's head, 4.5mm screws.

    • Be sure to retain all screws for reassembly.

  4. LG Optimus T Screen Replacement: 手順 4、 2の画像 1 LG Optimus T Screen Replacement: 手順 4、 2の画像 2
    • Remove interior case. There are indentations on the top and bottom of the phone. Using a spudger, remove the interior case.

    • You might have difficulty popping the interior case off, and a more durable prying device may be needed.

  5. LG Optimus T Screen Replacement: 手順 5、 1の画像 1
    • Pull up connector tab

    • Connector tabs may be difficult to remove, and tweezers may be required to assist removal.

  6. LG Optimus T Screen Replacement: 手順 6、 2の画像 1 LG Optimus T Screen Replacement: 手順 6、 2の画像 2
    • Remove SD card mount. Use a plastic opening tool to assist removal.

  7. LG Optimus T Screen Replacement: 手順 7、 1の画像 1
    • Use a J0 screwdriver to remove two 1.8mm screws from the charging port.

    • Charging port and motherboard are connected.

    • Be sure to retain all screws for reassembly.

  8. LG Optimus T Screen Replacement: 手順 8、 2の画像 1 LG Optimus T Screen Replacement: 手順 8、 2の画像 2
    • Remove connector tab. Then remove the motherboard.

    • Connector tabs may be difficult to remove, and tweezers may be required to assist removal.

  9. LG Optimus T Screen Replacement: 手順 9、 2の画像 1 LG Optimus T Screen Replacement: 手順 9、 2の画像 2
    • Using a spudger, gently pry off the metal panel on the back of the screen attached by 4 retaining points.

    • Remove the screen from the front of your device.

終わりに

To reassemble your device, follow these instructions in reverse order.

作成者

1人の作成者と共同作成されました。

Edward Farris

メンバー登録日: 02/07/17

112 ポイント

1ガイドが承認済み

チーム

Ohio State, Team 1-3, Wilder Spring 2017 Ohio State, Team 1-3, Wilder Spring 2017人のメンバー

OSU-WILDER-S17S1G3

4 メンバー

5のガイドは作成済み

0 件のコメント

コメントを追加

統計データ:

過去 24時間: 0

過去 7 日: 0

過去 30 日: 1

今までの合計 165