メインコンテンツにスキップ

LG Lucid 4G Headphone Jack Replacement

必要な工具と部品

  1. LG Lucid 4G Headphone Jack Replacement, Battery: 手順 1、 3の画像 1 LG Lucid 4G Headphone Jack Replacement, Battery: 手順 1、 3の画像 2 LG Lucid 4G Headphone Jack Replacement, Battery: 手順 1、 3の画像 3
    • Turn off the phone by pressing the power button, then press "Power Off", then press "OK" when notified that your phone will shut down.

  2. LG Lucid 4G Headphone Jack Replacement: 手順 2、 2の画像 1 LG Lucid 4G Headphone Jack Replacement: 手順 2、 2の画像 2
    • Flip the phone so that its back plate is facing upward.

    • Use your fingernail or prying tool to lift the back plate of the phone open by using the notch at the bottom.

  3. LG Lucid 4G Headphone Jack Replacement: 手順 3、 2の画像 1 LG Lucid 4G Headphone Jack Replacement: 手順 3、 2の画像 2
    • Using the notch located near the bottom center, remove the battery with a prying tool or your fingernail.

  4. LG Lucid 4G Headphone Jack Replacement, Headphone Jack: 手順 4、 1の画像 1
    • Remove the 7 ph000 screws found on the back of the phone.

  5. LG Lucid 4G Headphone Jack Replacement: 手順 5、 2の画像 1 LG Lucid 4G Headphone Jack Replacement: 手順 5、 2の画像 2
    • Once all the screws are removed, use a plastic opening tool to lift off the plastic cover. There are notches on the left side by the micro SD port.

    • It may be difficult to pry the plastic over off. You may need to use some force.

  6. LG Lucid 4G Headphone Jack Replacement: 手順 6、 1の画像 1
    • Next, remove another screw located in top left quadrant of phone.

  7. LG Lucid 4G Headphone Jack Replacement: 手順 7、 2の画像 1 LG Lucid 4G Headphone Jack Replacement: 手順 7、 2の画像 2
    • Remove SIM card holding by prying it with opening tool. As you are lifting it, disconnect the ribbon that is connecting the sim card holding and the rest of the phone.

  8. LG Lucid 4G Headphone Jack Replacement: 手順 8、 2の画像 1 LG Lucid 4G Headphone Jack Replacement: 手順 8、 2の画像 2
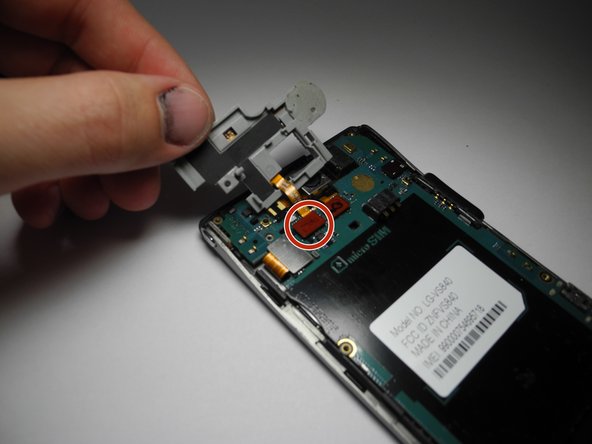
    • Disconnect the 5 ribbon cables connected to the motherboard.

    • Remove the motherboard.

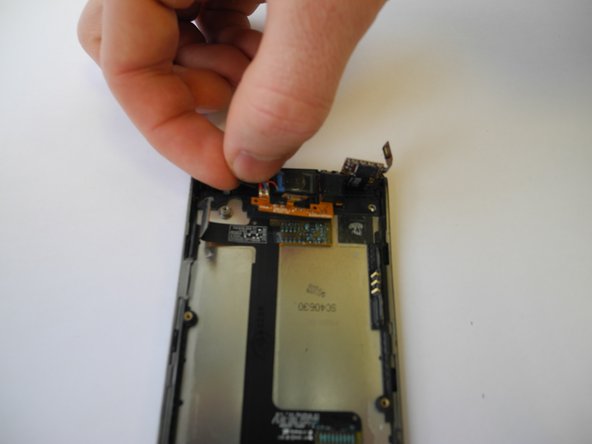
  9. LG Lucid 4G Headphone Jack Replacement: 手順 9、 2の画像 1 LG Lucid 4G Headphone Jack Replacement: 手順 9、 2の画像 2
    • Lift the additional ribbon in the top right quadrant.

    • Once that ribbon is lifted, the audio jack can easily be removed.

終わりに

To reassemble your device, follow these instructions in reverse order.

作成者

1人の作成者と共同作成されました。

Will Bonner

メンバー登録日: 02/07/17

101 ポイント

1ガイドが承認済み

チーム

Ohio State, Team 1-1, Wilder Spring 2017 Ohio State, Team 1-1, Wilder Spring 2017人のメンバー

OSU-WILDER-S17S1G1

4 メンバー

8のガイドは作成済み

0 件のコメント

コメントを追加

統計データ:

過去 24時間: 0

過去 7 日: 0

過去 30 日: 1

今までの合計 202