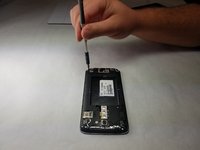
メインコンテンツにスキップ

LG K7 Screen Replacement

必要な工具と部品

  1. LG K7 Screen Replacement, Screen: 手順 1、 3の画像 1 LG K7 Screen Replacement, Screen: 手順 1、 3の画像 2 LG K7 Screen Replacement, Screen: 手順 1、 3の画像 3
    • Place phone face-down and use your nail to pry the back off the back.

  2. LG K7 Screen Replacement: 手順 2、 2の画像 1 LG K7 Screen Replacement: 手順 2、 2の画像 2
    • Use a plastic spudger or your nail to lift the battery out of the device and put it aside.

    • The battery should come out with little effort. If it does not, do not force it.

  3. LG K7 Screen Replacement: 手順 3、 3の画像 1 LG K7 Screen Replacement: 手順 3、 3の画像 2 LG K7 Screen Replacement: 手順 3、 3の画像 3
    • Use a Phillips #0 screwdriver to remove the single 3.5mm screw holding the power button and volume rocker in place and lift it out and put it to the side.

  4. LG K7 Screen Replacement: 手順 4、 3の画像 1 LG K7 Screen Replacement: 手順 4、 3の画像 2 LG K7 Screen Replacement: 手順 4、 3の画像 3
    • Use a Phillips #0 screwdriver to unscrew the three 3.5mm screws in the bottom portion of the phone and put them to the side.

    • Use a spudger to pry the plastic bit off. Be warned, it will pop out and might fling itself when you attempt to pry it out.

  5. LG K7 Screen Replacement: 手順 5、 3の画像 1 LG K7 Screen Replacement: 手順 5、 3の画像 2 LG K7 Screen Replacement: 手順 5、 3の画像 3
    • Use a spudger to pry the plastic bit off.

    • Warning, it will snap out and might fling itself when you attempt to pry it out.

  6. LG K7 Screen Replacement: 手順 6、 3の画像 1 LG K7 Screen Replacement: 手順 6、 3の画像 2 LG K7 Screen Replacement: 手順 6、 3の画像 3
    • Use a Phillips #0 screwdriver to unscrew the five 3.5mm screws holding the housing into the device.

    • Use a spudger to pop it out of the back of the device exposing the motherboard.

  7. LG K7 Screen Replacement: 手順 7、 3の画像 1 LG K7 Screen Replacement: 手順 7、 3の画像 2 LG K7 Screen Replacement: 手順 7、 3の画像 3
    • Use a plastic spudger to lift the motherboard out of the casing.

    • You must use a plastic tool for this step or you may risk damaging the motherboard.

  8. LG K7 Screen Replacement: 手順 8、 3の画像 1 LG K7 Screen Replacement: 手順 8、 3の画像 2 LG K7 Screen Replacement: 手順 8、 3の画像 3
    • Turn the device over and locate the connector between the digitizer and the motherboard.

    • Use a plastic spudger to disconnect the connector.

  9. LG K7 Screen Replacement: 手順 9、 1の画像 1
    • Turn the screen housing over and use a hair dryer to heat the screen.

    • This melts the adhesive between the screen and the housing, allowing you to separate the two.

    • Be sure to evenly heat the screen and take care not to burn yourself.

  10. LG K7 Screen Replacement: 手順 10、 1の画像 1
    • Once the screen is heated, use a plastic spudger to attempt to peel the glass away from the housing.

    • This will take some time, so take care not to break the glass.

    • Once the spudger is under the glass, drag it around the edge and separate the glass and the housing.

  11. LG K7 Screen Replacement: 手順 11、 2の画像 1 LG K7 Screen Replacement: 手順 11、 2の画像 2
    • You have now successfully removed the screen and digitizer from the housing.

終わりに

To reassemble your device, follow these instructions in reverse order.

8 の人々がこのガイドを完成させました。

作成者

2人の作成者と共同で作成されました。

Christopher Chheng

メンバー登録日: 11/01/18

559 ポイント

2のガイドは作成済み

チーム

IUPUI, Team S3-G4, Harley Fall 2018 IUPUI, Team S3-G4, Harley Fall 2018人のメンバー

IUPUI-HARLEY-F18S3G4

3 メンバー

4のガイドは作成済み

0 件のコメント

コメントを追加

統計データ:

過去 24時間: 0

過去 7 日: 1

過去 30 日: 6

今までの合計 1,721