メインコンテンツにスキップ

LG K40 Screen Assembly Replacement

  1. LG K40 Screen Assembly Replacement, Back Glass Removal Pt.1: 手順 1、 3の画像 1 LG K40 Screen Assembly Replacement, Back Glass Removal Pt.1: 手順 1、 3の画像 2 LG K40 Screen Assembly Replacement, Back Glass Removal Pt.1: 手順 1、 3の画像 3
    • Lets get started by heating up the back.

    • After we've heated the back put in your opening pick of choice; apply some alcohol and get going!

    • I prefer to start at the bottom and move around.

  2. LG K40 Screen Assembly Replacement, Back Glass Removal Pt.2: 手順 2、 3の画像 1 LG K40 Screen Assembly Replacement, Back Glass Removal Pt.2: 手順 2、 3の画像 2 LG K40 Screen Assembly Replacement, Back Glass Removal Pt.2: 手順 2、 3の画像 3
    • And on around we go!

  3. LG K40 Screen Assembly Replacement, Back Glass Removal Pt.3: 手順 3、 3の画像 1 LG K40 Screen Assembly Replacement, Back Glass Removal Pt.3: 手順 3、 3の画像 2 LG K40 Screen Assembly Replacement, Back Glass Removal Pt.3: 手順 3、 3の画像 3
    • Finish going around.

  4. LG K40 Screen Assembly Replacement, Adhesive Cleanup: 手順 4、 1の画像 1
    • Clean up the any remaining adhesive holding the back glass on.

  5. LG K40 Screen Assembly Replacement, Disconnecting the Fingerprint Sensor: 手順 5、 2の画像 1 LG K40 Screen Assembly Replacement, Disconnecting the Fingerprint Sensor: 手順 5、 2の画像 2
    • We will start removing the back cover now.

    • In this area there will be clips holding the fingerprint scanner flex connector in place. All you need to do to remove in is apply pressure to the top and bottom and it should come out.

    • Next pull the back cover to the side and disconnect the fingerprint flex connector.

  6. LG K40 Screen Assembly Replacement, Midframe Removal Pt.1: 手順 6、 3の画像 1 LG K40 Screen Assembly Replacement, Midframe Removal Pt.1: 手順 6、 3の画像 2 LG K40 Screen Assembly Replacement, Midframe Removal Pt.1: 手順 6、 3の画像 3
    • Remove the 15 Phillips screws.

    • Begin to remove the midframe. Luckily for us there are plenty of clips holding it down too, because the screws weren't enough I guess :)

  7. LG K40 Screen Assembly Replacement, Midframe Removal Pt.2: 手順 7、 3の画像 1 LG K40 Screen Assembly Replacement, Midframe Removal Pt.2: 手順 7、 3の画像 2 LG K40 Screen Assembly Replacement, Midframe Removal Pt.2: 手順 7、 3の画像 3
    • Finish prying around to remove the midframe. It will feel like you have to pry quite a bit. That is fine. Find those clips and pry away from the clip and that will save you some time.

  8. LG K40 Screen Assembly Replacement, Disconnecting the Flex Connectors Pt.1: 手順 8、 3の画像 1 LG K40 Screen Assembly Replacement, Disconnecting the Flex Connectors Pt.1: 手順 8、 3の画像 2 LG K40 Screen Assembly Replacement, Disconnecting the Flex Connectors Pt.1: 手順 8、 3の画像 3
    • On to the flex connectors we go!

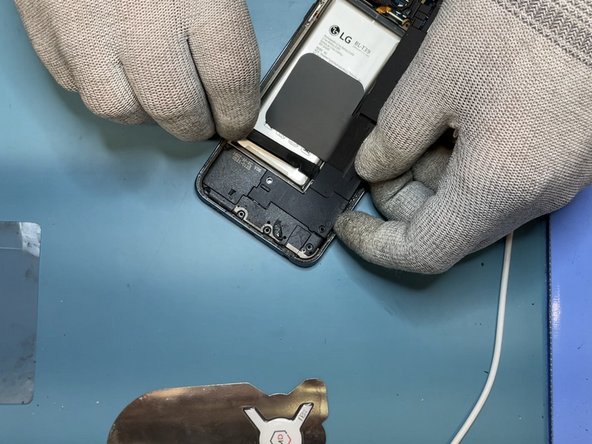
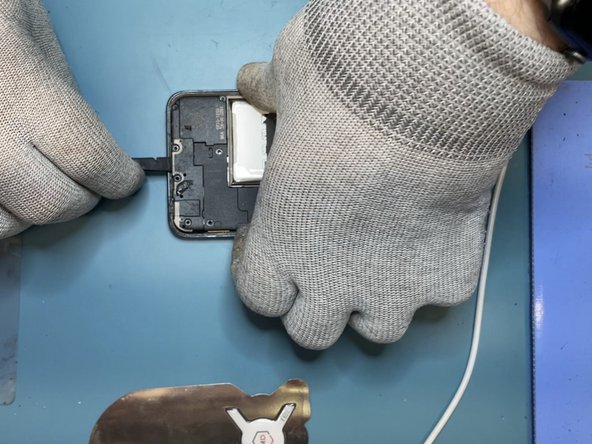
    • We will disconnect the battery first.

  9. LG K40 Screen Assembly Replacement, Disconnecting the Flex Connectors Pt.2: 手順 9、 2の画像 1 LG K40 Screen Assembly Replacement, Disconnecting the Flex Connectors Pt.2: 手順 9、 2の画像 2
    • Then we will disconnect the display.

  10. LG K40 Screen Assembly Replacement, Remove Sim Tray: 手順 10、 2の画像 1 LG K40 Screen Assembly Replacement, Remove Sim Tray: 手順 10、 2の画像 2
    • Remove the sim tray. You can use a sim ejector, needle, paper clip, or whatever your preferred ejector tool is.

  11. LG K40 Screen Assembly Replacement, Motherboard Removal: 手順 11、 3の画像 1 LG K40 Screen Assembly Replacement, Motherboard Removal: 手順 11、 3の画像 2 LG K40 Screen Assembly Replacement, Motherboard Removal: 手順 11、 3の画像 3
    • If you skip ahead to this step, like I would, make sure you remove the sim tray before this step.

    • Now we will get to remove the motherboard.

    • Luckily it too is held in with clips, YAY!

    • Move around the motherboard releasing it from the clips.

    • Once done just pull the motherboard up and away from the charge port and it comes right out!

  12. LG K40 Screen Assembly Replacement, A Brief Look at the Motherboard: 手順 12、 2の画像 1 LG K40 Screen Assembly Replacement, A Brief Look at the Motherboard: 手順 12、 2の画像 2
    • Here is the motherboard. One large board with no daughterboards.

  13. LG K40 Screen Assembly Replacement, Battery Removal: 手順 13、 2の画像 1 LG K40 Screen Assembly Replacement, Battery Removal: 手順 13、 2の画像 2
    • Next we will heat up the front of the phone to loosen the battery adhesive.

    • Apply small amounts of alcohol around the sides of the battery to help with the removal.

  14. LG K40 Screen Assembly Replacement, Ear Speaker Removal: 手順 14、 2の画像 1 LG K40 Screen Assembly Replacement, Ear Speaker Removal: 手順 14、 2の画像 2
    • Once again we will warm the front of the phone to help loosen the adhesive under the ear speaker.

    • I recommend not using alcohol as it can damage the ear speaker if not done correctly.

  15. LG K40 Screen Assembly Replacement, Vibrate Motor Removal: 手順 15、 2の画像 1 LG K40 Screen Assembly Replacement, Vibrate Motor Removal: 手順 15、 2の画像 2
    • Next we will remove the vibrate motor.

    • It should still be warm enough from the heating in the previous step, but if not you can heat it up again, or loosen with alcohol to help with the adhesive.

  16. LG K40 Screen Assembly Replacement, The End: 手順 16、 1の画像 1
    • There we are! Device disassembled for screen assembly replacement!

終わりに

To reassemble your device, follow these instructions in reverse order.

2 の人々がこのガイドを完成させました。

作成者

1人の作成者と共同作成されました。

Zach B

メンバー登録日: 10/28/22

313 ポイント

1ガイドが承認済み

0 件のコメント

コメントを追加

統計データ:

過去 24時間: 0

過去 7 日: 4

過去 30 日: 17

今までの合計 329