メインコンテンツにスキップ

LG G5 Auxiliary Port Replacement

必要な工具と部品

  1. LG G5 Auxiliary Port Replacement, Front Panel Assembly: 手順 1、 2の画像 1 LG G5 Auxiliary Port Replacement, Front Panel Assembly: 手順 1、 2の画像 2
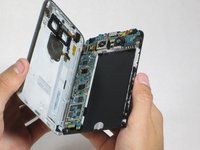
    • While holding the battery release button, pull the bottom end of the phone out of the body.

  2. LG G5 Auxiliary Port Replacement: 手順 2、 3の画像 1 LG G5 Auxiliary Port Replacement: 手順 2、 3の画像 2 LG G5 Auxiliary Port Replacement: 手順 2、 3の画像 3
    • Insert the sim card eject tool (0.8mm sim card eject head) into the small hole on the sim card tray.

    • Press inward with some force to eject the tray.

    • Pull the sim card tray out of the phone.

  3. LG G5 Auxiliary Port Replacement: 手順 3、 2の画像 1 LG G5 Auxiliary Port Replacement: 手順 3、 2の画像 2
    • Remove the two 5.5mm Phillips #00 screws from the base of the phone.

  4. LG G5 Auxiliary Port Replacement: 手順 4、 1の画像 1
    • Insert the plastic opening tool into the seam between the glass screen and the metal body.

    • Pry the glass from the body only a slight amount.

  5. LG G5 Auxiliary Port Replacement: 手順 5、 2の画像 1 LG G5 Auxiliary Port Replacement: 手順 5、 2の画像 2
    • Insert the Spudger into the now open space between the body and screen.

    • Push inward to separate the screen even more.

    • Slowly slide the nylon spudger up the edge the phone till the screen pops out of the body.

    • When putting the screen back in, press the edges down from the top of the phone to the bottom. The screen should "pop" into place.

  6. LG G5 Auxiliary Port Replacement: 手順 6、 2の画像 1 LG G5 Auxiliary Port Replacement: 手順 6、 2の画像 2
    • Peel the screen away from the body. The two parts should be completely separated.

  7. LG G5 Auxiliary Port Replacement, Auxiliary Port: 手順 7、 1の画像 1
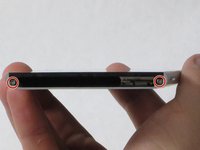
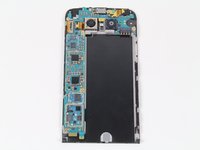
    • Locate the auxiliary port on the top right of the phone

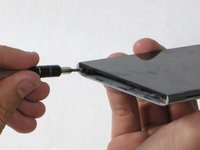
    • Using a finger, carefully take the port out

    • Replace the old auxiliary port with a new one by orienting the hole towards the top of the phone and the gold ribbon to the left (as shown in the picture).

終わりに

To reassemble your device, follow these instructions in reverse order.

8 の人々がこのガイドを完成させました。

作成者

2人の作成者と共同で作成されました。

Joshua Zalmanowitz

メンバー登録日: 09/27/16

1,811 ポイント

4のガイドは作成済み

チーム

Cal Poly, Team 18-2, Forte Fall 2016 Cal Poly, Team 18-2, Forte Fall 2016人のメンバー

CPSU-FORTE-F16S18G2

4 メンバー

15のガイドは作成済み

2 件のコメント

I saw a video where someone used a guitar pick as the plastic opening tool, seems safer to me. And that person also had a great idea to shove a pencil in the battery bay to apply a separating force, so that as you work the seam with a guitar pick, the the two halves will naturally want to separate.

Adam Mizban - 返信

Hi, I have two LG G5 phone. Let's call them

A & B.

So , B overheats and the battery last less than an hour. So I took the battery from A and I put it in B and I put the B battery in the A. Results: B still overheats and not the A ??? I also left the connector blocks on the batteries when I did the switching. So what could be the cause of this?

Julie Desruisseaux - 返信

コメントを追加

統計データ:

過去 24時間: 0

過去 7 日: 3

過去 30 日: 10

今までの合計 5,207