メインコンテンツにスキップ

このバージョンは誤った内容を含んでいる可能性があります。最新の承認済みスナップショットに切り替えてください。

必要な工具と部品

  1. この手順は未翻訳です。 翻訳を手伝う。

    : 手順 1、 3の画像 1 : 手順 1、 3の画像 2 : 手順 1、 3の画像 3
    • Remove the MicroSD Memory card, Sim Card, and the metal Sim Card Holder.

    • Put them off to the side for reassembly.

    • Now you can slowly use a plastic opening tool to go around the edge of the tablet to slowly pry upward.

  2. この手順は未翻訳です。 翻訳を手伝う。

    : 手順 2、 3の画像 1 : 手順 2、 3の画像 2 : 手順 2、 3の画像 3
    • Now that we have the back cover and can remove the orange port strip.

    • Use the spudger to gently remove the strip by pushing upward slowly.

  3. この手順は未翻訳です。 翻訳を手伝う。

    : 手順 3、 2の画像 1 : 手順 3、 2の画像 2
    この手順で使用する道具:
    Tweezers
    $4.99
    購入する
    • To disconnect the battery you are going to unplug the cables.

    • Use the tweezers to gently hold the cables and slowly push upward to detach it.

    • Don't be too rough and pinch the cables with the tweezers. Take your time and slowly detach.

  4. この手順は未翻訳です。 翻訳を手伝う。

    : 手順 4、 1の画像 1
    • Remove the 7 black screws on the motherboard.

    • Put them to the side for reassembly.

  5. この手順は未翻訳です。 翻訳を手伝う。

    : 手順 5、 3の画像 1 : 手順 5、 3の画像 2 : 手順 5、 3の画像 3
    • Detach the black tag in the middle of the motherboard. This is the main camera connection.

    • Locate the next camera connection at the top of the motherboard. Disconnect this black tag for your front camera.

    • Now you are able to remove the motherboard from the tablet.

  6. この手順は未翻訳です。 翻訳を手伝う。

    : 手順 6、 2の画像 1 : 手順 6、 2の画像 2
    • Now that the motherboard is removed, you can now access the main camera for removal. Gently use the tweezers to do this.

    • Put to the side for reassembly.

  7. この手順は未翻訳です。 翻訳を手伝う。

    : 手順 7、 2の画像 1 : 手順 7、 2の画像 2
    • Using the Phillips screwdriver, remove the screw and put aside for reassembly.

  8. この手順は未翻訳です。 翻訳を手伝う。

    : 手順 8、 3の画像 1 : 手順 8、 3の画像 2 : 手順 8、 3の画像 3
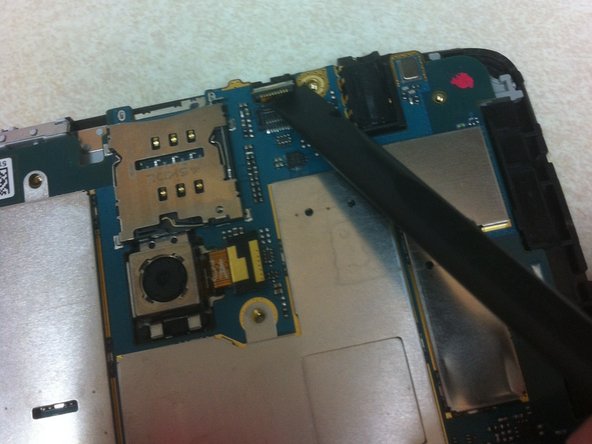
    • Two screws are holding the metal plate down. Remove the screws and put aside.

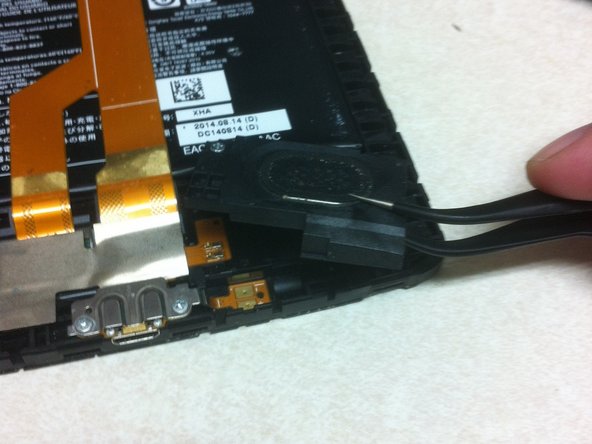
    • Use the tweezers to remove the tape to show the connection.

    • Use the spudger to push up and remove the connection.

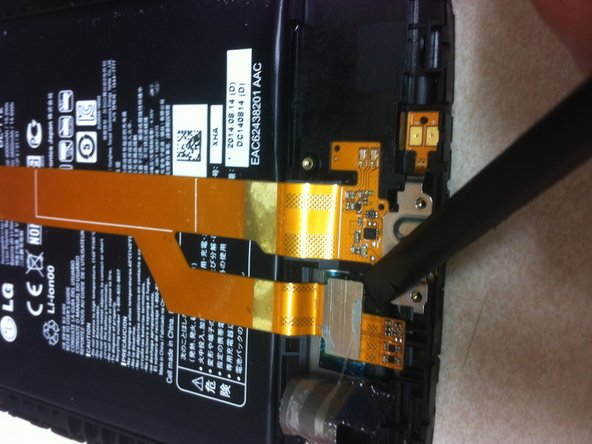
    • Use the tweezers to completely remove charging port from tablet. Put aside for reassembly.

  9. この手順は未翻訳です。 翻訳を手伝う。

    : 手順 9、 2の画像 1 : 手順 9、 2の画像 2
    • To remove the battery, use the spudger or the Jimmy tool to slowly work your way around the battery.

    • It is being held on by strips of tape so be patient with it. Work it a little bit at a time to remove the battery from the tablet.

    • Put it aside for reassembly.

  10. この手順は未翻訳です。 翻訳を手伝う。

    : 手順 10、 3の画像 1 : 手順 10、 3の画像 2 : 手順 10、 3の画像 3
    • Apply a heat gun or iOpener to front of screen to allow it to warm up the glue.

    • Use opening tool and work your way around the front of the screen. You may have to alternate applying the heat and prying to get it loose enough to separate.

    • Be careful not overdo the heat. Use a low temperature and take your time to separate the screen.

    • Clean the black backing off of any glass still sticking to it. Mine had a lot so I had to scrape for awhile to get all the little pieces off to have a clean surface to apply the new replacement screen.

    • Apply new screen to black backing.

ゴール

38 の人々がこのガイドを完成させました。

作成者

6人の作成者と共同で作成されました。

MissHeather

メンバー登録日: 07/03/15

1,674 ポイント

2のガイドは作成済み

チーム

Android Alliance Android Alliance人のメンバー

Community

87 メンバー

699のガイドは作成済み

18 件のコメント

Great help..........thanks

James Smith - 返信

Good job but I have just 1 speaker out.

James Smith - 返信

Do you mean you took one speaker out or the speaker is no longer functioning properly?

MissHeather -

Hello Ms. Heather I cannot access the motherboard, I am unable to remove the back cover. Pls help

kmonicaholloway - 返信

Are you using a prying tool and going around the edges of the tablet to open it? What exactly is happening?

MissHeather -

コメントを追加

統計データ:

過去 24時間: 1

過去 7 日: 16

過去 30 日: 40

今までの合計 39,895