メインコンテンツにスキップ

LG Chocolate Camera Replacement

必要な工具と部品

  1. LG Chocolate Camera Replacement, Battery: 手順 1、 2の画像 1 LG Chocolate Camera Replacement, Battery: 手順 1、 2の画像 2
    • Find a sliding button on the lower back side of the device and with your finger, slide it to the left firmly.

    • The battery should pop out fairly easily. If not, slide the button further or grab and pull it while sliding the button.

  2. LG Chocolate Camera Replacement, Back Cover: 手順 2、 1の画像 1
    • Use a Phillips #00 screwdriver to unscrew the four Phillips #00 screws on the four corners under the battery to unfasten the back case from the phone.

  3. LG Chocolate Camera Replacement: 手順 3、 3の画像 1 LG Chocolate Camera Replacement: 手順 3、 3の画像 2 LG Chocolate Camera Replacement: 手順 3、 3の画像 3
    • Take the case off by using a plastic opening tool.

    • Continue using the plastic opening tool around the sides of the device, unhooking the eight tabs securing the back cover to the rest of the phone as shown in the second photo.

    • The back speaker will be connected to the motherboard, and must be disconnected to remove the case.

  4. LG Chocolate Camera Replacement, Sliding Front: 手順 4、 1の画像 1
    • Unscrew the 4 Phillips 00 screws that connect the two halves of the phone together.

  5. LG Chocolate Camera Replacement: 手順 5、 2の画像 1 LG Chocolate Camera Replacement: 手順 5、 2の画像 2
    • Between the two halves is a ribbon. Use a plastic opening tool to flip up the lock and disconnect it.

  6. LG Chocolate Camera Replacement: 手順 6、 2の画像 1 LG Chocolate Camera Replacement: 手順 6、 2の画像 2
    • Pry off the plastic tabs that cover two screws, as shown in the first picture.

    • Then, remove the 6 Phillips 00 screws from the back of the case, as shown in the second picture.

  7. LG Chocolate Camera Replacement: 手順 7、 1の画像 1
    • Pry off the back cover from the front of the case using a plastic opening tool.

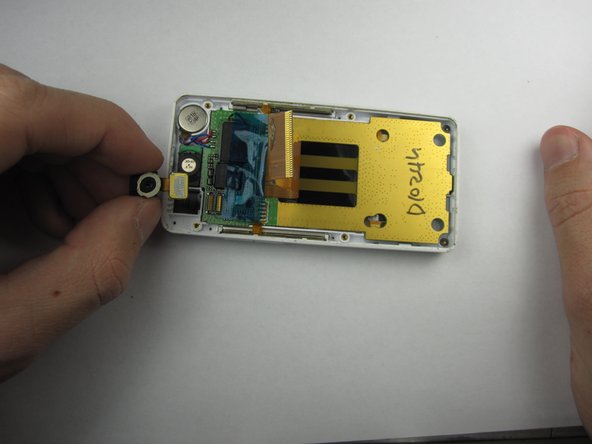
  8. LG Chocolate Camera Replacement, Camera: 手順 8、 1の画像 1
    • Carefully pry the connecting cable between the camera and the motherboard off of the board.

  9. LG Chocolate Camera Replacement: 手順 9、 2の画像 1 LG Chocolate Camera Replacement: 手順 9、 2の画像 2
    • Using a small screwdriver, carefully pry the camera out of its position.

    • The camera will seem stuck to the board because of its tape. Don't be afraid to pry it.

終わりに

To reassemble your device, follow these instructions in reverse order.

作成者

2人の作成者と共同で作成されました。

Thomas

メンバー登録日: 01/18/13

91 ポイント

4のガイドは作成済み

チーム

Cal Poly, Team 19-46, Regan Winter 2013 Cal Poly, Team 19-46, Regan Winter 2013人のメンバー

CPSU-REGAN-W13S19G46

4 メンバー

22のガイドは作成済み

0 件のコメント

コメントを追加

統計データ:

過去 24時間: 0

過去 7 日: 0

過去 30 日: 2

今までの合計 247