メインコンテンツにスキップ
リペアコミュニティに参加 - アカウントの作成

LG CF360 Front Case Replacement

必要な工具と部品

  1. LG CF360 Front Case Replacement, Battery: 手順 1、 2の画像 1 LG CF360 Front Case Replacement, Battery: 手順 1、 2の画像 2
    • On the back of the phone, place your thumb on the three raised bumps and slide the back cover upward.

    FixBotに聞いてみる

    コメントを追加

  2. LG CF360 Front Case Replacement: 手順 2、 1の画像 1
    • Lift and remove the battery.

    FixBotに聞いてみる

    コメントを追加

  3. LG CF360 Front Case Replacement, Back Cover: 手順 3、 2の画像 1 LG CF360 Front Case Replacement, Back Cover: 手順 3、 2の画像 2
    この手順で使用する道具:
    Tweezers
    $4.99
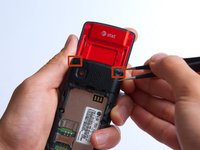
    • Remove the two screw covers at the top of phone with tweezers.

    FixBotに聞いてみる

    コメントを追加

  4. LG CF360 Front Case Replacement: 手順 4、 1の画像 1
    • Remove the six Phillips #000 (3mm) screws.

    FixBotに聞いてみる

    コメントを追加

  5. LG CF360 Front Case Replacement: 手順 5、 3の画像 1 LG CF360 Front Case Replacement: 手順 5、 3の画像 2 LG CF360 Front Case Replacement: 手順 5、 3の画像 3
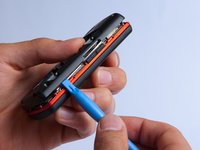
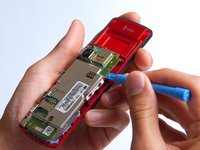
    • Use the plastic opening tool to pry the back cover off. Insert the tool between the back cover and red mid section and go around the entire phone.

    • The plastic side buttons fall out when you take the back cover off.

    • The back cover is connected to the speaker by red and black wires.

    FixBotに聞いてみる

    コメントを追加

  6. LG CF360 Front Case Replacement: 手順 6、 1の画像 1
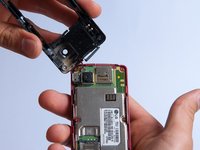
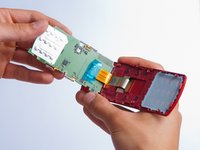
    • Use the tweezers to remove the red and black wires connecting the speaker to the green motherboard by pinching the sides of the plastic base near the motherboard.

    • Set the back cover with the speaker aside.

    FixBotに聞いてみる

    コメントを追加

  7. LG CF360 Front Case Replacement, Motherboard: 手順 7、 2の画像 1 LG CF360 Front Case Replacement, Motherboard: 手順 7、 2の画像 2
    • Use the plastic opening tool to gently lift the snapped-in motherboard from the front panel.

    • An orange ribbon from the LCD is connected to the underside of the motherboard, so do not force the motherboard from the rest of the phone yet.

    FixBotに聞いてみる

    コメントを追加

  8. LG CF360 Front Case Replacement: 手順 8、 1の画像 1
    • Gently remove the blue transparent tape from the connector.

    FixBotに聞いてみる

    コメントを追加

  9. LG CF360 Front Case Replacement: 手順 9、 1の画像 1
    • With the plastic opening tool, gently pry the LCD connector from the motherboard.

    • Set the motherboard aside.

    FixBotに聞いてみる

    コメントを追加

  10. LG CF360 Front Case Replacement, Front Case: 手順 10、 1の画像 1
    • Take the front case and unscrew the four Phillips #000 (1mm) screws around the ribbon.

    FixBotに聞いてみる

    コメントを追加

  11. LG CF360 Front Case Replacement: 手順 11、 1の画像 1
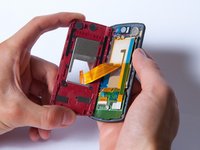
    • Gently pull the orange ribbon from the number pad casing.

    • Set the number pad case to the side once it is detached from the ribbon.

    FixBotに聞いてみる

    コメントを追加

  12. LG CF360 Front Case Replacement: 手順 12、 1の画像 1
    この手順で使用する道具:
    Tweezers
    $4.99
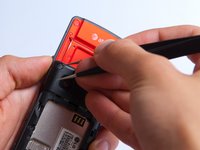
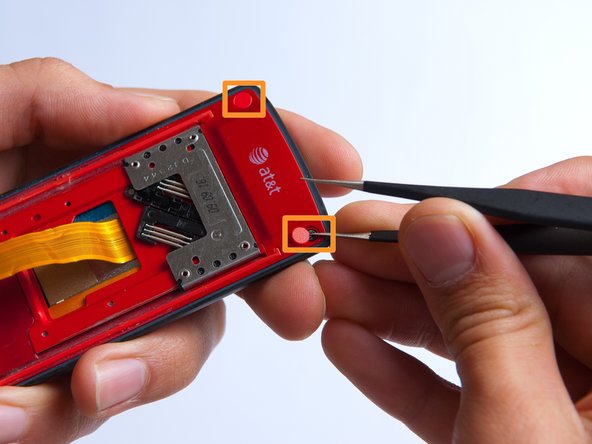
    • Remove the two red sticker screw coverings at the top corners with tweezers.

    FixBotに聞いてみる

    コメントを追加

  13. LG CF360 Front Case Replacement: 手順 13、 1の画像 1
    • Unscrew the four Phillips #000 (3mm) screws at the corners of the phone.

    FixBotに聞いてみる

    コメントを追加

  14. LG CF360 Front Case Replacement: 手順 14、 2の画像 1 LG CF360 Front Case Replacement: 手順 14、 2の画像 2
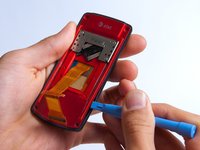
    • Pry the red sliding backing from the front cover by inserting the plastic opening tool in between the two sections and going around the entire phone.

    • Set the red sliding backing and front cover to the side.

    FixBotに聞いてみる

    コメントを追加

終わりに

To reassemble your device, follow these instructions in reverse order.

キャンセル: このガイドを終了できませんでした。

ある他の人がこのガイドを完成しました。

作成者

4人の作成者と共同で作成されました。

Kathrine Muirhead

メンバー登録日: 10/15/13

353 ポイント

3のガイドは作成済み

チーム

Cal Poly, Team 4-27, Amido Fall 2013 Cal Poly, Team 4-27, Amido Fall 2013人のメンバー

CPSU-AMIDO-F13S4G27

4 メンバー

19のガイドは作成済み

0件のガイドコメント

コメントを追加

統計データ:

過去 24時間: 1

過去 7 日: 5

過去 30 日: 49

今までの合計 693