はじめに
If the motor in your Krups F203 coffee grinder is faulty, you will need to replace it. This guide will explain how to access the motor in order to replace it.
必要な工具と部品
-
-
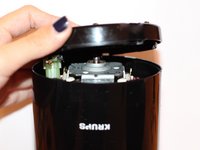
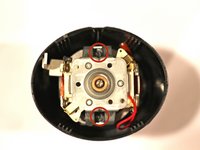
In each of the four rectangular slots on the bottom of the device, there is an E-shaped clip.
-
-
-
Wedge the spudger between the flat side of the E-clip and the outside wall of the slot. Then, loosen up the clip by prying it inward with the spudger.
Hello I need to remove the base as described here to repair th power cord in side. I got 2 of the clips cleared to lift off the base using the spudger, but just can’t get the other 2 released. Any ideas? Thanks
The red warning above is good as far as it goes, but should mention that not breaking the clips may be impossible. I was able to unclip 3 of the 4, but one snapped (the others were quite a struggle). Part of my problem was that this How-To’s photos show an F203 with all of its clips broken off, which makes for a misleading view of the disassembly, and shows that the author wasn’t able to separate the base successfully, either. The clips actually project from the bottom edge of the body tube about 1/4 inch (0.5 cm) into the base cap. I would recommend anyone attempting this iFixit have a roll of duct tape on hand to secure the base after the repairs are made, at least until you can buy a replacement.
Krups really don’t want you getting into their budget grinder; they’d rather you throw it away and buy a new one, of course.
Thanks to the author, even if the instructions are not very clear.
If anyone got this open without breaking the clips, please post a photo of the two parts in the clip region so that the geometry is clear. I was confused by ‘e-clip’, which is not the right terminology and means something else entirely.’
I broke all of the clips. Even after realizing the clip ledge is integral to the *inner* wall of the base. I still could not get the clips to release without jeopardy to the the outside edge of the base’s slots. One has to be able to proceed with conviction and with the right “spudger”.
I’m going to reconnect the base with epoxy and clamps. I’ll buy a new one in 15 years when the power cord breaks/wears again…!
I managed to pry it off without breaking clips. 1. clamp the grinder top between thighs upside down. 2. apply pulling force to the bottom with finger nails (but not too hard to hurt yourself obviously). 3.spudger prying the clip multiple times. When a tiny gap appears jam a triangle prying tip into it. 4. Proceed prying every other clip while keep applying pulling force all the while with finger nail.
Of course with a big vise this is supposedly easier.
-
-
-
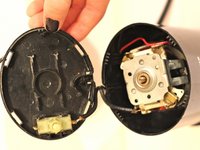
Work your way around the four clips, loosening each a little at a time. Eventually, all four clips will be loose enough to remove the base plate.
Instead of taking the cover off, I heated the tip of a metal hanger and melted the small rectangular hole just larger enough to get a screwdriver in to give the screw a quick turn looser and then tighter again. It is now working again.
-
-
-
-
The trigger button is held in with light tension clips. Gently pry them back to release.
-
-
-
Desolder the contact points between the trigger button and the red wire and also where the plug attaches to the trigger button
On mine the wires connected to the trigger have spade connectors which pull off.
-
-
-
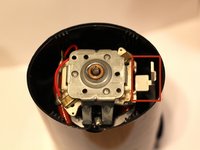
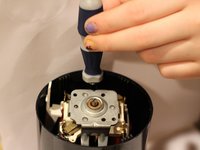
Using a Phillips screwdriver, remove the two screws holding the motor in place.
there are no screws that can be opened from top, looks like the whole assembly needs to be removed. (F203 2018 model)
Bob Grewal - 返信
-
-
-
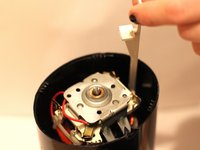
Remove the motor from the shell.
I just bought this! It stopped working after 1 day!
I would like a replacement. By the time I buy the parts to fix it, it will cost more than what I bought it for.
Tina De León
I just bought this grinder yesterday! Will not work anymore. I need to get a replacement for it. Buying the parts to fix it will cost more than what I paid for it
How can I get a replacement?
-


To reassemble your device, follow these instructions in reverse order.
To reassemble your device, follow these instructions in reverse order.
7 の人々がこのガイドを完成させました。

チーム

Baylor, Team 4-2, Williams Fall 2014 Baylor, Team 4-2, Williams Fall 2014人のメンバー
BU-WILLIAMS-F14S4G2
3 メンバー
10のガイドは作成済み
7 件のコメント
thank you so much
The first photo of the bottom plate is too dark to show details. I have type 203 B Made in France and the clips didn’t budge without first breaking/stretching the thin outer walls of the base plate. No need to remove the wires. With mine, you have to turn the bottom shaft of the motor with a screwdriver (counter clockwise as usual) while holding the blade stationary which unscrews the blade from the motor enabling you to remove the motor after the two phillips screws are removed.
Hi Ian!
Nice explanation!
Can you provide a close up of the spudger that you used for opening the bottom plate?
I want to use the correct one, so I don ´t break that aged plastic cover.
Bengt
Yngve Lien - 返信
Where does one get the replacement motor?
I’ve tried repairing mine but the upper bushing was gone and to repair that you have to take the stainless steel inlet out which is impossible (AFAIK). This is a one way product to an extreme….such a pity..such products should be extremely easy to repair and/or make to be repairable.Engineered not to last..
ARE we supposed to see this ? ,your kidding me -TRY A BLOW UP VIEW :
rayd32 - 返信