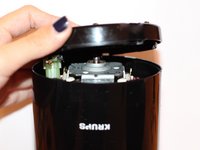
メインコンテンツにスキップ

Krups F203 Coffee Grinder Motor Replacement

必要な工具と部品

  1. Krups F203 Coffee Grinder Motor Replacement, Base Plate: 手順 1、 1の画像 1
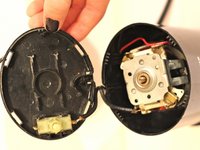
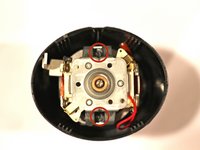
    • In each of the four rectangular slots on the bottom of the device, there is an E-shaped clip.

  2. Krups F203 Coffee Grinder Motor Replacement: 手順 2、 3の画像 1 Krups F203 Coffee Grinder Motor Replacement: 手順 2、 3の画像 2 Krups F203 Coffee Grinder Motor Replacement: 手順 2、 3の画像 3
    • Wedge the spudger between the flat side of the E-clip and the outside wall of the slot. Then, loosen up the clip by prying it inward with the spudger.

    • Try not to break these clips as this will cause structural integrity issues upon reassembly

  3. Krups F203 Coffee Grinder Motor Replacement: 手順 3、 2の画像 1 Krups F203 Coffee Grinder Motor Replacement: 手順 3、 2の画像 2
    • Work your way around the four clips, loosening each a little at a time. Eventually, all four clips will be loose enough to remove the base plate.

  4. Krups F203 Coffee Grinder Motor Replacement, Detach Trigger Button from Base Plate: 手順 4、 1の画像 1
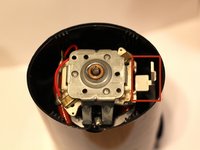
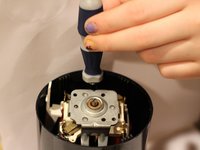
    • The trigger button is held in with light tension clips. Gently pry them back to release.

  5. Krups F203 Coffee Grinder Motor Replacement: 手順 5、 2の画像 1 Krups F203 Coffee Grinder Motor Replacement: 手順 5、 2の画像 2
    • Remove the white trigger.

  6. Krups F203 Coffee Grinder Motor Replacement: 手順 6、 1の画像 1
    • Desolder the contact points between the trigger button and the red wire and also where the plug attaches to the trigger button

    • Be sure to reference the how to solder video posted to the device page

  7. Krups F203 Coffee Grinder Motor Replacement, Motor: 手順 7、 1の画像 1
    • Desolder remaining contact point from the plug cord

  8. Krups F203 Coffee Grinder Motor Replacement: 手順 8、 2の画像 1 Krups F203 Coffee Grinder Motor Replacement: 手順 8、 2の画像 2
    • Using a Phillips screwdriver, remove the two screws holding the motor in place.

  9. Krups F203 Coffee Grinder Motor Replacement: 手順 9、 1の画像 1
    • Remove the motor from the shell.

終わりに

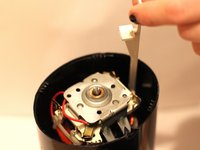
To reassemble your device, follow these instructions in reverse order.

6 の人々がこのガイドを完成させました。

作成者

3人の作成者と共同で作成されました。

Ian Hancock

メンバー登録日: 10/22/14

414 ポイント

3のガイドは作成済み

チーム

Baylor, Team 4-2, Williams Fall 2014 Baylor, Team 4-2, Williams Fall 2014人のメンバー

BU-WILLIAMS-F14S4G2

3 メンバー

8のガイドは作成済み

7 件のコメント

thank you so much

Nikolai Podrez - 返信

Doesn’t seem to apply to the Type 203. It looks different.

rpoland - 返信

The first photo of the bottom plate is too dark to show details. I have type 203 B Made in France and the clips didn’t budge without first breaking/stretching the thin outer walls of the base plate. No need to remove the wires. With mine, you have to turn the bottom shaft of the motor with a screwdriver (counter clockwise as usual) while holding the blade stationary which unscrews the blade from the motor enabling you to remove the motor after the two phillips screws are removed.

seeley6 - 返信

Hi Ian!

Nice explanation!

Can you provide a close up of the spudger that you used for opening the bottom plate?

I want to use the correct one, so I don ´t break that aged plastic cover.

Bengt

Yngve Lien - 返信

Where does one get the replacement motor?

Andrea Garrity - 返信

コメントを追加

統計データ:

過去 24時間: 1

過去 7 日: 24

過去 30 日: 109

今までの合計 27,139