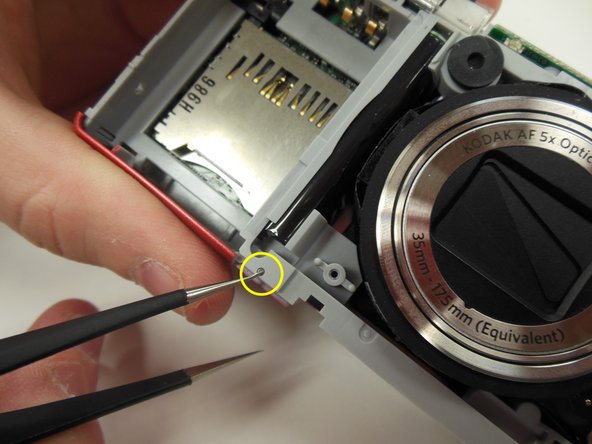
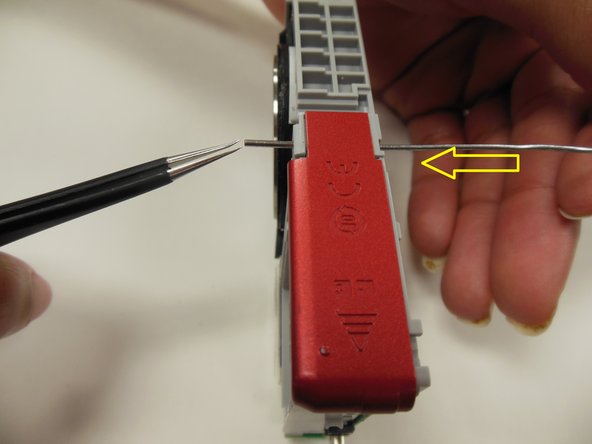
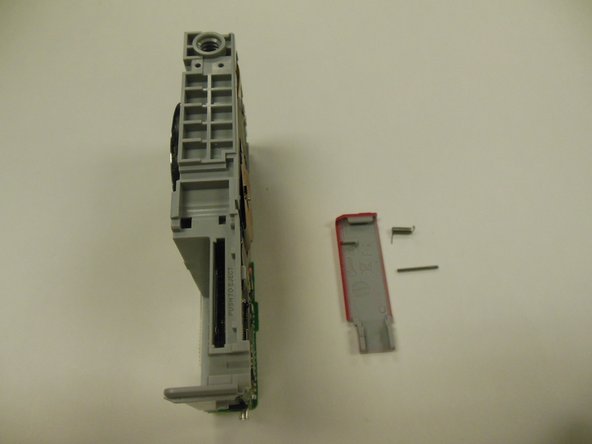
メインコンテンツにスキップ

Kodak EasyShare M381 Battery Latch Replacement

必要な工具と部品

  1. Kodak EasyShare M381 Battery Latch Replacement, Battery: 手順 1、 2の画像 1 Kodak EasyShare M381 Battery Latch Replacement, Battery: 手順 1、 2の画像 2
    • First, press in and slide forward the battery latch as indicated by the arrow.

  2. Kodak EasyShare M381 Battery Latch Replacement: 手順 2、 1の画像 1
    • Press down on battery until you hear a click and release it. Battery should easily slide out.

  3. Kodak EasyShare M381 Battery Latch Replacement, Back Panel Frame: 手順 3、 3の画像 1 Kodak EasyShare M381 Battery Latch Replacement, Back Panel Frame: 手順 3、 3の画像 2 Kodak EasyShare M381 Battery Latch Replacement, Back Panel Frame: 手順 3、 3の画像 3
    • Remove the 3.9 mm frame screws using a Phillips #00 screwdriver.

    • Using a magnetized surface to keep from losing screws may be very helpful.

  4. Kodak EasyShare M381 Battery Latch Replacement: 手順 4、 2の画像 1 Kodak EasyShare M381 Battery Latch Replacement: 手順 4、 2の画像 2
    • Using both hands, carefully pull the frame apart from the camera.

  5. Kodak EasyShare M381 Battery Latch Replacement, Screen: 手順 5、 1の画像 1
    • Remove the two 3.85 mm screws on the bottom right of the camera, as indicated.

  6. Kodak EasyShare M381 Battery Latch Replacement: 手順 6、 1の画像 1
    • Remove dial button located on top of camera, by gently pulling up.

  7. Kodak EasyShare M381 Battery Latch Replacement: 手順 7、 2の画像 1 Kodak EasyShare M381 Battery Latch Replacement: 手順 7、 2の画像 2
    • Starting at one side, carefully work the chrome frame off of the camera itself.

    • Be careful not to disturb the shutter or flash buttons on top of the camera.

  8. Kodak EasyShare M381 Battery Latch Replacement: 手順 8、 1の画像 1
    • On the right side of the camera, locate and remove the two 3.25 mm screws as highlighted.

  9. Kodak EasyShare M381 Battery Latch Replacement: 手順 9、 3の画像 1 Kodak EasyShare M381 Battery Latch Replacement: 手順 9、 3の画像 2 Kodak EasyShare M381 Battery Latch Replacement: 手順 9、 3の画像 3
    • Carefully lift the motherboard panel up, pulling towards the left. Make sure you do not rip the blue ribbon.

    • Using a plastic opening tool, gently lift up on the ribbon fastener until it is in an upright position.

    • Slide panel away from camera.

  10. Kodak EasyShare M381 Battery Latch Replacement: 手順 10、 2の画像 1 Kodak EasyShare M381 Battery Latch Replacement: 手順 10、 2の画像 2
    • Using a plastic opening tool, gently lift ribbon clamp as indicated to remove the screen ribbon from the motherboard.

    • Screen should now be detached. Gently lift it away from the base of the camera.

  11. Kodak EasyShare M381 Battery Latch Replacement, Battery Latch: 手順 11、 3の画像 1 Kodak EasyShare M381 Battery Latch Replacement, Battery Latch: 手順 11、 3の画像 2 Kodak EasyShare M381 Battery Latch Replacement, Battery Latch: 手順 11、 3の画像 3
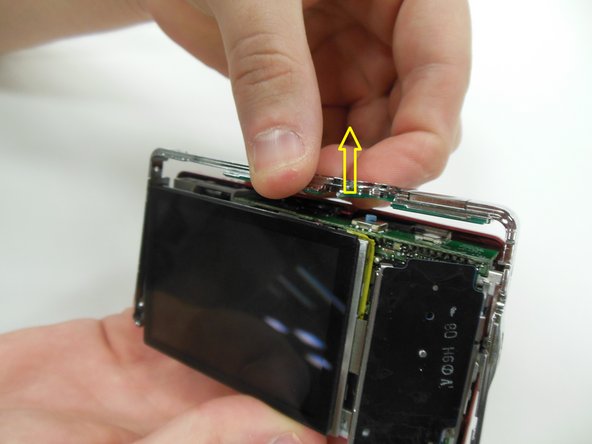
    • Locate and remove selector dial on the top of the camera.

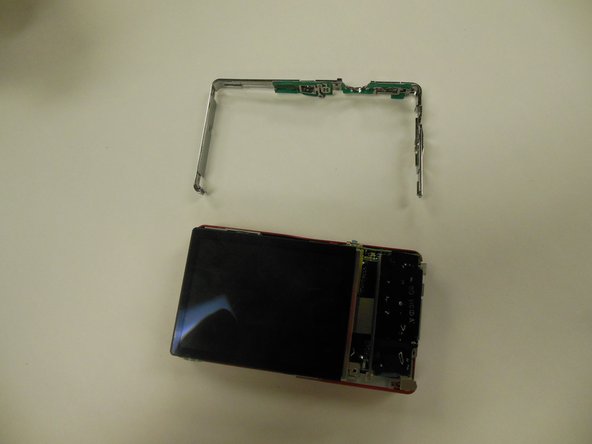
    • This should free the chrome mid-frame that encompasses the camera. Carefully lift and remove it as well.

  12. Kodak EasyShare M381 Battery Latch Replacement: 手順 12、 2の画像 1 Kodak EasyShare M381 Battery Latch Replacement: 手順 12、 2の画像 2
    • Carefully lift and remove front covered panel from the camera.

  13. Kodak EasyShare M381 Battery Latch Replacement: 手順 13、 1の画像 1
    • Locate metal battery panel. Carefully lift and remove it as indicated.

  14. Kodak EasyShare M381 Battery Latch Replacement: 手順 14、 3の画像 1 Kodak EasyShare M381 Battery Latch Replacement: 手順 14、 3の画像 2 Kodak EasyShare M381 Battery Latch Replacement: 手順 14、 3の画像 3
    • Locate the four 3.25 mm screws holding the metal lens panel in place, and remove them.

    • You should then be able to lift and remove the metal paneling. This will now expose the pin holding the battery latch in place as indicated.

  15. Kodak EasyShare M381 Battery Latch Replacement: 手順 15、 2の画像 1 Kodak EasyShare M381 Battery Latch Replacement: 手順 15、 2の画像 2
    • Keeping the battery latch panel closed and in place, use a straightened paper clip (or similar tool) to push the pin out of the hole.

    • Use tweezers to securely remove pin.

    • Placing the pin on a magnet pad or piece of tape is recommended to prevent from losing it.

    • The spring is under tension. When performing this step, it may fly out if not done correctly. Take proper precautions to minimize injury and loss of parts.

  16. Kodak EasyShare M381 Battery Latch Replacement: 手順 16、 2の画像 1 Kodak EasyShare M381 Battery Latch Replacement: 手順 16、 2の画像 2
    • The latch can now easily be pulled out of place and removed.

終わりに

To reassemble your device, follow these instructions in reverse order.

作成者

2人の作成者と共同で作成されました。

Christina Hamby

メンバー登録日: 01/30/15

449 ポイント

4のガイドは作成済み

チーム

University of Kentucky Louisville, Team 1-4, Rountree Winter 2015 University of Kentucky Louisville, Team 1-4, Rountree Winter 2015人のメンバー

LOUISVILLE-ROUNTREE-W15S1G4

4 メンバー

14のガイドは作成済み

0 件のコメント

コメントを追加

統計データ:

過去 24時間: 0

過去 7 日: 2

過去 30 日: 9

今までの合計 286