メインコンテンツにスキップ

Kodak EasyShare LS743 Capacitor Replacement

必要な工具と部品

  1. Kodak EasyShare LS743 Capacitor Replacement, Battery: 手順 1、 1の画像 1
    • Using your fingernail, open the battery cover.

  2. Kodak EasyShare LS743 Capacitor Replacement: 手順 2、 1の画像 1
    • Slide the orange latch sideways to eject the battery.

    • Remove the battery from the battery slot.

  3. Kodak EasyShare LS743 Capacitor Replacement, Kodak EasyShare LS743 Camera Case Disassembly: 手順 3、 3の画像 1 Kodak EasyShare LS743 Capacitor Replacement, Kodak EasyShare LS743 Camera Case Disassembly: 手順 3、 3の画像 2 Kodak EasyShare LS743 Capacitor Replacement, Kodak EasyShare LS743 Camera Case Disassembly: 手順 3、 3の画像 3
    • Using a Phillips #00 screwdriver, remove two 5.39 mm screws next to the battery slot.

    • Remove the metal piece holding down the lanyard, then remove the lanyard.

  4. Kodak EasyShare LS743 Capacitor Replacement: 手順 4、 3の画像 1 Kodak EasyShare LS743 Capacitor Replacement: 手順 4、 3の画像 2 Kodak EasyShare LS743 Capacitor Replacement: 手順 4、 3の画像 3
    • Using a Phillips #00 screwdriver, remove seven screws located on the outside case of the camera.

    • One 6.25 mm screw is located on the top right corner, right to the "OK" button.

    • Four 4.45 mm screws are on the bottom of the camera.

    • Two 2.95 mm screws are on the left side of the camera, above the USB port.

  5. Kodak EasyShare LS743 Capacitor Replacement: 手順 5、 2の画像 1 Kodak EasyShare LS743 Capacitor Replacement: 手順 5、 2の画像 2
    • Carefully remove the rear camera casing.

    • Carefully remove the front camera casing.

  6. Kodak EasyShare LS743 Capacitor Replacement, Capacitor: 手順 6、 3の画像 1 Kodak EasyShare LS743 Capacitor Replacement, Capacitor: 手順 6、 3の画像 2 Kodak EasyShare LS743 Capacitor Replacement, Capacitor: 手順 6、 3の画像 3
    • The capacitor can store electricity even when the camera is off! Do not touch it until you have safely discharged it.

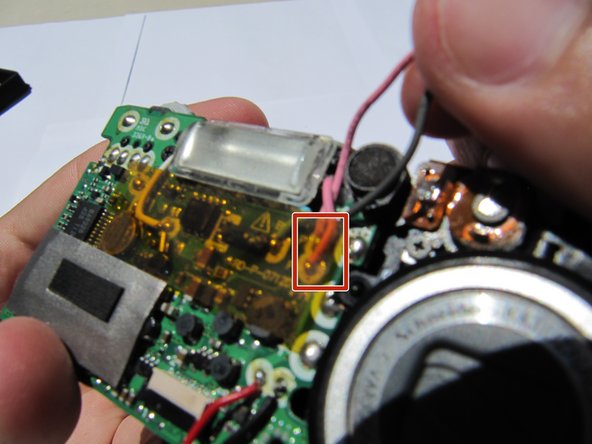
    • Connect the two capacitor wires briefly with a pair of metal tweezers to discharge the capacitor. You may see a small spark.

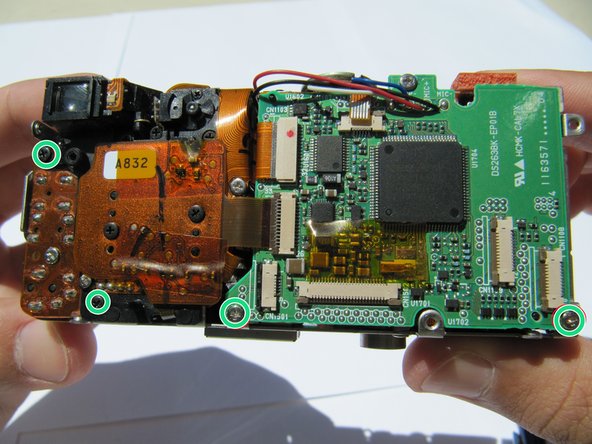
    • Remove eight screws using a Phillips #00 screwdriver.

    • Two (4.31 mm) screws are in the front of the camera.

    • Two (3.30 mm) screws are located in the bottom of the camera.

    • This causes the tripod mount on the bottom to become loose.

    • Four (3 x 3.33 mm and 1 x 4.34 mm) screws are in the back of the camera.

  7. Kodak EasyShare LS743 Capacitor Replacement: 手順 7、 1の画像 1
    • Remove the tripod mount from the bottom of the camera and set it aside.

  8. Kodak EasyShare LS743 Capacitor Replacement: 手順 8、 1の画像 1
    • Pull the black latch outward slightly to release the orange flex cable.

    • Carefully disconnect the orange flex cable.

  9. Kodak EasyShare LS743 Capacitor Replacement: 手順 9、 1の画像 1
    • Soldering irons pose a burn risk if handled improperly.

    • Desolder the red and black wire and remove them.

  10. Kodak EasyShare LS743 Capacitor Replacement: 手順 10、 2の画像 1 Kodak EasyShare LS743 Capacitor Replacement: 手順 10、 2の画像 2
    • Hold the camera firmly and gently remove the capacitor (attached by adhesive) by wiggling it loose.

    • Desolder the pink and black wire and remove both of them.

終わりに

To reassemble your device, follow these instructions in reverse order.

ある他の人がこのガイドを完成しました。

作成者

9人の作成者と共同で作成されました。

Elizabeth Loui

メンバー登録日: 06/24/10

81 ポイント

2のガイドは作成済み

チーム

Cal Poly, Team 2-8, Johann Summer 2010 Cal Poly, Team 2-8, Johann Summer 2010人のメンバー

CPSU-JOHANN-R10S2G8

5 メンバー

16のガイドは作成済み

0 件のコメント

コメントを追加

統計データ:

過去 24時間: 0

過去 7 日: 0

過去 30 日: 1

今までの合計 2,254