メインコンテンツにスキップ

Kodak EasyShare CD82 LCD Display Screen Replacement

必要な工具と部品

  1. Kodak EasyShare CD82 LCD Display Screen Replacement, LCD Screen: 手順 1、 3の画像 1 Kodak EasyShare CD82 LCD Display Screen Replacement, LCD Screen: 手順 1、 3の画像 2 Kodak EasyShare CD82 LCD Display Screen Replacement, LCD Screen: 手順 1、 3の画像 3
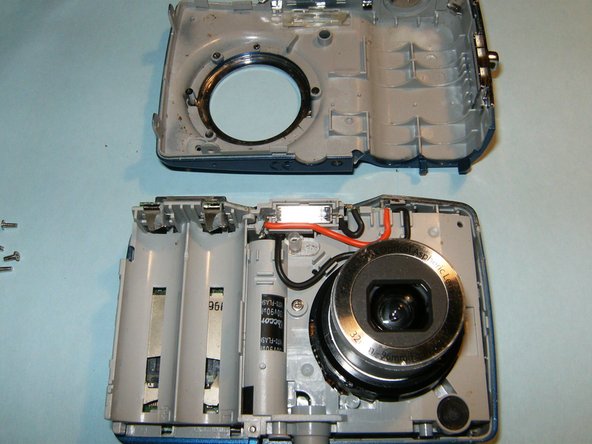
    • Remove the batteries and the memory card from the device.

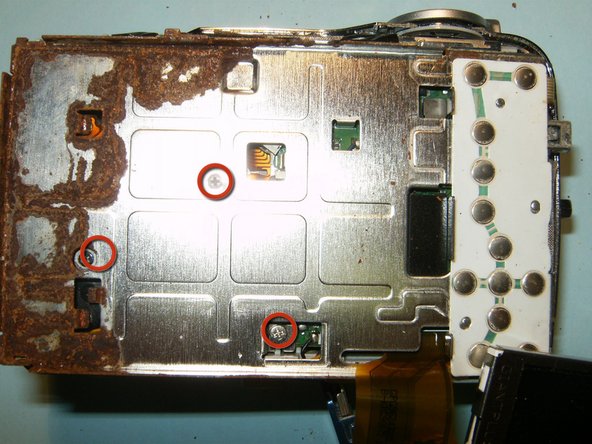
    • Remove the 2 screws located at the bottom of the device.

  2. Kodak EasyShare CD82 LCD Display Screen Replacement: 手順 2、 3の画像 1 Kodak EasyShare CD82 LCD Display Screen Replacement: 手順 2、 3の画像 2 Kodak EasyShare CD82 LCD Display Screen Replacement: 手順 2、 3の画像 3
    • Remove the 2 screws on the side, to the left of the camera lens.

    • Remove the 2 screws on the side, to the right of the camera lens.

    • Pry the casing from the device starting at the battery compartment and following the seem around the camera.

  3. Kodak EasyShare CD82 LCD Display Screen Replacement: 手順 3、 3の画像 1 Kodak EasyShare CD82 LCD Display Screen Replacement: 手順 3、 3の画像 2 Kodak EasyShare CD82 LCD Display Screen Replacement: 手順 3、 3の画像 3
    • Remove the front panel from the device first, then remove the back panel.

    • Do not remove the LCD screen from the device once it becomes visible.

  4. Kodak EasyShare CD82 LCD Display Screen Replacement: 手順 4、 3の画像 1 Kodak EasyShare CD82 LCD Display Screen Replacement: 手順 4、 3の画像 2 Kodak EasyShare CD82 LCD Display Screen Replacement: 手順 4、 3の画像 3
    • Flip the LCD screen away from the top of the device to reveal the ribbon cable.

    • This is water damage the has afflicted the camera.

    • Remove the 3 screws from the LCD screen holder.

    • Pry the screen holder from the circuit board connector.

  5. Kodak EasyShare CD82 LCD Display Screen Replacement: 手順 5、 2の画像 1 Kodak EasyShare CD82 LCD Display Screen Replacement: 手順 5、 2の画像 2
    • Disconnect the logic board from the right side of the frame.

    • Remove the small ribbon cable that is connecting the button panel to the logic board, using a small pair of tweezers or hemostat.

    • Remove the screw on the top right side of the device.

  6. Kodak EasyShare CD82 LCD Display Screen Replacement: 手順 6、 2の画像 1 Kodak EasyShare CD82 LCD Display Screen Replacement: 手順 6、 2の画像 2
    • Open the connector and move the black clip into the upward position, freeing the cable. Remove the LCD screen and the holder.

    • While the camera is disassembled, use isopropyl alcohol to remove rust and clean the device.

    • Follow these steps in reverse order to reassemble. The device should be fully functional upon completion.

終わりに

To reassemble your device, follow these instructions in reverse order.

2 の人々がこのガイドを完成させました。

作成者

5人の作成者と共同で作成されました。

oldturkey03

メンバー登録日: 09/29/10

781,634 ポイント

119のガイドは作成済み

チーム

Global Fixers Global Fixers人のメンバー

Community

32 メンバー

531のガイドは作成済み

コメント 1 件

Is there any repair for Kodak CD80 easy share camera…..as my camera is not working

Januchowdary - 返信

コメントを追加

統計データ:

過去 24時間: 0

過去 7 日: 3

過去 30 日: 13

今までの合計 1,475