はじめに
The circuit board contains the hardware of the blender and instructs the rest of the blender what to do.
必要な工具と部品
-
-
Remove the glass container and place the blender upside down on a solid surface.
-
Remove the four rubber feet using the needle nose pliers.
-
Remove the four #7.5 Phillips 25mm screws that were located underneath the rubber feet using the Phillips #2 screwdriver.
-
-
-
Remove the two #6 Hex 82mm screws using the Phillips #2 screwdriver.
-
Remove the rubber O-ring by lifting it up.
-
-
-
-
Remove the ribbon cable from the chassis by lifting it up.
-
Remove the other end of the ribbon cable from the circuit board by lifting it up.
-
-
-
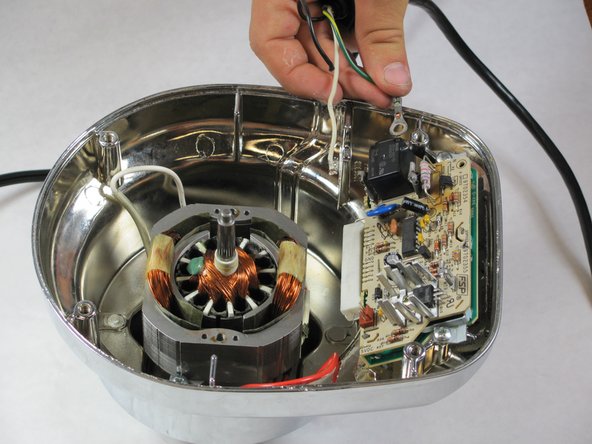
Slide the knife into the metal loop holding the insulation before the white copper wire, and wiggle it back and forth until it loosens.
-
Pull the wire out from the metal loop that you loosened.
-
Repeat this process with the black copper wire.
-
-
-
Using the Phillips #2 screwdriver, remove the #8 Phillips 6mm screw to which the green wire is attached.
-
-
-
Remove the #8 Phillips 12mm screws using the Phillips #2 screwdriver.
-


To reassemble your device, follow these instructions in reverse order.
To reassemble your device, follow these instructions in reverse order.
2 の人々がこのガイドを完成させました。
チーム

Cal Poly, Team 12-5, Forte Fall 2014 Cal Poly, Team 12-5, Forte Fall 2014人のメンバー
CPSU-FORTE-F14S12G5
5 メンバー
6のガイドは作成済み
3 件のコメント
Hello, Thanks for video, very good! I see on my blender that main capacitor (blue one) has burned out. Could you tell me the value of it? is it on 110v? many thanks!
Hola, Muy bueno gracias. me voló el capacitor principal (azul grande) me podrías indicar de cuanto es? es para 110v? gracias!
I have already founded components that burn when plugged to 220v instead 110v. it was a varistor 14D201K, (circular blue), and also burn a thermal fusible besides (black cillinder) . 3A 250V. hope helps someone. thanks.
Hello, in my case I have lost the motor magnet, additionally the sensor is worn and I cannot see the reference, could you give me the sensor reference, and some idea of how to replace the magnet.
hola, en mi caso he perdido el iman del motor, adicionalmente el sensor esta gastado y no logro ver la referencia, me podrias regalar la referencia del sensor, y alguna ida de como reemplazar el iman.
thank you so much