メインコンテンツにスキップ

Kitchen Sink Basket Strainer Assembly Replacement

必要な工具と部品

  1. Kitchen Sink Basket Strainer Assembly Replacement, Kitchen Basket Strainer Assembly: 手順 1、 3の画像 1 Kitchen Sink Basket Strainer Assembly Replacement, Kitchen Basket Strainer Assembly: 手順 1、 3の画像 2 Kitchen Sink Basket Strainer Assembly Replacement, Kitchen Basket Strainer Assembly: 手順 1、 3の画像 3
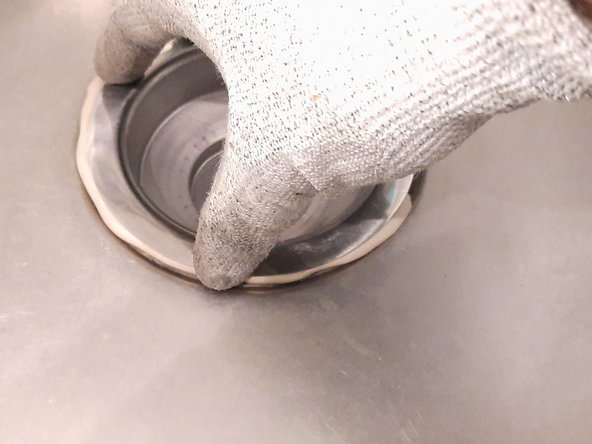
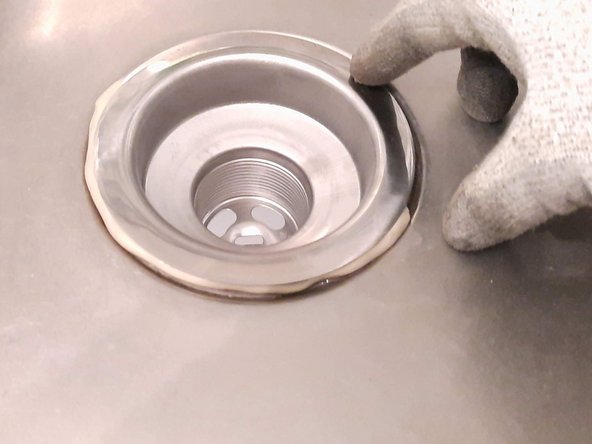
    • Inspect the strainer under the sink and inspect the basket over the sink. Take out the basket from the top.

  2. Kitchen Sink Basket Strainer Assembly Replacement: 手順 2、 3の画像 1 Kitchen Sink Basket Strainer Assembly Replacement: 手順 2、 3の画像 2 Kitchen Sink Basket Strainer Assembly Replacement: 手順 2、 3の画像 3
    • Loosen the bottom lock nut under the sink with your hands. If your hands are not enough, use a 12" pipe wrench to loosen the bottom nut out.

    • Twist the bottom lock left when loosening it.

    • Get ready to take out the old flange that sits on top of the tailpiece as shown.

  3. Kitchen Sink Basket Strainer Assembly Replacement: 手順 3、 2の画像 1 Kitchen Sink Basket Strainer Assembly Replacement: 手順 3、 2の画像 2
    • Take out the old flange and clean the inside of the tailpiece with a paper towel. Trust me, the tailpiece will be very dirty.

  4. Kitchen Sink Basket Strainer Assembly Replacement: 手順 4、 3の画像 1 Kitchen Sink Basket Strainer Assembly Replacement: 手順 4、 3の画像 2 Kitchen Sink Basket Strainer Assembly Replacement: 手順 4、 3の画像 3
    • Loosen the top lock nut that sits below the strainer, take the lock nut out.

    • Twist the top lock nut left.

    • At this point, the top strainer should be loose after removing the second lock nut.

  5. Kitchen Sink Basket Strainer Assembly Replacement: 手順 5、 3の画像 1 Kitchen Sink Basket Strainer Assembly Replacement: 手順 5、 3の画像 2 Kitchen Sink Basket Strainer Assembly Replacement: 手順 5、 3の画像 3
    • The top strainer easily comes off now due to no nut holding it in place.

    • If there is resistance from prior washers or gaskets, give the strainer a pull to take it out.

  6. Kitchen Sink Basket Strainer Assembly Replacement: 手順 6、 2の画像 1 Kitchen Sink Basket Strainer Assembly Replacement: 手順 6、 2の画像 2
    • Clean the top of the sink engrave of putty, washer residue, or water with a paper towel.

  7. Kitchen Sink Basket Strainer Assembly Replacement: 手順 7、 3の画像 1 Kitchen Sink Basket Strainer Assembly Replacement: 手順 7、 3の画像 2 Kitchen Sink Basket Strainer Assembly Replacement: 手順 7、 3の画像 3
    • Prepare and roll up the putty with your hands.

    • Roll the putty into a hotdog shape and use enough so that you can cover the top of the sink engrave where the strainer must be placed.

  8. Kitchen Sink Basket Strainer Assembly Replacement: 手順 8、 3の画像 1 Kitchen Sink Basket Strainer Assembly Replacement: 手順 8、 3の画像 2 Kitchen Sink Basket Strainer Assembly Replacement: 手順 8、 3の画像 3
    • When placing the putty, follow the trace of the indent for the strainer outlined in the sink.

    • Slightly press down, but not completely so that the putty sticks. Prepare to place the new top strainer.

  9. Kitchen Sink Basket Strainer Assembly Replacement: 手順 9、 3の画像 1 Kitchen Sink Basket Strainer Assembly Replacement: 手順 9、 3の画像 2 Kitchen Sink Basket Strainer Assembly Replacement: 手順 9、 3の画像 3
    • Place the new top strainer on to the grave of the putty.

    • Slightly press with your finger so that the putty sticks to the top strainer.

  10. Kitchen Sink Basket Strainer Assembly Replacement: 手順 10、 3の画像 1 Kitchen Sink Basket Strainer Assembly Replacement: 手順 10、 3の画像 2 Kitchen Sink Basket Strainer Assembly Replacement: 手順 10、 3の画像 3
    • Press down the top strainer until the putty squeezes out from the sides.

    • Clean the excess putty with your hands and paper towels.

  11. Kitchen Sink Basket Strainer Assembly Replacement: 手順 11、 3の画像 1 Kitchen Sink Basket Strainer Assembly Replacement: 手順 11、 3の画像 2 Kitchen Sink Basket Strainer Assembly Replacement: 手順 11、 3の画像 3
    • The placement of the washers on the bottom strainer is as follows from bottom to top: (1) paper gasket, (2) rough washer, (3) soft washer.

    • Place the washers and the new strainer in the order shown.

    • Place the strainer with the washers before putting the top lock nut.

  12. Kitchen Sink Basket Strainer Assembly Replacement: 手順 12、 2の画像 1 Kitchen Sink Basket Strainer Assembly Replacement: 手順 12、 2の画像 2
    • Tighten the lock nut under the strainer with your hands.

    • When tightening, twist the top lock nut right.

    • Extra tighten the locknut with a wrench if necessary.

    • Putty from the top will likely squeeze out as you tighten the lock nut. Simply clean off the putty after you're done.

  13. Kitchen Sink Basket Strainer Assembly Replacement: 手順 13、 3の画像 1 Kitchen Sink Basket Strainer Assembly Replacement: 手順 13、 3の画像 2 Kitchen Sink Basket Strainer Assembly Replacement: 手順 13、 3の画像 3
    • Place a new flange if needed (depending on the condition of your old flange).

    • Tighten the bottom lock nut that connects the tailpiece with the strainer. Use a wrench for extra security.

    • Twist the bottom lock nut right.

終わりに

By the end of this guide, you should now know the ins and outs of the kitchen strainer and how to replace it.

作成者

1人の作成者と共同作成されました。

Shahnawaz Chodhry

メンバー登録日: 09/10/21

217 ポイント

1ガイドが承認済み

チーム

YORK-SHAHNAWAZ-F21SEG3 YORK-SHAHNAWAZ-F21SEG3人のメンバー

Community

1 メンバー

1のガイドは作成済み

0 件のコメント

コメントを追加

統計データ:

過去 24時間: 3

過去 7 日: 17

過去 30 日: 71

今までの合計 1,759