はじめに
暗所で読書ができませんか?このガイドを参照して、不均衡や機能しないディスプレイのLEDライトを交換しましょう。
必要な工具と部品
-
-
ミッドフレームを固定している3.0mmプラスネジを11本外します。
Hello, the original battery is 1420m Ah and 3.7VDC, but the buttery you offer to sell is 1600mAh, is it right? there is no problem with different mAh? mi kindle is the amazon kindle 1est generation
-
-
-
バッテリーの下側から慎重に持ち上げて、ミッドフレームからスライドして取り出します。
Thanks for providing this guide, I would have been lost without it. My old kindle, however, had very stiff and hard rubber/plastic. There was no way I could have slid the glass to the side or gotten the plastic spud under the edge of the glass or the plastic.
What I did was to remove a piece of the plastic next to the glass , about 1/8” square, then insert a putty knife in between the two sides towards the edges. It all popped apart without breaking anything. Perhaps I could have done this without cutting out the little piece.
Thank you for this very user friendly guide.My kindle is now working as new.The screws are small and fiddly and the correct tools are essential. I took roughly about 45 minutes from start to finish and the most difficult part was taking the casing apart without damaging the screen .. A 5 star service.
The bezel sits on a film meant to protect the screen. When lifting the bezel, it is a good idea to slightly push on the screen with cardboard or something elese, to make sure the screen film stays on the screen as you lift the bezel.
-
-
-
-
スパッジャーを使って、白い固定ケーブルのテンショナーを持ち上げて、フレックスケーブルを引き抜きます。
-
反時計回りに次のケーブルに移って、同じ作業を繰り返します。下側にある小さなフレックスケーブルはケーブルのテンショナーを持ち上げる必要はありません。ただ、慎重に引き抜いてください。
The second connector is not exactly a "repeat". The lock to be lifted is on the cable side, whereas the first connector's lock is away from the cable.
-
-
-
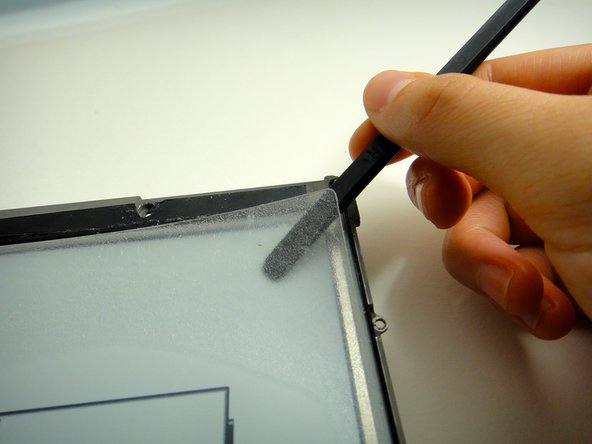
スパッジャーを使って、慎重にディスプレイからプラスチックのスクリーンを外します。
Does anyone know what kind of adhesive is used between the waveguide / dffuser layer, and the display layers under it? It’s definitely not a hard-cured epoxy, but almost a gel — probably silicone — and probably matched to the refractive index of the layers.
Or, did anyone succeed in re-using the original stuff, and if so did you have air pockets or artifacts because of it?
-


デバイスを再組立する際は、これらのインストラクションを逆の順番に従って作業を進めてください。
デバイスを再組立する際は、これらのインストラクションを逆の順番に従って作業を進めてください。
5 の人々がこのガイドを完成させました。
以下の翻訳者の皆さんにお礼を申し上げます:
100%

Midori Doiさんは世界中で修理する私たちを助けてくれています! あなたも貢献してみませんか?
翻訳を始める ›
チーム

Cal Poly, Team 3-33, Amido Winter 2013 Cal Poly, Team 3-33, Amido Winter 2013人のメンバー
CPSU-AMIDO-W13S3G33
4 メンバー
17のガイドは作成済み
13 件のコメント
Hello to you! Your guide helped me to understand what happened with my kindle. I've got a scratch on the screen but it seems not very deep; the scratch is on a plastic screen, mentioned on the 12-th step. Is it possible to replace this screen with the same one or simple screen protector can do? Thank you.
Can the LEDs simply be removed using this method? I think they are giving me a headache, even on the lowest setting...
Best way is to jailbreak the kindle and use KO reader. In that you can switch off the lights completely. This is a software hack but then you do not need to open the paperweight at all
I removed the plastic screen easily enough but the glue that held it to the display leaves quite a mess on both sides and loses it's tack once removed. I suppose I could clean both sides (with IPA?) and remove the old glue but what's best to reattach the plastic to the screen that will give a nice clear finish?
I actually bought a new screen without the LEDs (all that was available) and it doesn't even have the plastic cover on it yet.
I was wondering, if it is possible to connect the two LED lights to the same power driver?Recently I noticed that my led bulb turns on/off for a split second randomly over the past few days. Does this mean it is starting to die or could it be something..please visit our website: http://lighthut.co.uk
Can someone please confirm that this process is reversible without totally destroying the screen i.e. when you put it back you won't see glue smudges everywhere?
Are you kidding me? You lost me at #3. Does anyone know where I can get this done by a professional?
kariesmom1 - 返信
Hallo,
nach Austausch des Akkus funktioniert das Kindle PW bis auf die Beleuchtung normal.
Wie erkennt man, ob die Beleuchtung defekt ist.
Wo kann man die LED Beleuchtung fürKindle PW erwerben?
Whats the part number for the plastic screen panel itself, my e-ink display is perfectly fine but the plastic is cracked (light leak into crack when lighting is on). I am guessing this is a standard plastic panel with stepped edge to give an interface for light transmission, is it theoretically possible to use a plastic panel with an oversize acetate sheet (or some other clear plastic film) attached to the front to allow landing for the LED to be attached.
Where do I buy the LED replacement?
I found it easier to start this step off with one of the Opening Picks found in the iOpener pack.
NathanF - 返信
The glue on bezel started to peel the sticky back protective layer off the screen for me - managed to smooth it back down, although now have an unsightly crease. I would try to hold the screen down when you pull the bezel off to stop damaging the screen.
Callum Rogers - 返信
This step is most time consuming. Take you time and try not to scratch the bezel :)
Oleksii - 返信
Couldn't get the plastic spudger under the edge of the bezel. A right-angle X-Acto blade was a satisfactory tool here.
dbrick - 返信
The glue was VERY difficult...I used a trick, from taking apart phones, and used a hair drier to loosen up the glue...worked like a charm.
billkaris - 返信