この翻訳は、ソースガイドの最新の更新を反映していない可能性があります。 翻訳の更新に協力してください。 または ソースガイドを参照してください。
はじめに
Kindle Fire HD 8.9インチのフロントガラスもしくはスクリーンが破損していれば、このガイドを使って、LCDディスプレイ、タッチデジタイザー、フロントパネルとフレームを含むディスプレイアセンブリ全体を交換します。
必要な工具と部品
-
-
-
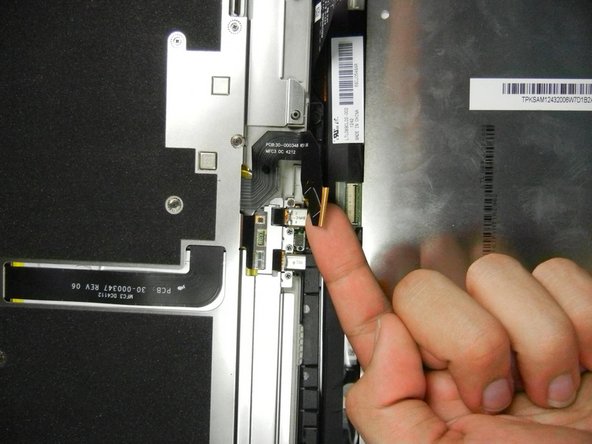
上部フレックスケーブルのZIFコネクタ上の固定フラップを持ち上げます。
-
慎重にソケットからケーブルを引き抜きます。
This is very delicate. The flap is very easy to break off. Remove the yellow tape on both these connectors and replace with ordinary plastic tape upon reassembly. If you don't tape them you'll pull them apart working on the other. A helper to hold the assy is a good idea.
Bob Steger - 返信
-


デバイスを再組立する際は、これらのインストラクションを逆の順番に従って作業を進めてください。
デバイスを再組立する際は、これらのインストラクションを逆の順番に従って作業を進めてください。
60 の人々がこのガイドを完成させました。
以下の翻訳者の皆さんにお礼を申し上げます:
75%

Midori Doiさんは世界中で修理する私たちを助けてくれています! あなたも貢献してみませんか?
翻訳を始める ›
チーム

Cal Poly, Team 5-16, Forte Winter 2013 Cal Poly, Team 5-16, Forte Winter 2013人のメンバー
CPSU-FORTE-W13S5G16
5 メンバー
14のガイドは作成済み
21 件のコメント
Where are the rest of the instructions???? I now have a disassembled Kindle and no idea how to install the new screen!
Lisa Comer - 返信
At the end of every iFixit guide, next to the "I did it! Success!" button, there is a message that says "To reassemble your kindle, follow these steps in reverse order." However in some cases, there will be a slightly different message. In the case of this guide, the message says "To reassemble your kindle, follow these steps in reverse order. Just make sure that you successfully connect the two flex cables to each half of your kindle and that you then align the two halves on the side opposite the camera before reassembling it."
while you are at it, try replacing the battery for a better experience.
I did, checkout this battery for kindle here :
I was wondering how to reattach the flex cables, do they slide in or do they rest on top? Mine came with 2 little pieces of yellow tape.
The connectors for the display assembly flex cables each have a delicate lever tab that flips up to release the flex cable and the cable slides out of a slot under the lever tab. To reinstall, the black lever tab should be up and the flex cable can then slide under the tab. When the flex cable feels like it is inserted as far as it will go fold the lever tab down flat over the cable. The yellow tape is typically installed after the cable is in place and the lever is closed. The tape provides some insurance that the lever will stay down and the flex cable stays in place.
What, and where is the "Lock Key" ? I was unable to find such on my grandson's Kindle Fire HD 8.9" tablet when I disassembled it.
I am an experienced fixer, so I don't believe that I missed anything.
Thanks!
I've replaced the battery but the Kindle still doesn't work. It charges and the start up screen say Kindle Fire but the swipe screen doesn't come up. The screen doesn't show any visible cracks. Hate to purchase a new screen to find out there something else wrong with the device any help would be appreciated.
I purchaed a lcd and digitizer to do this repair. It did not come with the frame around it. How do i replace without breaking anything. Seems like things are glued together. This guide only really shows how to replace with a full frame and already has the lcd and digitizer glued in
Okay I replaced the screen but when I turn it on the screen is split. It repeats itself. What do I do?
As stated in prior comment, I purchased a Display Assemby(LCD and Touch Screen). There is no front frame included. Do you have instructions to remove old Display assembly from front cover? Any information is appreciated.
Is this screen adaptable to the Kindle Fire HD 8 (7th Generation)?
After replacing the battery, the ZIF cable retaining flap on the largest of the two sockets broke off while re-connecting. I tried using tape and it seems to hold. Images appear on the screen, but the touch-screen doesn’t work. Is there any solution other than replacing the socket (which would not be worthwhile due to the unit’s age)? And I suppose it’s possible I may also have damaged the cable itself—not sure. 3HT7G, 8.9”. Thanks! sdelahoyde@netscape.net
Getting the SIM card dummy plug out a real challenge. Broke off one end. Seems this part was never intended to be removed.
Bob Steger - 返信