はじめに
Kindle Fire HD 8.9インチのヘッドホン入力用のインストールガイドです。
必要な工具と部品
-
-
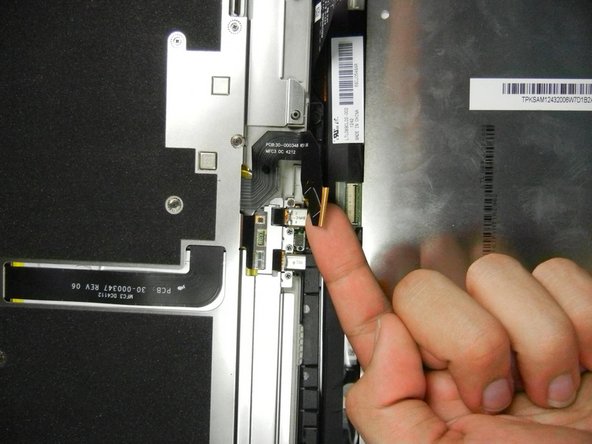
上部フレックスケーブルのZIFコネクタ上の固定フラップを持ち上げます。
-
慎重にソケットからケーブルを引き抜きます。
This is very delicate. The flap is very easy to break off. Remove the yellow tape on both these connectors and replace with ordinary plastic tape upon reassembly. If you don't tape them you'll pull them apart working on the other. A helper to hold the assy is a good idea.
Bob Steger - 返信
-
-


デバイスを再組み立てする際は、これらの手順を逆の順番に従って作業を進めてください。
デバイスを再組み立てする際は、これらの手順を逆の順番に従って作業を進めてください。
4 の人々がこのガイドを完成させました。
以下の翻訳者の皆さんにお礼を申し上げます:
100%

Midori Doiさんは世界中で修理する私たちを助けてくれています! あなたも貢献してみませんか?
翻訳を始める ›
チーム

Cal Poly, Team 5-16, Forte Winter 2013 Cal Poly, Team 5-16, Forte Winter 2013人のメンバー
CPSU-FORTE-W13S5G16
5 メンバー
14のガイドは作成済み
3 件のコメント
This guide was quite useful - until I came across it I had no idea it was feasible to replace the audio jack! There were a couple of areas where the instructions could be improved, namely:
* Overall - the description of "Easy" must be relative. Once you've done it once it might be easy, but although I've many years of experience tearing apart computers, as a newbie to opening a tablet device I found it quite tricky. Next time it may feel easy, but that is misleading for a newbie.
* Step 1
** On my device it took a LOT of force both to get the tool inserted and at various locations as I slide it along each side. Also, going around each corner to a new side was also tricky.
** Unsure what "Make sure to remove the lock key" meant. What "lock key"?
** Although there is no true hinge, the two ribbon cables imply one should treat the device as if hinged along the conventional "bottom" (where the USB and HDMI ports are).
* Steps 3 & 4 - It would help to mention that each connector has a movable locking mechanism and that the "black" item referred to is the movable part. Also that it is secured with yellowish transparent tape that must be pulled off prior to unlocking. Unlocking consists of flipping the black plastic piece up 90 to 180 degrees and locking is the inverse operation. Lastly you cannot get your finger under the black piece, but your fingernail might work. I was initially very confused, the only black thing I could get my finger under was the ribbon cable. I did in fact manage to pull the cable loose before realizing I should have removed the yellow tape and unlocked the connector.
* Step 7 - I'm not sure why the 3rd screw is mentioned. I did NOT need to unscrew it.
Hope this comment clarifies things for the next person (and thanks to the original author).
This was super easy. Instructions are well written and easy to follow. I purchased a new Kindle before I found the instructions. In the future, I will check here before buying anything new.
Getting the SIM card dummy plug out a real challenge. Broke off one end. Seems this part was never intended to be removed.
Bob Steger - 返信