はじめに
Kindleのスクリーンは”ベースのパーツ”として見なされます。つまり他のコンポーネントに接続する重要なパーツです。修理は比較的簡単ですが、Kindleの完全な解体が必要です。
必要な工具と部品
-
-
ブルーのプラスチック開口ツールを使って、各コーナーのクリップを外して、フロントパネルの接着剤を剥がします。
-
ツールを継ぎ目に沿ってスライドして、フロントパネルをこじ開けます。
-
-
-
フロントパネルを剥がして、Kindleより取り出します。
-
フロントパネルを破損しないように、パネルをコーナーからKindle中央に向けて剥がします。
What is the adhesive you are using resecure the screen? Would Tesa 61395 Tape work (4mm) or would this create protrusion?
Did that option work for you? I'm about to try and change my battery and don't have any idea on what backup adhesive to have
Lagroth -
-
-
-
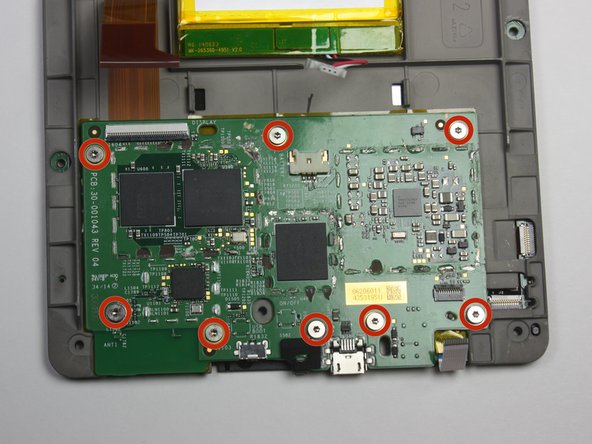
T5トルクスドライバーで、 5.0 mmプラスネジを10本外します。
You will break the newer vision of kindle just like this. there is a peg that connect the top center of the screen to the back case. Remove the black double sided tape in the center and push this peg back .
If you see black double sided tape at the top of your Kindle, as the commenter above did, you are on the wrong model—have a look here to see if this is your model: Kindle Paperwhite 3rd Generation Screen/Display Touch Panel Replacement
-
-
-
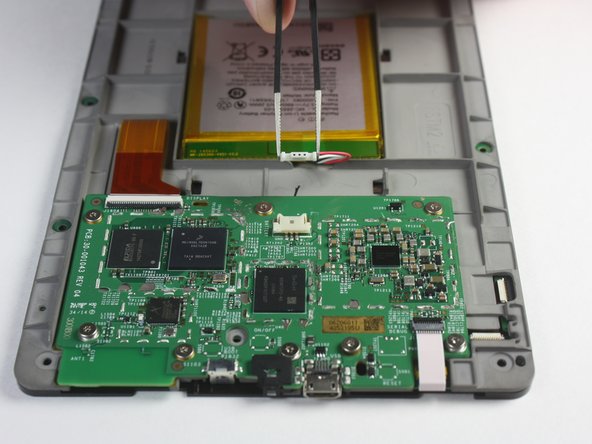
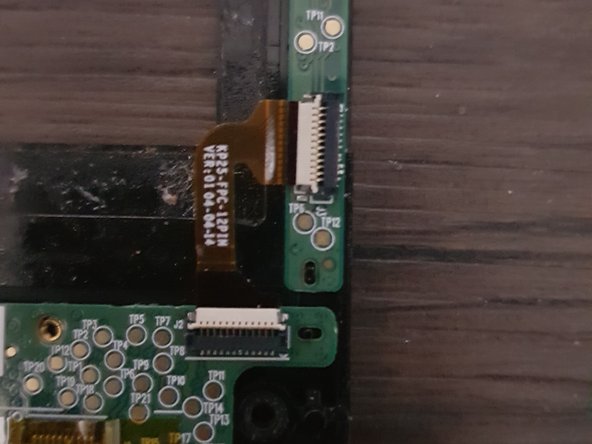
スクリーンを裏返して、マザーボードとバッテリーパックを表に配置します。
-
先端が鋭利でないピンセットを使って、バッテリーパックとマザーボードに接続されたケーブルのクリップを慎重に外します。
-
-


デバイスを再組み立てする際は、これらの手順を逆の順番に従って作業を進めてください。
デバイスを再組み立てする際は、これらの手順を逆の順番に従って作業を進めてください。
9 の人々がこのガイドを完成させました。
以下の翻訳者の皆さんにお礼を申し上げます:
100%

Midori Doiさんは世界中で修理する私たちを助けてくれています! あなたも貢献してみませんか?
翻訳を始める ›
チーム

Cal Poly, Team 6-28, Amido Winter 2015 Cal Poly, Team 6-28, Amido Winter 2015人のメンバー
CPSU-AMIDO-W15S6G28
4 メンバー
18のガイドは作成済み
9 件のコメント
I Need this Screen for my kindle, where find to buy.
Hi, I have a big problem with my kindle 7th genration, the screen is frozen, I tried the root by pushing start buton for 40 sec and more, nothing, even if I took apart every peace of the tablaet ( main board batery...) it still frozen !!!! how can I fix it? thank you
i just let mine sit for a few months i didn’t even turn it on after a few months i plugged it in then turned it on and it worked
My screen froze two days ago while doing a reboot. So I read up on advice and nothing worked. Then I contacted Amazon and spent a mammoth six hours on chat trying to sort out the issue. After 5 consultants I ended up ordering a new kindle with a discount. When trying to apply the discount I spoke to an Australian Kindle guy who told me to drain the battery by leaving it for months without charge. Then I found this page and so I disassembled my Kindle up to removing the battery. Then I plugged the battery back in, and switched it on and it worked!! So I reassembled it and now it is working fine. Only problem is I just paid $249 for a new Kindle.
Hi, anyone knows if the replacement screen is still available somewhere? Any other screen I could buy that are compatible? Thanks!
Yes. I believe there are new-old surplus stock display panels available on AliExpress and eBay. Just be sure to check to make sure that you’re ordering the correct EPD panel or assembly.
Hi, I need the replacement screen for Kindle 7 Paperwhite model # WP63GW. Where are they available? Can the screen be dissembled further than the picture shown in the instruction above? I can see the mirror from the back of my piece? Can that be removed or else that is it, it can no longer separated from the mirror part?
My screen is working after disassembling but the touch function is not working which was previously working before dissassembly. what did i do wrong, please help
Khan Haadi - 返信
i had a battery that wouldn't even last a full day in the end. by accident i let the battery fall below 10% charge and when turned on it only showed the battery icon. I fully charged it and now i am having no problems with it. what i think happened is it reset the batteries memory and that was the problem. worth trying anyway before buying a new battery.
soupamanx - 返信