メインコンテンツにスキップ

Kindle 7th Generation LCD Circuit Board Replacement

必要な工具と部品

  1. Kindle 7th Generation LCD Circuit Board Replacement, Front Panel: 手順 1、 2の画像 1 Kindle 7th Generation LCD Circuit Board Replacement, Front Panel: 手順 1、 2の画像 2
    • Power off your Kindle before beginning disassembly.

    • At each corner, use the blue plastic opening tool to unhook and separate the front panel from the adhesive.

    • Run the tool along the seams to pry open the front panel.

  2. Kindle 7th Generation LCD Circuit Board Replacement: 手順 2、 1の画像 1
    • Peel the front panel off to remove it from the Kindle.

    • If this is the first time the front panel has been removed, the adhesive may require a significant amount of force to undo.

    • To prevent damaging the front panel, peel the panel from the corners towards the middle of the Kindle.

    • When reassembling your device, if you are replacing the front panel, additional adhesive may be required.

  3. Kindle 7th Generation LCD Circuit Board Replacement, Back Panel: 手順 3、 2の画像 1 Kindle 7th Generation LCD Circuit Board Replacement, Back Panel: 手順 3、 2の画像 2
    • Remove the ten 5.0 mm T5 Torx screws.

    • A magnetized screw mat can help you keep track of your screws.

  4. Kindle 7th Generation LCD Circuit Board Replacement: 手順 4、 1の画像 1
    • Working evenly along the corners and edges, separate the internal contents from the back panel.

    • There are many clips securing the screen to the back panel. Force will be required to remove the back, but you should never feel that the Kindle may break.

  5. Kindle 7th Generation LCD Circuit Board Replacement, Motherboard: 手順 5、 2の画像 1 Kindle 7th Generation LCD Circuit Board Replacement, Motherboard: 手順 5、 2の画像 2
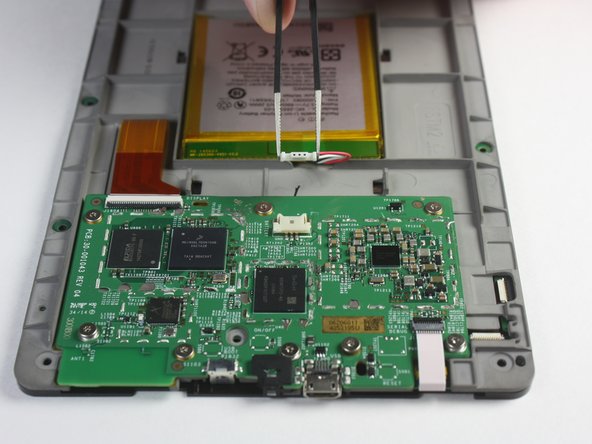
    • Flip the screen over to face the motherboard and battery pack.

    • Use the blunted precision tweezers to gently unclip and detach the cable connecting the battery pack and motherboard.

  6. Kindle 7th Generation LCD Circuit Board Replacement: 手順 6、 3の画像 1 Kindle 7th Generation LCD Circuit Board Replacement: 手順 6、 3の画像 2 Kindle 7th Generation LCD Circuit Board Replacement: 手順 6、 3の画像 3
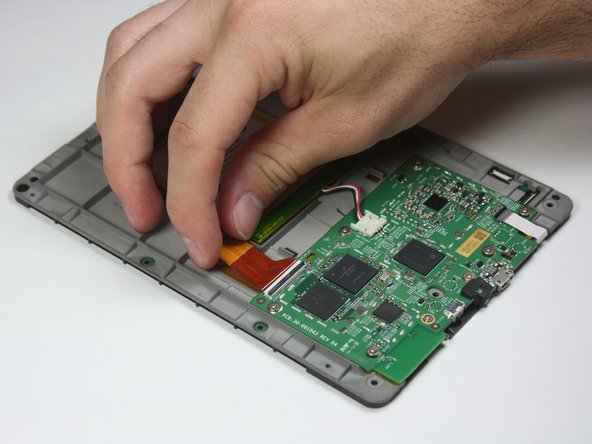
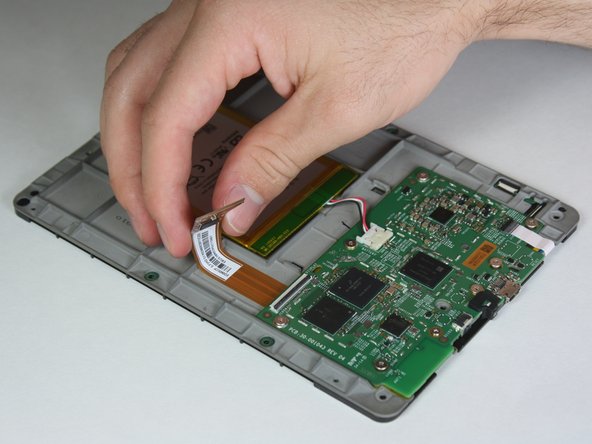
    • Use the tip of the spudger to flip up the small retaining flap on the copper colored zero insertion force (ZIF) connector.

    • Make sure to flip up the flap and not the connection itself.

    • Pull the cable from the connector.

    • No force is required to do this, as the name, ZIF, implies.

  7. Kindle 7th Generation LCD Circuit Board Replacement: 手順 7、 2の画像 1 Kindle 7th Generation LCD Circuit Board Replacement: 手順 7、 2の画像 2
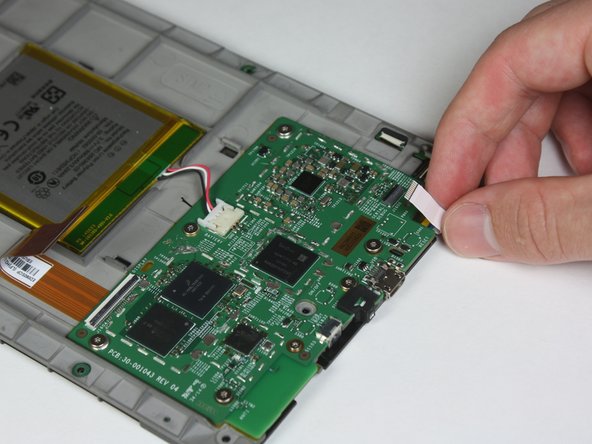
    • Similar to the previous step, flip up the retaining flap on the white cable connector.

    • Pull the white cable from the connection.

    • During reassembly, make sure the retaining flaps for both the white and copper colored cable connections are secured. As these are zero insertion force connections, the cables could potentially slide out if this is not done.

  8. Kindle 7th Generation LCD Circuit Board Replacement: 手順 8、 2の画像 1 Kindle 7th Generation LCD Circuit Board Replacement: 手順 8、 2の画像 2
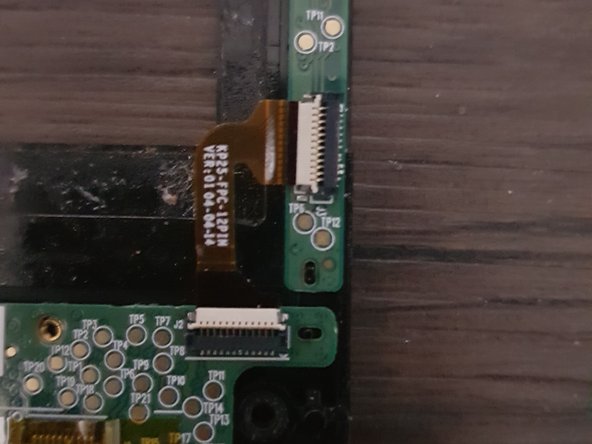
    • Disconnect the touch digitiser bridge cable by using your Spudger to lift up the white tabs on both connectors.

    • Use tweezers to pull out the cable.

    • The touch digitiser bridge cable is the one connecting between these two connectors.

  9. Kindle 7th Generation LCD Circuit Board Replacement: 手順 9、 2の画像 1 Kindle 7th Generation LCD Circuit Board Replacement: 手順 9、 2の画像 2
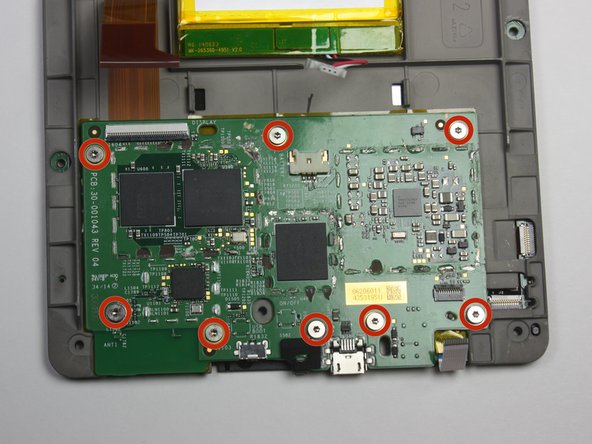
    • Use the T5 Torx screwdriver to remove the eight 3.0 mm Phillips Head screws.

    • Some screws have washers associated with them. It is important to keep track of the washers and remember which thread they came from.

  10. Kindle 7th Generation LCD Circuit Board Replacement: 手順 10、 1の画像 1
    • Remove the motherboard.

  11. Kindle 7th Generation LCD Circuit Board Replacement, LCD Circuit Board: 手順 11、 2の画像 1 Kindle 7th Generation LCD Circuit Board Replacement, LCD Circuit Board: 手順 11、 2の画像 2
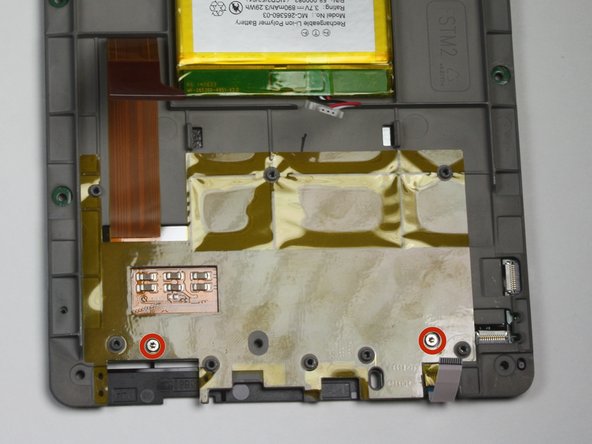
    • Remove the two 2.5 mm Phillips Head screws using the T5 Torx screwdriver.

  12. Kindle 7th Generation LCD Circuit Board Replacement: 手順 12、 1の画像 1
    • Run the plastic opening tool around the edge to separate the bezel from the adhesive.

  13. Kindle 7th Generation LCD Circuit Board Replacement: 手順 13、 1の画像 1
    • Lift the bezel from the screen.

    • Use care, the bezel and circuit board are flimsy and the adhesive is strong.

  14. Kindle 7th Generation LCD Circuit Board Replacement: 手順 14、 1の画像 1
    • Flip the bezel over to view the circuit board.

    • Use the T5 Torx screwdriver to undo the six 2.0 mm screws holding the circuit board to the bezel.

    • Remove the LCD circuit board.

終わりに

To reassemble your device, follow these instructions in reverse order.

ある他の人がこのガイドを完成しました。

作成者

3人の作成者と共同で作成されました。

Julien

メンバー登録日: 02/03/15

128 ポイント

1ガイドが承認済み

チーム

Cal Poly, Team 6-28, Amido Winter 2015 Cal Poly, Team 6-28, Amido Winter 2015人のメンバー

CPSU-AMIDO-W15S6G28

4 メンバー

18のガイドは作成済み

コメント 1 件

Where do you buy the replacement parts?

Freedom Rose - 返信

コメントを追加

統計データ:

過去 24時間: 2

過去 7 日: 6

過去 30 日: 32

今までの合計 4,435