はじめに
Kindle 3の破損したスクリーンを交換するための修理ガイドです。
必要な工具と部品
-
-
ネジで止められていたバッテリーの先端から、筐体よりバッテリーを持ち上げます。
The washer came loose. Will it be ok?
I lost one of the washers. What do they do and where can I buy one? What’s the specific name for it?
They hold the battery flat. Without it pulls the battery into a curve. I have plenty of spare parts, including motherboards, both Wi-Fi and 3G. I’m in the UK
-
-
-
-
画像で示した位置に留められた、6本のシルバープラスネジ を外します。
The components look slightly different from mine, eg there is a plastic covering the hard drive. what model is yours?
-
-
-
上部端から持ち上げて、マザーボード全体とミッドフレームアセンブリを一緒にKindle本体端からスライドして取り出します。作業は慎重に行なってください。
When lifting it out, it seemed to be affixed to something at the far bottom right corner (relative to the above photo), and required a bit of tugging before popping free, which was a bit alarming. Not sure where it was stuck. Was definitely lifting it away from the base first before lifting too far up.
Also this is a good point to be reminded not to lose the little battery washers from earlier (step 3) if you decided to be smart and leave them on the board! Remove them and place them with the screws.
-
-
-
筐体から破損したスクリーンを取り出します。
-
外側から内側へ軽く押します。 フレームを壊さないように注意してください。
Brilliant guide far simpler than any other I have seen.
Adding a reminder to remove the screen protector would be good as I forgot and had to re-do it.
-


デバイスを再組み立てする際は、これらの手順を逆の順番に従って作業を進めてください。
デバイスを再組み立てする際は、これらの手順を逆の順番に従って作業を進めてください。
97 の人々がこのガイドを完成させました。
以下の翻訳者の皆さんにお礼を申し上げます:
100%

Midori Doiさんは世界中で修理する私たちを助けてくれています! あなたも貢献してみませんか?
翻訳を始める ›
チーム

CSU Fullerton, Team 1-5, Bruce Fall 2014 CSU Fullerton, Team 1-5, Bruce Fall 2014人のメンバー
CSUF-BRUCE-F14S1G5
4 メンバー
7のガイドは作成済み
37 件のコメント
I did it!
But it worked only the third time I opened the kindle, the first and second time the screen stayed frozen with some horizontal lines, the third time I only unlatched and latched all the ribbon cables and...voila! it worked!
Thank you, Im VERY happy!
marferrero - 返信
Hi!!where have you buy the screen??? I've broken my today, and I doesn't want to buy another e-book reader yet!!
Thank you
Awesome Guide!!!
Ebay or this place has them.
http://www.powerbookmedic.com/Amazon-Kin...
The screw diagrams for grey and silver sets were very helpful!
note: There 2 or 3 odd cup-shaped washers that differ between versions. 2 go under the batter screws to keep height/pressure constant, on may be under a screw for the modem/RF module.
Yes! I did it! Kindle works properly! Many tnx!!!
Mike Titov - 返信
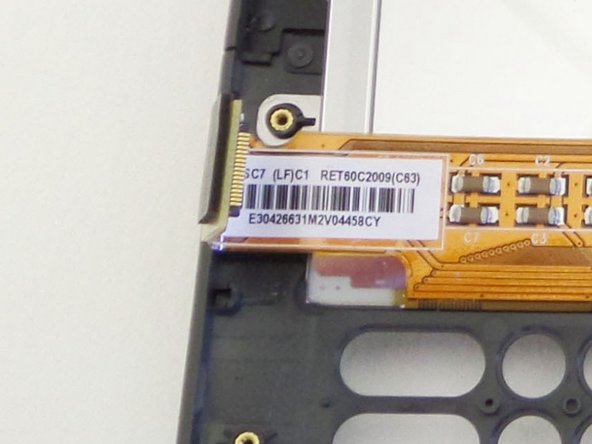
Please note before ordering: there are at least two different models of screen for the Kindle 3 keyboard.
ED060SCE(LF)T1-0I and ED060SC7(LF)C1 (you can find the model no. on a sticker on the back of the screen). My UK 3G model had the ...C1 built in. Be sure to order the correct one. The ...T1 screen will work as a replacement for the ...C1 model, but badly (text is fine, images and screensavers are not display correctly).
Broke screen Friday night stripped down 30 mins on Saturday morning (my tip is to take all the black screws out the start at the battery and take the silver ones out until the board 'falls' out). Received new screen Monday and less than an hour later Kindle working again. Thank you for all this information. Cheers
Just did this again. The last time on this Kindle I was a little brutish snapping the case back to gather and broke the replacement screen. Now that replacements screen are down to $16 I did it again and was much more careful when getting the last couple case latches seated. All good. Beats putting it in a landfill.
my screen was not cracked but appeared to be frozen with one of the screen saver images on it. I tried every possible way to reboot and nothing worked. I assumed the screen was shot and ordered a new one from ebay. It arrived today and when i opened the package the new screen already had an image showing on it. I was expecting the new screen to be blank before installation. i installed it and still nothing. I am not sure if I got a bad screen from ebay or if the problem with the kindle is not the screen but something else. Anyone have any ideas??
From Zero to Hero - 1 x wife HAPPY :-)
Thanks - this was a great help
Thanks - Thanks - Thanks Thanks - Thanks - Thanks Thanks - Thanks - Thanks Thanks - Thanks - Thanks Thanks - Thanks - Thanks
I just changed my Kindle screen with the help of this great guide.
My Kindle does not contain 3G module. A dummy plastic block is in place, instead.
Also the 3G antenna is absent, so it means one less silver screw than indicated.
I also had metal rings between the battery and the motherboard that does not appear in this guide.
If I should issue a warning about any difficulties I met in the process, it would be (from the harder to the easier) : connect ribbon cables, separate back panel, disconnect ribbon cables, gently remove old screen without breaking appart the casing that holds it and put back the back panel.
I also got another crack on the old screen while I removed it but as it was already dead, this is not too much a trouble.
Thanks a lot anyway !
Great tutorial. Replaced my kindle screen today thanks to you !
Take seriously what ibreakit wrote on 12/04/2015. I ordered a replacement screen without clarifying that I needed the C1 variety, a different one arrived and the texts were unsharp and the images even ghosty. Fortunately the seller sent a second one (a C1) without requiring the first one back, but you might not have such good luck. It works fine now.
Followed Dave's guideline's and it worked like a charm! Very easy and smooth! I would recommend taking it apart before ordering, though, due to the aforementioned display variants. Thankfully, I got lucky and got a C1. My faithful old Kindle is good as new now! (also replaced front panel that was cracked)
Wonderful guide, thanks for helping me save my Kindle!!!
Wonderful guide, worked a treat.
An excellent guide. I ordered replacement screen from EWWT group in Hong Kong and used these instructions to remove cracked screen and replace new one. It now works a treat. As good as new !
Nice guide. Be careful when prying back cover open, left side at the back, from middle to bottom, you may damage screen ribbon cable (visible in step 5, orange mark) if you push too deep. I was lucky to just unplug it, so I replaced screen successfully.
NOTE: very helpful hints in notes from Mike Kobb, there is no need to remove all connectors and all screws. Motherboard can be flipped over together with the frame. It shortens the entire procedure to just 20-25 minutes.
Thank you, just replaced my kindle’s screen following your directions!!!
Simple straight forward instructions. Screw location guide was perfect. Good to go. Thanks!
Excellent guide the hardest bit was getting the back off mainly because I was unclear which bit you had to try and get off and was trying to pry off 2 small slits in the side but it’s the very back seam with no gaps and you do need a thin flat widget and patience. I now have a working kindle 3 again with the help of this guide and a replacement screen from China via ebay. Some guides say remove and disconnect extra bit but this one worked fine. Tiny screwdriver and flat widget required.
This was a great guide. Caution to future fixers: it might be that your model's screen is affixed with entirely too much adhesive. After gentle pushing and pulling (more of a slow rocking inward and outward motion) for about ten minutes, I finally tried to semi-pry it loose using the pick I had on hand for spudging (my spudger wasn't thin enough) and it was verrry delicate work to keep the frame from snapping or otherwise coming apart.
I also learned that my particular model for which I was replacing the screen has an area on the motherboard for a SIM and a big black plastic retaining house(?) for a data card, but…no SIM nor data card, as is shown in these pictures. However, in the Kindle I'd torn down for parts, it had a SIM and data card as shown. Bizarre. I assume mine was a prelim model? Idk. Both are D00901, but it's probable that mine is an earlier.
Either way, great guide and thanks so much!
Thank you for all the help. Just finished replacing my kindle screen. Now, it works wonderfully.
Hello! I need to fix my Kindle 3 screen, and this looks like a great guide! But I can’t find the screen replacement anywhere. Does anyone have a link for one? Thanks!
My screen also displays only the bottom half since today.
Amazon and the linked merchants seem to have run out of stock, but I found some overpriced screens on ebay and some promising ones on alibaba and aliexpress.
For example here
https://www.aliexpress.com/item/32857584...
https://www.ebay.de/itm/6-zoll-fur-Amazo...
https://www.aliexpress.com/i/32993341980...
https://www.aliexpress.com/item/18371337...
Mostly that’s the C1 version. ForT1 displays I didn’t see much.
Thank you! I really appreciate the high-detail tutorial
I found this very helpful but wanted to add one piece of advice. I got the right screen but when I fitted it, it looked very grainy and the pictures just became dim outlines and I initially assumed I’d been sent the wrong type of screen. However, before I complained to the ebayer, I found some other advice. Leave the battery plugged in to exchange screens. When the battery is removed the internal screen settings disappear and the quality plummets. The advice was to replug the old screen in (just open the back and unplug the screen connector) and do a full reset (hold switch to on for 30s), then swap the connectors. The screen was then fully restored. I was also advised to keep the old screen (or at least the connector and eeprom) as any time the battery is replaced, the same issue will recur. If your screen looks faint/grainy, this may solve the problem.
Replaced screen and only borders works ( screen under box, 2 mm from edge). The main screen stay frozen. What can I do?
Replacing my kindle screen was the first time I'd done anything like this, so I was very grateful for such clear instructions and photographs! It worked and I'm very happy to keep my kindle :)
Only one thing that wasn't as described - taking off the back is quite hard and required real tugging.
Cassie Mae - 返信
Unless you also plan to replace the battery, there is no need to remove it from the mother-board to access the screen.
All you don't want is a short circuit when manipulating the board and causing damage to the device or hurting yourself. Disconnecting the battery is the smart thing to do before touching any electronic circuit.
Thiago M -
This was a helpful guide and worked well. These screens are harder to find in 2024. I found one on AliExpress for ~$18 including shipping. Make sure to check your screen model before ordering.
Ah, I put it on in the wrong order, then figured out that starting at the bottom works best. I did the bottom, top and corners and then the sides, because I already had the top done.
kwood - 返信
BE VERY CAREFUL HERE!! 15mm below the "next page" button was directly where the flex cable was. And it is an extremely fragile cable, even for flex cables. Which means I, of course, tore right through it without knowing until I got the cover off. So don't do that. Start 15mm above the lower corner, if anything, or start on the opposite side. Starting on the side with a single-point-of-failure is a really risky choice. The opposite side has basically nothing up against the edge, so you're free to poke it.
The other thing that isn't stated here is that the flex cable is inherently tied into the screen. Which means that if you, like me, damage that cable, the entire screen now broken and needs replacing. And if you, like me, was just trying to replace the battery or the motherboard, now it just makes sense to replace the entire device, both environmentally and financially. Whomp whomp.
bhurwitz - 返信
As is, the guide sets you up SPECIFICALLY to DAMAGE THE SCREEN by prying into its very delicate ribbon cable.
A Kenny - 返信
Apart from the buttons, are there any other specific places where we shouldn't pry, because it would damage something?
okojoijohoij - 返信
There are clips a several centimeters from the edge of the Kindle across from the page-turning buttons. Undoing these clips was the most difficult part of opening the back of the Kindle. Be careful and take your time here.
It's a good idea to start on at the left page-turning button to help minimize risk of damage to the flex cable.
John Thoreson - 返信