メインコンテンツにスキップ

Kindle 2 Screen Replacement

必要な工具と部品

  1. Kindle 2 Screen Replacement, Battery: 手順 1、 3の画像 1 Kindle 2 Screen Replacement, Battery: 手順 1、 3の画像 2 Kindle 2 Screen Replacement, Battery: 手順 1、 3の画像 3
    • Lay the Kindle face down on a soft cloth to protect its screen.

    • Wedge the plastic opening tool in the small opening between the grey plastic and the metal casing.

    • Move the plastic opening tool across the opening while pressing down to separate the grey plastic from the metal casing.

    • Slide the gray plastic top piece away from the Kindle's metal casing.

    • Once the gray plastic top piece is detached from the metal back cover, remove it.

  2. Kindle 2 Screen Replacement: 手順 2、 2の画像 1 Kindle 2 Screen Replacement: 手順 2、 2の画像 2
    • Use a Phillips #00 screwdriver to remove the two 4 mm screws from the metal casing.

  3. Kindle 2 Screen Replacement: 手順 3、 2の画像 1 Kindle 2 Screen Replacement: 手順 3、 2の画像 2
    • Use the plastic opening tool to push down and pry towards the metal casing to release each of the three clips that hold the metal case in place.

    • Remove the metal casing.

    • The volume control button rests in a slot on the side of the Kindle. When the metal casing is removed, the volume control button may fall out. When reassembling, place the volume control button back into its slot.

  4. Kindle 2 Screen Replacement: 手順 4、 1の画像 1
    • Use a Phillips #00 screwdriver to remove the two 3 mm screws that hold the battery in place.

    • The battery should be removed before continuing with the rest of this guide to prevent harm to you and the device.

  5. Kindle 2 Screen Replacement: 手順 5、 2の画像 1 Kindle 2 Screen Replacement: 手順 5、 2の画像 2
    • Pry upward under the black tab with the spudger to dislodge the battery.

    • Use your fingers to lift the battery out of the device.

  6. Kindle 2 Screen Replacement, Wireless Card: 手順 6、 1の画像 1
    • Rotate the Kindle 180 degrees. Locate the wireless card with the AnyData logo on the top left and the FCC symbol on the right.

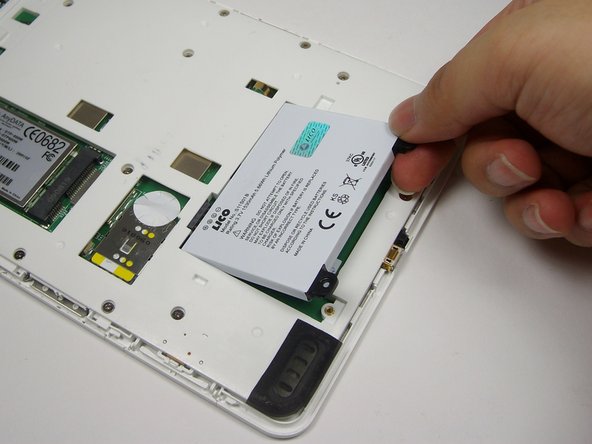
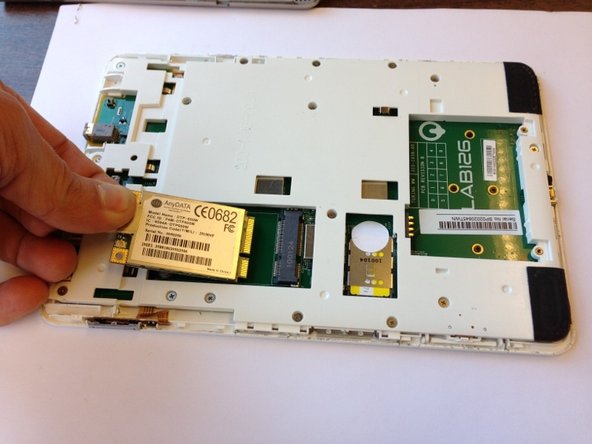
    • Use a Phillips #00 screwdriver to remove the two 2mm screws from the wireless card.

  7. Kindle 2 Screen Replacement: 手順 7、 1の画像 1
    • Use the plastic opening tool to wedge underneath the connection and gently pop off the wire cap.

  8. Kindle 2 Screen Replacement: 手順 8、 2の画像 1 Kindle 2 Screen Replacement: 手順 8、 2の画像 2
    • Use your fingers to lift the left end of the wireless card.

    • Pull the card out of the slot.

  9. Kindle 2 Screen Replacement, Motherboard: 手順 9、 2の画像 1 Kindle 2 Screen Replacement, Motherboard: 手順 9、 2の画像 2
    • Remove 16 screws from the midframe.

  10. Kindle 2 Screen Replacement: 手順 10、 3の画像 1 Kindle 2 Screen Replacement: 手順 10、 3の画像 2 Kindle 2 Screen Replacement: 手順 10、 3の画像 3
    • Use the plastic opening tool to push each side of the crimp away from each other. This will open the crimp holding the wire.

    • Use your fingers to lift the wire out of the crimp when there is enough separation between the sides of the crimp.

  11. Kindle 2 Screen Replacement: 手順 11、 3の画像 1 Kindle 2 Screen Replacement: 手順 11、 3の画像 2 Kindle 2 Screen Replacement: 手順 11、 3の画像 3
    • Wedge the opening tool underneath the plastic ribbon and gently pull up to lift the brown connector flap.

    • Squeeze the plastic ribbon gently with the tweezers and pull away from the connector to remove it.

  12. Kindle 2 Screen Replacement: 手順 12、 1の画像 1
    • Locate the next brown connector three inches to the right of the previous connector and repeat Step 10 to remove the plastic ribbon.

  13. Kindle 2 Screen Replacement: 手順 13、 2の画像 1 Kindle 2 Screen Replacement: 手順 13、 2の画像 2
    • Rotate the device 180 degrees and locate a smaller brown connector on the left side of the device.

    • Repeat Step 10.

  14. Kindle 2 Screen Replacement: 手順 14、 1の画像 1
    • Push your finger down on the last plastic ribbon.

    • Slide your finger away from the connector to remove the last ribbon.

  15. Kindle 2 Screen Replacement: 手順 15、 1の画像 1
    • Use a Phillips #00 screwdriver to remove the four 4 mm screws from the motherboard located around the LAB126 logo.

  16. Kindle 2 Screen Replacement: 手順 16、 1の画像 1
    • Grab the bottom corner of the motherboard and safely remove it from the Kindle.

  17. Kindle 2 Screen Replacement, Screen: 手順 17、 1の画像 1
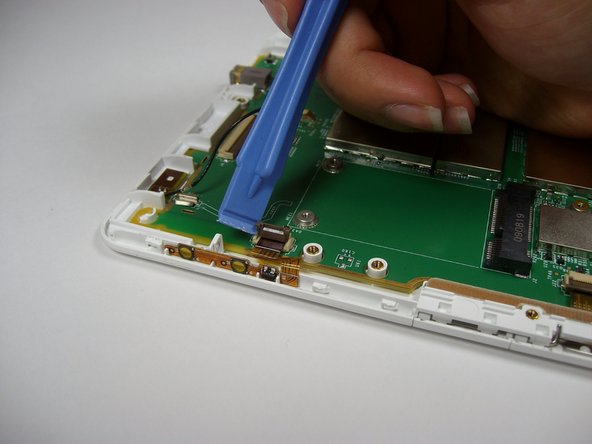
    • Flip the motherboard over so the screen is facing up.

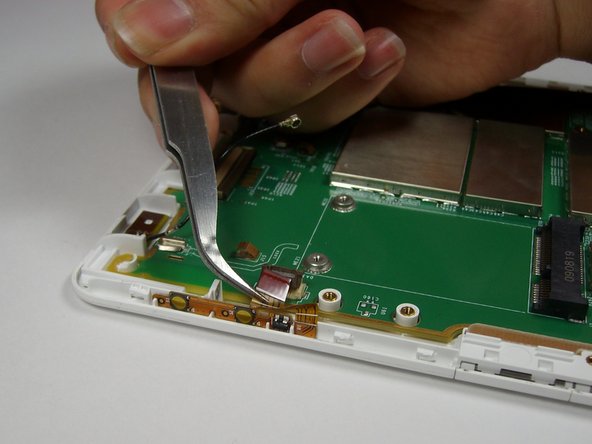
    • Using your fingers, gently pull off the plastic header bar located at the top of the screen attached to the motherboard.

  18. Kindle 2 Screen Replacement: 手順 18、 3の画像 1 Kindle 2 Screen Replacement: 手順 18、 3の画像 2 Kindle 2 Screen Replacement: 手順 18、 3の画像 3
    • The screen is attached to the motherboard with double sided tape.

    • Pry underneath all four sides of the device with the plastic opening tool to remove the screen from the motherboard.

終わりに

To reassemble your device, follow these instructions in reverse order.

25 の人々がこのガイドを完成させました。

作成者

7人の作成者と共同で作成されました。

Dayna Scott

メンバー登録日: 04/16/13

955 ポイント

5のガイドは作成済み

チーム

Cal Poly, Team 12-32, Amido Spring 2013 Cal Poly, Team 12-32, Amido Spring 2013人のメンバー

CPSU-AMIDO-S13S12G32

4 メンバー

14のガイドは作成済み

7 件のコメント

Great guide!

My replacement screen came with a spudger like the one shown, but it was pretty mangled by the time I got the back off. I had much better luck with another spudger shaped like a guitar pick.

Yeah, the step to remove the inner plastic protector is missing. It is pretty obvious that it needs to happen, but it would be good to include in the guide.

The ribbon for the screen needs to be pushed in further than the other ribbons, and took a bit of wiggling. FYI for others attempting this!

Hannah - 返信

I followed this guide, but the screen is still on the "Amazon Kindle" screen that was on the replacement when it came in the mail. I opened it to ensure the ribbons are all in place. It's fully charged (green light) and the computer can see it as a hard drive. Calibre can also see all the books are still in place. Any ideas what connection I need to recheck to get the replacement screen working? I'd love to get my old Kindle 2 back in business!

tanderson92 - 返信

Answering my own question in case it helps anyone. It turns out the ribbon for the screen (the last one removed in Step 14) wasn't far enough in the connector. I was trying it with the line about even with the "39" on the board, which wasn't far enough. After the eBay seller kindly gave me some tips, I was able to manhandle the ribbon closer to the connector, and now the screen works great!

tanderson92 -

Where can I get one of those replacement screens?

Andie - 返信

In order to be pre-prepared, (I'm pretty sure the double-sided tape holding the screen to the motherboard will need replacement after years of service) is the tape of the fairly thick foam variety or the much thinner plastic ribbon style?

Richard Herndon - 返信

コメントを追加

統計データ:

過去 24時間: 0

過去 7 日: 4

過去 30 日: 37

今までの合計 22,223