はじめに
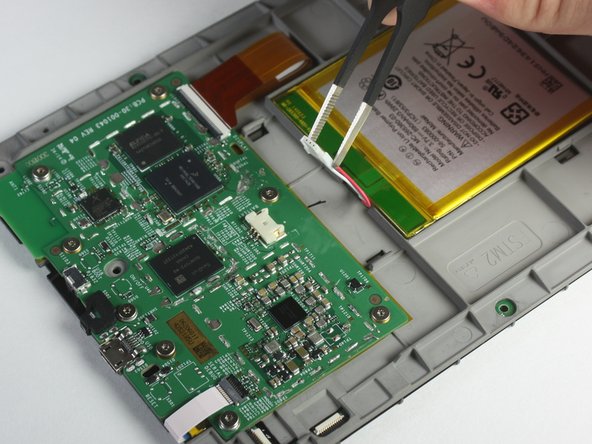
バッテリーの交換が近づいてきましたか?このサイトを見つけていただき、ありがとうございます。バッテリーの交換はKindle 7世代の中で最も簡単に交換ができるコンポーネントです。このガイドに従って、作業を進めてください。
必要な工具と部品
-
-
ブルーのプラスチック開口ツールを使って、各コーナーのクリップを外して、フロントパネルの接着剤を剥がします。
-
ツールを継ぎ目に沿ってスライドして、フロントパネルをこじ開けます。
-
-
-
フロントパネルを剥がして、Kindleより取り出します。
-
フロントパネルを破損しないように、パネルをコーナーからKindle中央に向けて剥がします。
What is the adhesive you are using resecure the screen? Would Tesa 61395 Tape work (4mm) or would this create protrusion?
Did that option work for you? I'm about to try and change my battery and don't have any idea on what backup adhesive to have
Lagroth -
-
-
-
T5トルクスドライバーで、 5.0 mmプラスネジを10本外します。
You will break the newer vision of kindle just like this. there is a peg that connect the top center of the screen to the back case. Remove the black double sided tape in the center and push this peg back .
If you see black double sided tape at the top of your Kindle, as the commenter above did, you are on the wrong model—have a look here to see if this is your model: Kindle Paperwhite 3rd Generation Screen/Display Touch Panel Replacement
-
-
デバイスを再組み立てする際は、これらの手順を逆の順番に従って作業を進めてください。
デバイスを再組み立てする際は、これらの手順を逆の順番に従って作業を進めてください。
23 の人々がこのガイドを完成させました。
以下の翻訳者の皆さんにお礼を申し上げます:
100%
これらの翻訳者の方々は世界を修理する私たちのサポートをしてくれています。 あなたも貢献してみませんか?
翻訳を始める ›
16 件のコメント
Where do I get a new battery from please?
You can get the batteries on Ebay.
Does replacing the battery reset the Kindle 7 to factory defaults?
No. I just replaced my battery, and it booted with my settings and content.
I have a 7'th gen kindle paperwhite, and inside the screws look nothing like the pictures here! :(
1. There are way more screws, but none of them a torx.
2. The battery is screwed down, and is in a hard black plastic package
3. the main board is edge-to-egde, and with 3 ribbon connectors goring around the sides
4. main board has 4 metal housings hiding all the chips
Thanks for this! But as others have said, this doesn't look like my 7th generation Kindle Paperwhite (I'm in the UK – I guess it’s possible there might be regional differences?).
But the principle is just the same. Be prepared for 11 crosshead screws instead of ten Torx. The nice thing about the 7th gen is that the battery is in a rigid carrier held down by three screws instead of glue. I’m impressed with the repairability of this Kindle, and the build quality too.
Comment savoir si la batterie est à remplacer ? merci
You could have mentioned that this is not a Kindle Voyage 7th Generation! Your instructions have had me trying to prise the back off one of those when it just needs the top panel removing and 4 screws undoing. Thanks to ifu##it.com, I have ruined a Kindle. Thanks very much, I won't be ordering any more tools from you!
Hello @tonywinter47915
i understand that your situation is really unsettling. The Kindle and the Kindle Voyage are completely different devices, even if they are both Kindles and they are both black. It is absolutely unsatisfying, I understand that, but you cannot blame iFixit for buying the wrong sparepart or using a wrong guide.
If you still need to contact the support, feel free to contact them at support@ifixit.com
In case you need some more support fixing your Kindle Voyage, we have some guides to fix issues with it: Kindle Voyage
BenZ78 -
"i understand that your situation is really unsettling. The Kindle and the Kindle Voyage are completely different devices, even if they are both Kindles and they are both black. It is absolutely unsatisfying, I understand that, but you cannot blame iFixit for buying the wrong sparepart or using a wrong guide."
Don't you think that adding a clarification to the Kindle 7 guides that it is not the Kindle 7 Voyage would be more helpful than telling me they are both Kindles and both black?


i had a battery that wouldn't even last a full day in the end. by accident i let the battery fall below 10% charge and when turned on it only showed the battery icon. I fully charged it and now i am having no problems with it. what i think happened is it reset the batteries memory and that was the problem. worth trying anyway before buying a new battery.
soupamanx - 返信