はじめに
Disassembling the gearbox to replace the SER1018 planetary gearbox
必要な工具と部品
-
-
Loosen the 6-point nut
-
Pull the planetary gear straight out
-
Loosen the Torx screws that hold the bottom of the case
-
-
-
Remove the bottom case
-
The rubber gasket can be removed for cleaning
-
Remove felt mat
-
-
-
Remove the Phillips screws to remove both plastic parts
-
The plastic parts are different
-
The screws are Imperial not Metric
-
-
-
Remove the three torx screws
-
Lift off the housing cover
-
Pay attention to the white rubber buffer (red square)
-
-
-
-
If the plastic drive wheel was removed in the above step, the next step can be skipped.
-
Loosening the Tx20 screw hidden by the plastic drive wheel is challenging
-
I was not able to pull off the plastic drive wheel
-
If you want to take a chance, you can drill a hole in the plastic drive wheel. However, I did not have the courage to do so.
-
I made myself a special tool -> see next step
-
-
-
I machined a 6mm open end wrench to be form fit with the Tx20 bit
-
A slot has been cut in the screw for easier re-assembly
-
-
-
Remove guides (marked in red). They can be used after closing the case.
-
Remove seal. Has been replaced with silicone sealant.
-
-
-
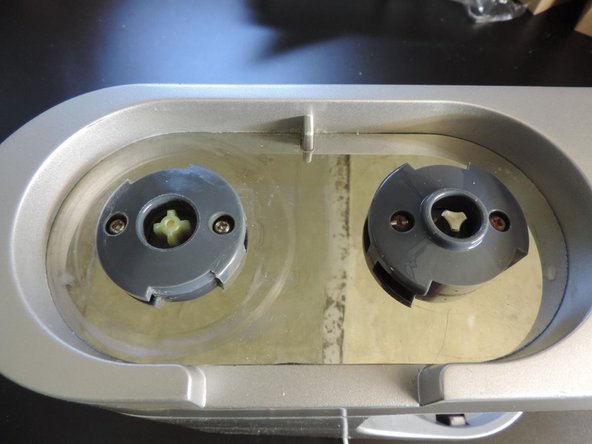
The one with the cross drive is the old one
-
The new one has a bayonet lock. However, the whisks and kneading hooks are in the same position, opposite of the mixing bowl.
-
Difference in gear thickness doesn't seem to have an effect on the function.
-
-
-
Cod. SER1018: Label from the plastic bag containing the three spare parts
-
Planetary gear label
-
6-point nut: label and part
-
-
-
There is a lot of grease in the housing. Grease all the parts to be well lubricated.
-
Replace seal. See step 8.
-
Stand the machine upright on its feet and place the arm in the horizontal position. With the arm raised, the shaft falls out from the slow drive.
-
Gently push the parts together.
-
When disassembling, the screws were loose. That's why they were secured with a drop of screw lock.
-
Introduce the guides into the right places
-


Continue from step 6 in reverse order to reassemble the device.
Continue from step 6 in reverse order to reassemble the device.
3 の人々がこのガイドを完成させました。
以下の翻訳者の皆さんにお礼を申し上げます:
100%

oldturkey03さんは世界中で修理する私たちを助けてくれています! あなたも貢献してみませんか?
翻訳を始める ›
10 件のコメント
Hallo , sehr tolle Anleitung!! Meine Frage - nach dem Tausch des kompletten Getriebes (keine Einzelteile wie Zahnräder und dergleichen) wird das Getriebe nach ca. 10 -15 min. Knetarbeit sehr sehr heiß! Man kann sich eigentlich daran Verbrennungen zuziehen. Was kann da die Ursache sein??
Vielleicht hast du eine Idee dafür?
Lg Heinz
Hallo Bruno,
das ist ja eine geniale Anleitung - KOMPLIMENT!
Bevor ich das Gerät zerlege, hätte ich eine Frage.
Zwischen Gummi und Planetengetriebe (siehe Bilder Step 1+2) fallen im Betrieb schwarze Krümel raus…
Was könnte das sein (hart gewordenes Getriebefett)?
Danke
Peter
Hallo Bruno,
vielen Dank für die detailierte Anleitung. Mir ist es gelunge das grosse Kunststoffzahnrad abzuschrauben, obwohl das verlinkte Video nicht funktioniert. Bei mir ist aber der untere Getriebedeckel gebrochen. Daher meine Frage: wo beziehst du deine Ersatzteile? Die meisten kommen aus UK oder Italien oder aus “zur Zeit nicht lieferbar”. Gibt es noch eine schlaue Quelle die Dr. Google unbekannt ist?
Danke
Armin