メインコンテンツにスキップ

Jura Impressa S Model Water Boiler repair/replacment

必要な工具と部品

  1. Jura Impressa S Model Water Boiler repair/replacment, How to open a Jura Impressa S model cover: 手順 1、 2の画像 1 Jura Impressa S Model Water Boiler repair/replacment, How to open a Jura Impressa S model cover: 手順 1、 2の画像 2
    • Always remove the power cord from the wall outlet.

    • Lift out the coffee tray

    • Remove the lid sealing the coffee bean container

    • Remove all of the coffee beans you can possibly remove.

    • Pull the adjuster of the coffee bean grinder straight up

    • Remove the four T15 Torx screws

  2. Jura Impressa S Model Water Boiler repair/replacment: 手順 2、 2の画像 1 Jura Impressa S Model Water Boiler repair/replacment: 手順 2、 2の画像 2
    • Remove the cup heat plate.

    • It can be opened like a book.

    • Below the cup heat plate there are three more T15 Torx screws. Remove them.

  3. Jura Impressa S Model Water Boiler repair/replacment: 手順 3、 1の画像 1
    • The top cover is now free. Lift ´er up and set ´er aside.

  4. Jura Impressa S Model Water Boiler repair/replacment, Jura Impressa S model front cover: 手順 4、 2の画像 1 Jura Impressa S Model Water Boiler repair/replacment, Jura Impressa S model front cover: 手順 4、 2の画像 2
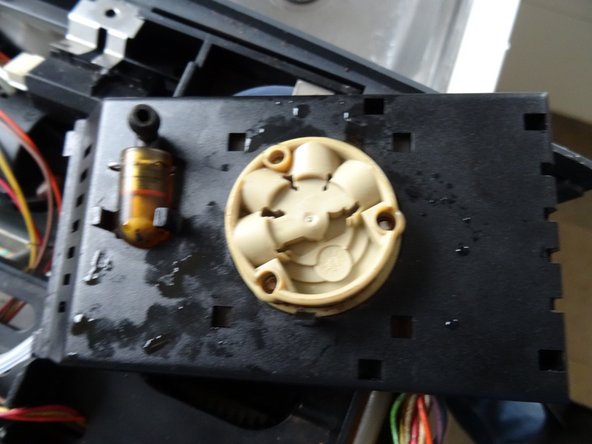
    • Remove the knob for the steam valve by simply pulling it off.

    • The front cover is secured with a Torx T15 screw. Remove it.

  5. Jura Impressa S Model Water Boiler repair/replacment: 手順 5、 1の画像 1
    • Now the front cover can be opened like a door for a few inches. The hinge is on the left.

  6. Jura Impressa S Model Water Boiler repair/replacment: 手順 6、 1の画像 1
    • Various hoses hinder the further opening of the front cover. You need to remove the steam valve keypad from the cover.

    • Use a spudger to lift the two notches at the top of the front cover a bit to release the keypad at the top.

    • Lift the keypad upwards and pull it to the back. The steam pipe will slide out from its connection.

    • All hoses can remain connected.

  7. Jura Impressa S Model Water Boiler repair/replacment: 手順 7、 1の画像 1
    • Remove the silicone hose leading from the steam valve to the coffee spout. If it is secured with a cable tie which must be removed first.

    • The front cover is now free and can be opened.

  8. Jura Impressa S Model Water Boiler repair/replacment, Water Boiler: 手順 8、 3の画像 1 Jura Impressa S Model Water Boiler repair/replacment, Water Boiler: 手順 8、 3の画像 2 Jura Impressa S Model Water Boiler repair/replacment, Water Boiler: 手順 8、 3の画像 3
    • The first picture shows the front of the unit, the other two pictures the back.

  9. Jura Impressa S Model Water Boiler repair/replacment: 手順 9、 3の画像 1 Jura Impressa S Model Water Boiler repair/replacment: 手順 9、 3の画像 2 Jura Impressa S Model Water Boiler repair/replacment: 手順 9、 3の画像 3
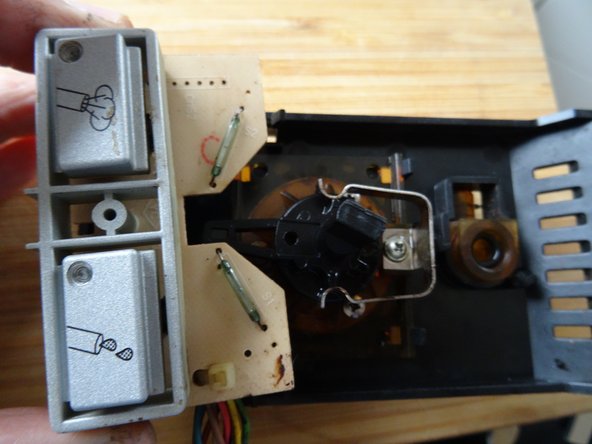
    • Loosen the clips on the black cover and carefully lift it off.

    • Pull out all hose connections. There are small O-rings at the ends, they may also be stuck in the valve body. Remove the O-rings and replace them with new ones when reassembling.

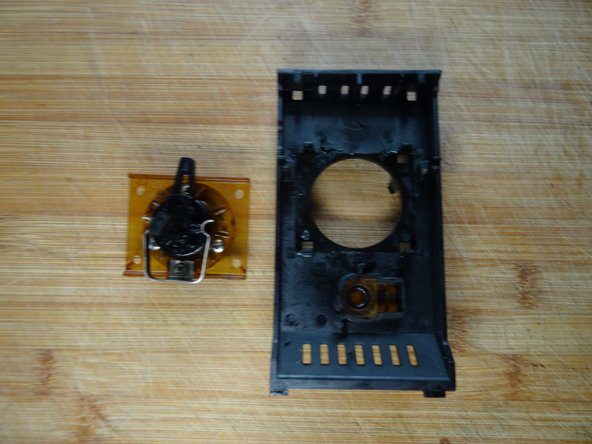
    • Note exactly where which hose is connected, e.g. by taking a photo, or mark the connection points. In the third photo, the connections are marked (this may also look different on some models):

    • H = Heating

    • S = Steam generator on

    • S = Steam generator off

    • A= Pressure release valve (elbow)

    • P = Pump

  10. Jura Impressa S Model Water Boiler repair/replacment: 手順 10、 2の画像 1 Jura Impressa S Model Water Boiler repair/replacment: 手順 10、 2の画像 2
    • Carefully unclip the circuit board with the switches. Caution: the two reed switches (marked green) are made of glass and break very easily.

    • Release the two latches on the pushbutton board.

    • Lift the board very carefully by the bottom and pull it off the unit.

    • The unit is free.

  11. Jura Impressa S Model Water Boiler repair/replacment: 手順 11、 2の画像 1 Jura Impressa S Model Water Boiler repair/replacment: 手順 11、 2の画像 2
    • Loosen the four latches on the steam valve.

    • Gently lift the steam valve upwards.

  12. Jura Impressa S Model Water Boiler repair/replacment: 手順 12、 1の画像 1
    • In the next steps you have to be very careful: inside the valve there are two ceramic discs that stick easily. If they fall off, they break easily and are broken.

    • Loosen the three Phillips screws on the black valve bonnet and very slowly lift it upwards off the valve body.

  13. Jura Impressa S Model Water Boiler repair/replacment: 手順 13、 3の画像 1 Jura Impressa S Model Water Boiler repair/replacment: 手順 13、 3の画像 2 Jura Impressa S Model Water Boiler repair/replacment: 手順 13、 3の画像 3
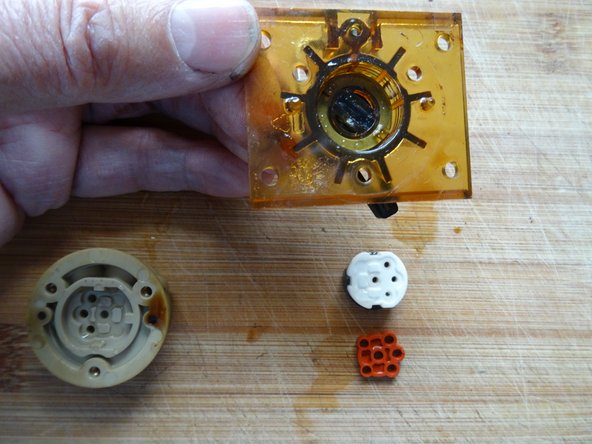
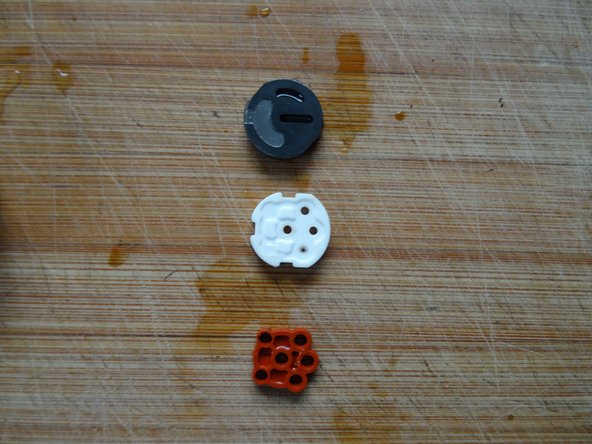
    • Turn the valve bonnet over. The molded seal becomes visible. Make sure that it is seated correctly; it must be seated in the valve body again later, otherwise the valve will not work.

    • Carefully lift out the molded seal and the two ceramic washers. Note the exact installation position.

    • Now you can clean all parts. If the seal is defective, you need to replace it.

    • Pay close attention to the correct orientation when assembling.

終わりに

Work through the steps in reverse order to reassemble your device.

以下の翻訳者の皆さんにお礼を申し上げます:

de en

100%

shingleさんは世界中で修理する私たちを助けてくれています! あなたも貢献してみませんか?
翻訳を始める ›

作成者

1人の作成者と共同作成されました。

VauWeh

メンバー登録日: 10/19/15

203,663 ポイント

246のガイドは作成済み

チーム

Repair is War on Entropy Repair is War on Entropy人のメンバー

Community

25 メンバー

1,126のガイドは作成済み

11 件のコメント

How can i find the right hose connections? I have a Jura S75, and i lost my picture about the connections.

M Hunor - 返信

See 3rd picture in step 9

VauWeh -

I connencted like that, but at the bottom of the brewing unit there is a pipe and the water flushes from that. Maybe i connencted a wrong pipe?

M Hunor -

OK, here are two documents (in german), which will hopefully help:

(1) https://www.yumpu.com/de/document/read/7...

(2)

https://www.juraprofi.de/anleitungen/BND...

VauWeh -

Follow the way of the water! The pipe on the bottom of the brewing unit leads into the drainage valve. Normally this is closed and the fresh hot water coming from the ceramic valve via heater flows into the lower piston and changes to coffee. It only opens - the loud "clack" - for a short moment, when the brewing cycle ends for pressure release. Maybe the drainage valve is permanent open?

VauWeh -

コメントを追加

統計データ:

過去 24時間: 1

過去 7 日: 9

過去 30 日: 48

今までの合計 965