メインコンテンツにスキップ

Jura Impressa C E F models coffee dispenser replacement

必要な工具と部品

  1. Jura Impressa C E F models coffee dispenser replacement, Jura Impressa Type C E F opening procedure: 手順 1、 1の画像 1
    • The instructions are suitable for nearly every model of Jura and similar ones e.g. AEG and Krups.

    • Unplug!

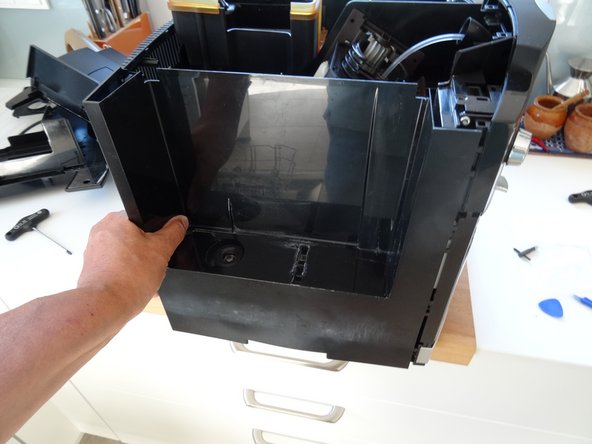
    • Remove the water reservoir.

  2. Jura Impressa C E F models coffee dispenser replacement: 手順 2、 3の画像 1 Jura Impressa C E F models coffee dispenser replacement: 手順 2、 3の画像 2 Jura Impressa C E F models coffee dispenser replacement: 手順 2、 3の画像 3
    • On the rear side is an obstacle: four "oval head screws" looking like rivets. You can remove them using a special oval drive bit. They are sold at iFixit with the tool kits as well as some Jura suppliers or somewhere in the internet. Jura wants to keep us out of our own machines!

    • Using an oval head bit you can screw them out. If you haven´t got one you can carefully use pliers. It is a good idea to later change the screws for normal ones.

    • You can even create your own specialty tool

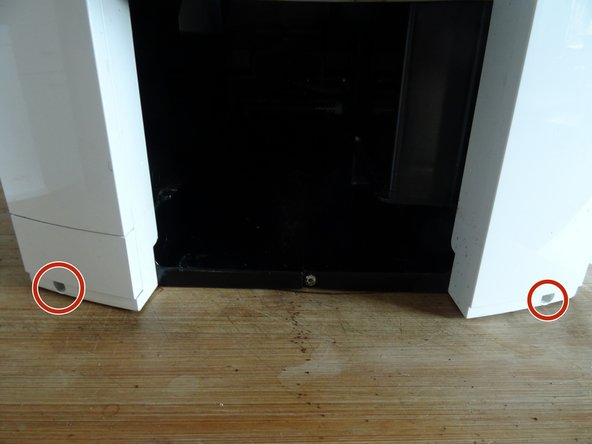
    • Beneath both top side covers are two Torx T15 screws. Remove those. Now lift off the whole top cover. Sometimes it jams and you have to use a bit of force.

    • The side covers must be pushed backwards by about 1 cm. Sometimes this is a little bit difficult to move. If necessary, wedge a plastic opening tool into the gap between the side covers and the front panel. The rear cover can be easily removed.

  3. Jura Impressa C E F models coffee dispenser replacement, Coffee dispenser: 手順 3、 2の画像 1 Jura Impressa C E F models coffee dispenser replacement, Coffee dispenser: 手順 3、 2の画像 2
    • Unscrew the two T10 Torx screws at the bottom of the front panel.

  4. Jura Impressa C E F models coffee dispenser replacement: 手順 4、 1の画像 1
    • Unscrew the T15 Torx screw on the right.

  5. Jura Impressa C E F models coffee dispenser replacement: 手順 5、 1の画像 1
    • Remove the T15 Torx screw from the left side as well

    • The front cover is still connected on the bottom by two bayonet like fasteners. Lift the machine slightly up and release the fasteners and remove the front cover

    • Insert translation here

    • The front is still connected to the rest of the machine with some wiring and the steam hose. To remove the steam hose, simple pull the hose clamp off. Depending on the repair the cable can either stay connected or can be separated from the front by the connector.

  6. Jura Impressa C E F models coffee dispenser replacement: 手順 6、 1の画像 1
    • Open the front cover as far as possible to the sides.

    • Loosen the hose clamp on the steam hose and pull the hose off.

    • Pull the thick cable off the clamps on the front cover.

  7. Jura Impressa C E F models coffee dispenser replacement: 手順 7、 3の画像 1 Jura Impressa C E F models coffee dispenser replacement: 手順 7、 3の画像 2 Jura Impressa C E F models coffee dispenser replacement: 手順 7、 3の画像 3
    • Remove the four T10 Torx screws that hold the coffee spout to the housing.

    • In case this has not yet been done, remove the inlet funnel. It is connect by two T10 Torx screws. (This picture shows it already removed)

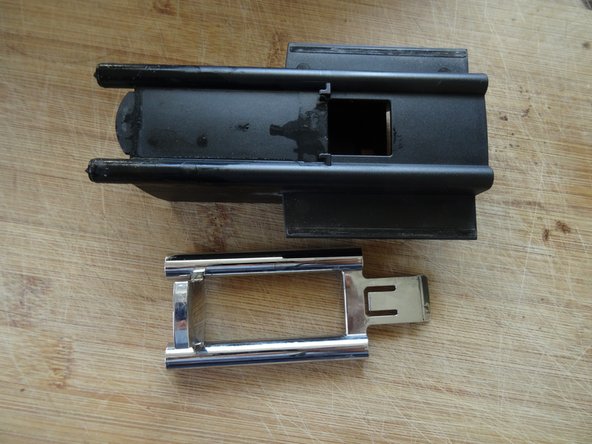
    • These are the magnet that hold two metal sliding plates in place. Do not lose those.

    • With a little bit of force remove the holder from the coffee spout.

  8. Jura Impressa C E F models coffee dispenser replacement: 手順 8、 2の画像 1 Jura Impressa C E F models coffee dispenser replacement: 手順 8、 2の画像 2
    • To the coffee spout is a decorative panel attached. Slide it of the spout by the tab.

    • On the inside of the spout is still distribution nozzle. Remove this by removing the tab on the top side.

    • Clean the coffee spout thoroughly or replace it if needed

  9. Jura Impressa C E F models coffee dispenser replacement: 手順 9、 2の画像 1 Jura Impressa C E F models coffee dispenser replacement: 手順 9、 2の画像 2
    • Advice for the assembly:

    • The coffee spout can be moved up and down, but must also remain in any position. As a brake, two sliding plates are held in place by magnets on the back of the bracket. Be careful not to lose these magnets.

    • There are four pins on the back of the coffee spout. Insert these into the corresponding holes in the sliding plates. It is a bit tricky to install and screw the holder and the coffee spout at the same time.

    • Check whether the spout can be moved against slight resistance and whether it remains in any position.

終わりに

Follow the steps in reverse order to reassemble your coffee machine

7 の人々がこのガイドを完成させました。

以下の翻訳者の皆さんにお礼を申し上げます:

de en

100%

これらの翻訳者の方々は世界を修理する私たちのサポートをしてくれています。 あなたも貢献してみませんか?
翻訳を始める ›

作成者

2人の作成者と共同で作成されました。

VauWeh

メンバー登録日: 10/19/15

202,382 ポイント

246のガイドは作成済み

チーム

Repair is War on Entropy Repair is War on Entropy人のメンバー

Community

25 メンバー

1,103のガイドは作成済み

7 件のコメント

Tipp: Beim Öffnen Staubsauger und Pinsel parat haben, damit man die vielen kleinen Bohnen aus den ganzen Rillen saugen kann.

nepumax - 返信

Danke,

war sehr hilfreich und hat zum Erfolg geführt!

Kurt Bühler - 返信

*******Auf der Rückseite des Kaffeeauslaufs befinden sich vier Stifte. Setze diese in die entsprechenden Löcher in den Gleitblechen ein. Es ist etwas knifflig, den Halter und den Kaffeeauslauf gleichzeitig einzubauen und zu verschrauben.*******

Wenn man die Magnete entfernt hat braucht man nicht alles gleichzeitig zu machen. Zuerst Auslauf, dann denn Halter und dann die zwei Magnete.

So klappt es auch einfacher

Paul Hendriks - 返信

Gute Anleitung, das lösen der Arretierung der silbernen Blende könnte etwas detaillierter beschrieben werden.

Günter Bertsch - 返信

Vielen lieben Dank, Deine Tipps waren sehr hilfreich und haben zum Erfolg geführt. Ich konnte auch eine Innenreinigung mit dem Staubsauger und Pinsel durchführen.

Peter Heinrich - 返信

コメントを追加

統計データ:

過去 24時間: 15

過去 7 日: 112

過去 30 日: 471

今までの合計 24,303