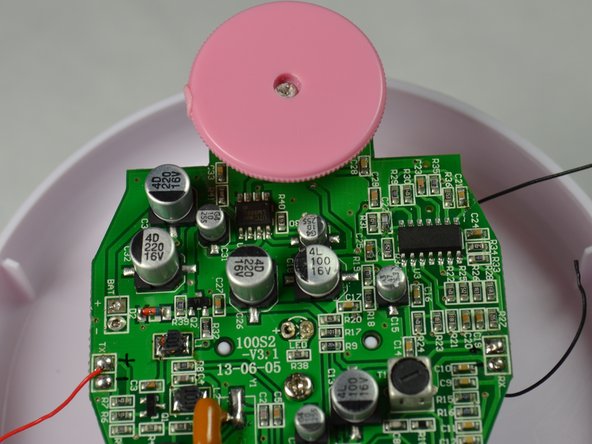
メインコンテンツにスキップ

Jumper Angelsounds JPD-100S Volume Knob Replacement

必要な工具と部品

  1. Jumper Angelsounds JPD-100S Volume Knob Replacement, Motherboard: 手順 1、 1の画像 1
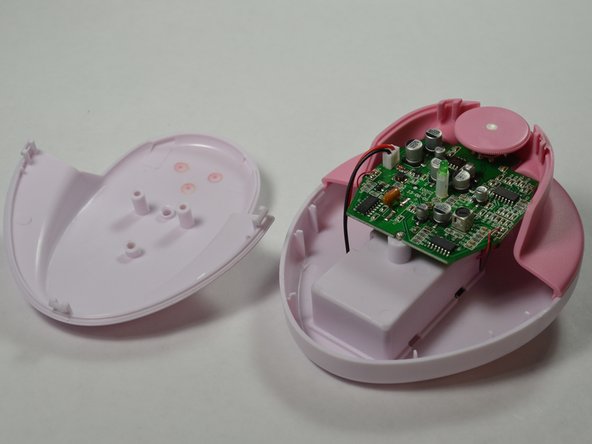
    • Access the battery compartment

    • Remove the battery compartment lid and set it aside.

    • Disconnect the battery and set it aside.

  2. Jumper Angelsounds JPD-100S Volume Knob Replacement: 手順 2、 2の画像 1 Jumper Angelsounds JPD-100S Volume Knob Replacement: 手順 2、 2の画像 2
    • Puncture the sticker in the battery compartment with a spudger to access the screw beneath it.

  3. Jumper Angelsounds JPD-100S Volume Knob Replacement: 手順 3、 1の画像 1
    • Remove the 7mm Phillips #1 screw from the battery compartment.

    • Place the screw in a secure place.

  4. Jumper Angelsounds JPD-100S Volume Knob Replacement: 手順 4、 2の画像 1 Jumper Angelsounds JPD-100S Volume Knob Replacement: 手順 4、 2の画像 2
    • Begin prying open the device.

    • Insert a plastic opening tool into the side groove about 2cm from the pink plastic component and pry open one side of the device.

    • Once the side is separated, leave the opening tool inside to prevent the two sides from closing.

  5. Jumper Angelsounds JPD-100S Volume Knob Replacement: 手順 5、 2の画像 1 Jumper Angelsounds JPD-100S Volume Knob Replacement: 手順 5、 2の画像 2
    • Insert another plastic opening tool into the groove opposite to the side of the tool already inserted.

    • Create separation on that side until the white plastic component comes off entirely.

    • Place the white plastic component in a secure place.

  6. Jumper Angelsounds JPD-100S Volume Knob Replacement: 手順 6、 1の画像 1
    • With your hand, remove the pink component.

  7. Jumper Angelsounds JPD-100S Volume Knob Replacement: 手順 7、 1の画像 1
    • Remove the 7mm Phillips #1 screw in the middle of the motherboard.

  8. Jumper Angelsounds JPD-100S Volume Knob Replacement, Volume Knob: 手順 8、 2の画像 1 Jumper Angelsounds JPD-100S Volume Knob Replacement, Volume Knob: 手順 8、 2の画像 2
    • Remove the white glue on the volume knob by peeling it off or gently using tweezers to pull it out.

    • Allow approximately 10 minutes for the soldering station to heat up before using.

  9. Jumper Angelsounds JPD-100S Volume Knob Replacement: 手順 9、 2の画像 1 Jumper Angelsounds JPD-100S Volume Knob Replacement: 手順 9、 2の画像 2
    • Remove the 5mm Phillips #00 screw holding the volume knob to the motherboard.

    • Place the screw and volume knob in a secure, safe place.

  10. Jumper Angelsounds JPD-100S Volume Knob Replacement: 手順 10、 3の画像 1 Jumper Angelsounds JPD-100S Volume Knob Replacement: 手順 10、 3の画像 2 Jumper Angelsounds JPD-100S Volume Knob Replacement: 手順 10、 3の画像 3
    • Unsolder the five points holding the volume knob to the motherboard.

    • Carefully place the soldering iron down, as you will need it for reassembly.

終わりに

To reassemble your device, follow these instructions in reverse order.

作成者

4人の作成者と共同で作成されました。

Melanie Orozco

メンバー登録日: 08/31/15

143 ポイント

1ガイドが承認済み

チーム

USF Tampa, Team 6-1, Remmell Fall 2015 USF Tampa, Team 6-1, Remmell Fall 2015人のメンバー

USFT-REMMELL-F15S6G1

6 メンバー

6のガイドは作成済み

0 件のコメント

コメントを追加

統計データ:

過去 24時間: 1

過去 7 日: 3

過去 30 日: 5

今までの合計 167