メインコンテンツにスキップ

JBL Pulse 3 Charging Port Replacement

必要な工具と部品

  1. JBL Pulse 3 Charging Port Replacement, Speaker Grill: 手順 1、 1の画像 1
    • Lay the JBL Pulse 3 on its side as shown in the picture.

    • Use a plastic opening tool to lift the top right corner of the speaker grill. A small amount of force is necessary to remove the grill.

  2. JBL Pulse 3 Charging Port Replacement: 手順 2、 1の画像 1
    • Repeat step 1 for bottom right corner of speaker grill.

  3. JBL Pulse 3 Charging Port Replacement: 手順 3、 2の画像 1 JBL Pulse 3 Charging Port Replacement: 手順 3、 2の画像 2
    • After pulling the right side of the grill off, place thumb underneath grill as shown in the picture.

    • Lift and pull straight out to pull grill off the posts.

    • Repeat steps 1-3 for the left side of the speaker grill on the JBL Pulse 3. The speaker grill should now be completely removed from the JBL Pulse 3.

  4. JBL Pulse 3 Charging Port Replacement, Outside Casing: 手順 5、 2の画像 1 JBL Pulse 3 Charging Port Replacement, Outside Casing: 手順 5、 2の画像 2
    • Use a Phillips #00 screwdriver to remove the six black 6mm screws on the inside of the top of the bottom section.

  5. JBL Pulse 3 Charging Port Replacement: 手順 6、 2の画像 1 JBL Pulse 3 Charging Port Replacement: 手順 6、 2の画像 2
    • Turn the JBL Pulse 3 right-side up and unscrew the top ring of the device. A small amount of force and/or a cotton cloth may be necessary to remove this piece.

  6. JBL Pulse 3 Charging Port Replacement: 手順 7、 2の画像 1 JBL Pulse 3 Charging Port Replacement: 手順 7、 2の画像 2
    • Remove the six 5mm screws on top of the JBL Pulse 3 with a Phillips #0 screwdriver.

  7. JBL Pulse 3 Charging Port Replacement: 手順 8、 1の画像 1
    • Pull off the top disc of the JBL Pulse 3.

  8. JBL Pulse 3 Charging Port Replacement: 手順 9、 2の画像 1 JBL Pulse 3 Charging Port Replacement: 手順 9、 2の画像 2
    • Remove the five 7mm screws on the inside of the JBL Pulse 3 with a Phillips #1 screwdriver.

  9. JBL Pulse 3 Charging Port Replacement: 手順 10、 2の画像 1 JBL Pulse 3 Charging Port Replacement: 手順 10、 2の画像 2
    • Peel off black, taped-on electrical lead from the inside side of the JBL Pulse 3.

  10. JBL Pulse 3 Charging Port Replacement: 手順 11、 1の画像 1
    • Pull the top section of the JBL Pulse 3 up. The outside casing to the JBL Pulse 3 should now be removed.

  11. JBL Pulse 3 Charging Port Replacement, LED Light Display: 手順 12、 3の画像 1 JBL Pulse 3 Charging Port Replacement, LED Light Display: 手順 12、 3の画像 2 JBL Pulse 3 Charging Port Replacement, LED Light Display: 手順 12、 3の画像 3
    • Use a Phillips #2 screwdriver to remove the six 11 mm screws that circle the bottom of the LED light display.

    • Pull the LED light display off of the JBL Pulse 3 base.

  12. JBL Pulse 3 Charging Port Replacement: 手順 13、 2の画像 1 JBL Pulse 3 Charging Port Replacement: 手順 13、 2の画像 2
    • Use tweezers to pull the five connections off of the LED light display.

  13. JBL Pulse 3 Charging Port Replacement, Motherboard: 手順 14、 2の画像 1 JBL Pulse 3 Charging Port Replacement, Motherboard: 手順 14、 2の画像 2
    • Using a Phillips #0 screwdriver, remove the two black 8mm screws on the bottom of the LED light display.

  14. JBL Pulse 3 Charging Port Replacement: 手順 15、 3の画像 1 JBL Pulse 3 Charging Port Replacement: 手順 15、 3の画像 2 JBL Pulse 3 Charging Port Replacement: 手順 15、 3の画像 3
    • Pull out the motherboard slightly from the LED light display as shown. Using tweezers, unplug the three connections attached to the motherboard.

  15. JBL Pulse 3 Charging Port Replacement: 手順 16、 1の画像 1
    • Pull the rest of the motherboard out from the LED light display.

    • Using wire cutters, snip the black wire connecting to the base of the JBL Pulse 3 at the base of the motherboard. The motherboard should now be removed from the JBL Pulse 3.

  16. JBL Pulse 3 Charging Port Replacement, Speaker: 手順 17、 2の画像 1 JBL Pulse 3 Charging Port Replacement, Speaker: 手順 17、 2の画像 2
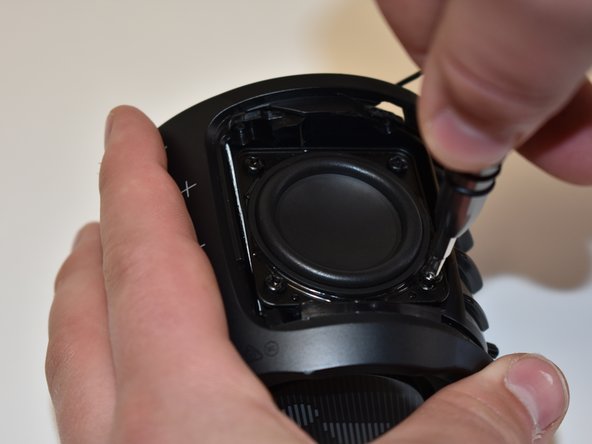
    • Using a Phillips #2 screwdriver, remove the four 10mm screws on the corner of the speaker on the side of the base of the JBL Pulse 3.

  17. JBL Pulse 3 Charging Port Replacement: 手順 18、 2の画像 1 JBL Pulse 3 Charging Port Replacement: 手順 18、 2の画像 2
    • Pull out the speaker and cut the black and red wire with wire cutters. The speaker should now be removed from the JBL Pulse 3.

  18. JBL Pulse 3 Charging Port Replacement, Charging Port: 手順 19、 2の画像 1 JBL Pulse 3 Charging Port Replacement, Charging Port: 手順 19、 2の画像 2
    • Repeat the steps to take out all three speakers on the base of the JBL Pulse 3.

    • Using a Phillips #0 screwdriver, remove the 6 mm screw under each of the three speakers around the base of the JBL Pulse 3.

  19. JBL Pulse 3 Charging Port Replacement: 手順 20、 2の画像 1 JBL Pulse 3 Charging Port Replacement: 手順 20、 2の画像 2
    • Grab the outside of the JBL Pulse 3 at the bottom and pull outward until the outside button cover comes off.

  20. JBL Pulse 3 Charging Port Replacement: 手順 21、 2の画像 1 JBL Pulse 3 Charging Port Replacement: 手順 21、 2の画像 2
    • Disconnect the two connections from the inside side of the base of the JBL Pulse 3 by pushing on the wire with your index finger in the opposite direction of the connection.

  21. JBL Pulse 3 Charging Port Replacement: 手順 22、 2の画像 1 JBL Pulse 3 Charging Port Replacement: 手順 22、 2の画像 2
    • Using a Phillips #1 screwdriver, remove the four 10mm screws by the push buttons on the side of the base of the JBL Pulse 3.

  22. JBL Pulse 3 Charging Port Replacement: 手順 23、 1の画像 1
    • Pull off the inside button cover with the attached charging port. The charging port should now be removed.

終わりに

To reassemble your device, follow these instructions in reverse order.

5 の人々がこのガイドを完成させました。

作成者

1人の作成者と共同作成されました。

Kaitlyn Greenfield

メンバー登録日: 09/20/18

1,161 ポイント

6のガイドは作成済み

チーム

Central Washington University, Team S1-G2, Pengilly Fall 2018 Central Washington University, Team S1-G2, Pengilly Fall 2018人のメンバー

CWU-PENGILLY-F18S1G2

3 メンバー

12のガイドは作成済み

3 件のコメント

And how to put it back with cut cable?

Robert Rpunkt - 返信

I've done a teardown and was able to access the charging terminal without cutting any wires. I didn't have a replacement, so I just put it back together hoping that cleaning it would work. Didn't work.

Beresford Crowder - 返信

コメントを追加

統計データ:

過去 24時間: 6

過去 7 日: 36

過去 30 日: 140

今までの合計 15,754