メインコンテンツにスキップ

JBL Pulse 2 Battery Replacement

必要な工具と部品

  1. JBL Pulse 2 Battery Replacement, Battery: 手順 1、 2の画像 1 JBL Pulse 2 Battery Replacement, Battery: 手順 1、 2の画像 2
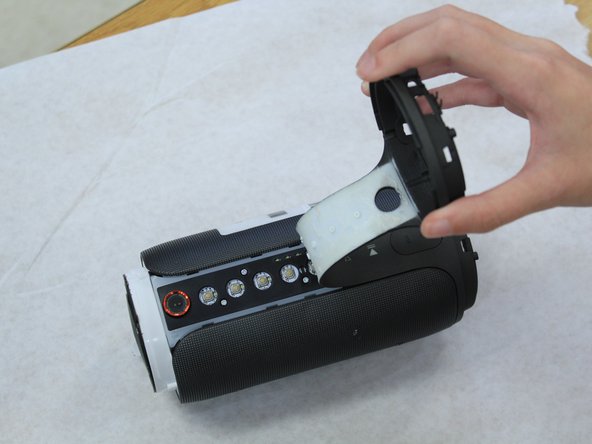
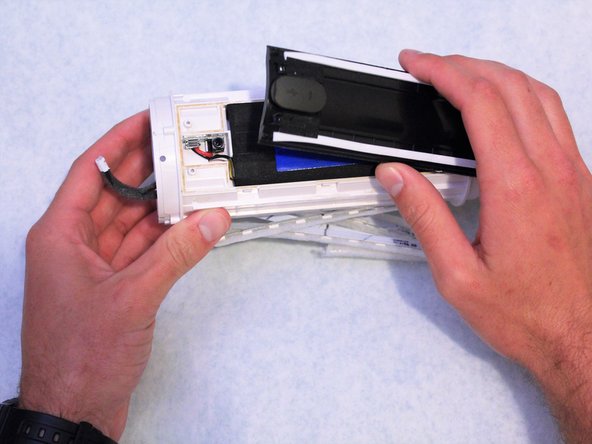
    • Remove the rubber rings from either end of the device.

    • If there is difficulty in lifting the rings from the device, use the metal spudger.

  2. JBL Pulse 2 Battery Replacement: 手順 2、 1の画像 1
    • Remove the four 4.8mm Phillips #1 screws from each end of the device with the Phillips head screwdriver.

    • Lift the end pieces off of the device.

  3. JBL Pulse 2 Battery Replacement: 手順 3、 1の画像 1
    • Remove the four 9.5mm Phillips #1 screws from each end of the device.

  4. JBL Pulse 2 Battery Replacement: 手順 4、 2の画像 1 JBL Pulse 2 Battery Replacement: 手順 4、 2の画像 2
    • Peel one end off and slowly draw it across the length of the device until you get to the other side.

  5. JBL Pulse 2 Battery Replacement: 手順 5、 3の画像 1 JBL Pulse 2 Battery Replacement: 手順 5、 3の画像 2 JBL Pulse 2 Battery Replacement: 手順 5、 3の画像 3
    • Remove the four 7.9mm Phillips #1 screws along the black centerpiece of the device between the camera and the auxiliary port.

    • Lift up the casing and circuit board but do not try and remove the ribbon wires.

  6. JBL Pulse 2 Battery Replacement: 手順 6、 1の画像 1
    • Remove the cover from the end that the ribbon wires are attached to. It should peel off easily.

  7. JBL Pulse 2 Battery Replacement: 手順 7、 2の画像 1 JBL Pulse 2 Battery Replacement: 手順 7、 2の画像 2
    • Unlatch the mechanism holding the ribbon wires in place, then disconnect them from the motherboard.

    • To access the wires, remove some of the black glue holding them in place with the spudger.

  8. JBL Pulse 2 Battery Replacement: 手順 8、 2の画像 1 JBL Pulse 2 Battery Replacement: 手順 8、 2の画像 2
    • Slowly pull the ribbon wires out from the outside.

    • If there is too much resistance, remove more of the black glue.

  9. JBL Pulse 2 Battery Replacement: 手順 9、 2の画像 1 JBL Pulse 2 Battery Replacement: 手順 9、 2の画像 2
    • Remove the four 7.9mm Phillips #1 screws around the edges of the center piece.

    • Slide the outer casing off away from the auxiliary and micro USB port.

  10. JBL Pulse 2 Battery Replacement: 手順 10、 1の画像 1
    • Remove the other end of the device to access the wiring underneath it.

  11. JBL Pulse 2 Battery Replacement: 手順 11、 1の画像 1
    • Use the angled tweezers to disconnect the battery from the motherboard. It will take some work to remove this piece.

  12. JBL Pulse 2 Battery Replacement: 手順 12、 1の画像 1
    • Remove the four 7.9mm Phillips #1 screws from the black centerpiece of the device.

  13. JBL Pulse 2 Battery Replacement: 手順 13、 2の画像 1 JBL Pulse 2 Battery Replacement: 手順 13、 2の画像 2
    • Use the spudger to reach under the sides of the black centerpiece to access the six latches, three of which are on each side.

  14. JBL Pulse 2 Battery Replacement: 手順 14、 2の画像 1 JBL Pulse 2 Battery Replacement: 手順 14、 2の画像 2
    • Lift the black centerpiece off with the metal spudger to reveal the battery underneath.

  15. JBL Pulse 2 Battery Replacement: 手順 15、 1の画像 1
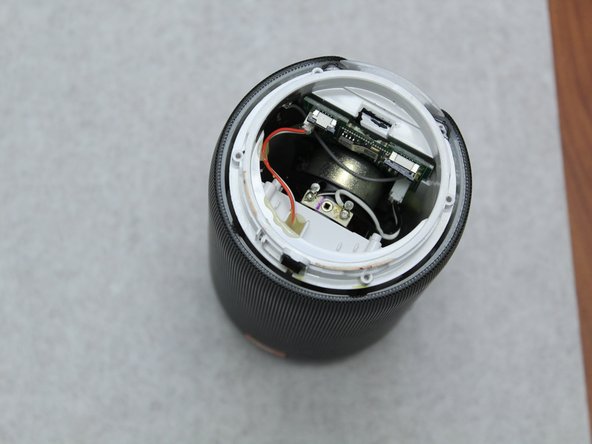
    • Use a hot air gun to soften the hot glue in order to fully remove the battery.

    So annoying… got to that last step which would have needed some more pictures and guiding to remove the wire… space is too small to remove the wire head part. Looks like everything (USB plug and all) should be removed.

    isabelle laroche - 返信

    I agree and I'm at that point at this very moment. As a service technician, one trick I have learned is that each of those individual sockets in the plug can be removed. On one side of the plug you will be able to see each individual socket and that each one is held in by a little extruded tab that catches against the plastic connector. If you get a small screwdriver and push on that tab you'll be able to pull that little socket out from the connector. A few words of CAUTION: Do NOT let the exposed connectors touch one other! Also, do NOT let your screwdriver short them out when pushing on the tabs. Work on one at a time, tape them, keep them separated and label them! After they are all removed they can easily be pushed back into the connector again.

    Charles Kulbacki -

    I don’t think it’s necessary to remove the battery as long as you unplug it. I don’t see any benefits from this but maybe I’m wrong so someone can clarify? Does removing of the battery give you better access to the aux/usb sockets?

    ndjenny - 返信

    Just because this procedure is for replacing the battery, it is important to remove the old battery.

    Cam McNicol -

    There was a mountain of hot glue on mine on the battey wires. Since i was replacing the battery anyway, i cut the wires off and made a new hole through the plastic

    Oliver Brasø - 返信

    I like your style!

    Randyll Twardosky -

終わりに

To reassemble your device, follow these instructions in reverse order.

6 の人々がこのガイドを完成させました。

作成者

3人の作成者と共同で作成されました。

Jarid Slopek

メンバー登録日: 08/31/18

448 ポイント

1ガイドが承認済み

チーム

Western Carolina University, Team S1-G1, Virtue Fall 2018 Western Carolina University, Team S1-G1, Virtue Fall 2018人のメンバー

WCU-VIRTUE-F18S1G1

4 メンバー

9のガイドは作成済み

0 件のコメント

コメントを追加

統計データ:

過去 24時間: 2

過去 7 日: 21

過去 30 日: 79

今までの合計 7,672