メインコンテンツにスキップ

このバージョンは誤った内容を含んでいる可能性があります。最新の承認済みスナップショットに切り替えてください。

必要な工具と部品

  1. , JBL Chargeのケースの分解: 手順 1、 3の画像 1 , JBL Chargeのケースの分解: 手順 1、 3の画像 2 , JBL Chargeのケースの分解: 手順 1、 3の画像 3
    • 分解を始める前にデバイスの電源が切れていることを確認します。

    • 短い金のこや金属製のスパッジャーを使い、デバイスから枠を取り外します。

  2. : 手順 2、 2の画像 1 : 手順 2、 2の画像 2
    • PH1ドライバーを使って、バッテリーカバーから6mmプラスネジを5本外します

    • バッテリーカバーを外し、適当なところに置いておきます。

  3. この手順は未翻訳です。 翻訳を手伝う。

    : 手順 3、 2の画像 1 : 手順 3、 2の画像 2
    • Use a spudger to carefully remove the liquid electrical tape that holds the battery inside the battery compartment.

    • Be careful not to puncture the battery, or damage the battery wire underneath the liquid electrical tape.

  4. : 手順 4、 2の画像 1 : 手順 4、 2の画像 2
    • メタル製スパッジャーを使って、バッテリーの端を持ち上げ、デバイスから取り外します。

    • バッテリーを持ち上げ、その下にある16mm PH2ネジを外します。

    • バッテリーをデバイスに接続しているバッテリーワイヤーにご注意ください。完全にバッテリーを取り外そうとすると、ワイヤーにダメージを与える恐れがあります。

  5. : 手順 5、 2の画像 1 : 手順 5、 2の画像 2
    • PH2ドライバーを使って、白のプラスチックケースから残りの4本の16mmプラスネジを外します。

  6. この手順は未翻訳です。 翻訳を手伝う。

    : 手順 6、 2の画像 1 : 手順 6、 2の画像 2
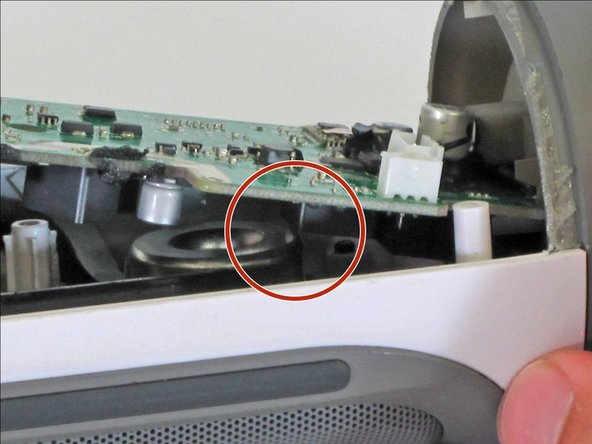
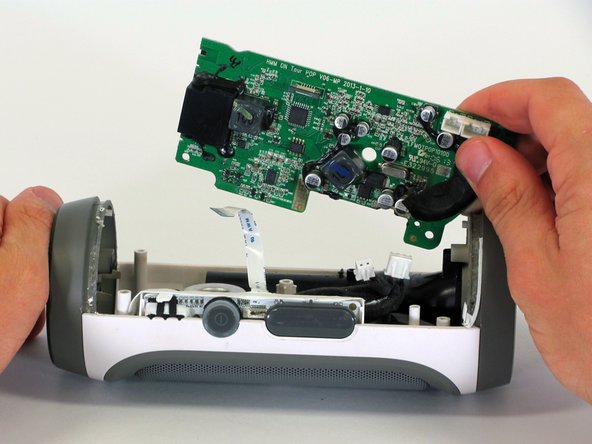
    • Starting in a corner of the device where the casing and the side meet, use a pointed metal spudger to pry the back casing off the speaker and the glue holding the seam together.

    • Slide the metal spudger along the seam to separate the back casing from the rest of the speaker.

  7. : 手順 7、 2の画像 1 : 手順 7、 2の画像 2
    • デバイスが一度開いたら、マザーボードから白のコネクタを3本外します。

    • 上部カバーを取り外します。

  8. この手順は未翻訳です。 翻訳を手伝う。

    : 手順 8、 1の画像 1
    • Remove the 9 mm Phillips screw in the corner of the motherboard.

  9. この手順は未翻訳です。 翻訳を手伝う。

    : 手順 9、 2の画像 1 : 手順 9、 2の画像 2
    • Remove the motherboard from the casing by lifting the corner of the board out of the device.

    • If the motherboard won't budge, be sure that the square component on the bottom of the motherboard clears the edge of the speaker.

    • During reassembly, make sure the motherboard is fully installed and not sticking up past its original position, as this could damage the motherboard.

  10. この手順は未翻訳です。 翻訳を手伝う。

    : 手順 10、 1の画像 1
    • Disconnect the two white connectors from the bottom of the motherboard.

  11. この手順は未翻訳です。 翻訳を手伝う。

    : 手順 11、 2の画像 1 : 手順 11、 2の画像 2
    • Pull down on the black clip holding the ribbon cable in place.

    • Pull the ribbon cable from the connector using the blue tab.

    • Remove the motherboard from the device.

ゴール

7 の人々がこのガイドを完成させました。

作成者

6人の作成者と共同で作成されました。

Jake Bertholf

メンバー登録日: 04/01/15

366 ポイント

2のガイドは作成済み

チーム

Cal Poly, Team 12-1, Lancaster Spring 2015 Cal Poly, Team 12-1, Lancaster Spring 2015人のメンバー

CPSU-LANCASTER-S15S12G1

5 メンバー

11のガイドは作成済み

14 件のコメント

Hello I have 3 jbl speakers I bought that work only if plugged to the wall and aux cable... other than that it doesn't work at all .. Bluetooth or even the buttons don't function

hector - 返信

had same issue. fixed it by reconnecting the cable that conncts LEDs/ buttons

nyancatsarecute -

i have the same problem

Denny Berroa - 返信

Hello, mine doesn't emit any sound, bluetooth is connected, buttons are working, could it be that some audio cable inside is disconnected?

giubo - 返信

hello can i ask if how many pins in the flex for power button i accidentally damage when i fixed it

djcriztorey - 返信

コメントを追加

統計データ:

過去 24時間: 4

過去 7 日: 10

過去 30 日: 65

今までの合計 29,949