メインコンテンツにスキップ

Insignia NS-24ER310NA17 Infrared Sensor Replacement

必要な工具と部品

  1. Insignia NS-24ER310NA17 Infrared Sensor Replacement, Remove the base: 手順 1、 3の画像 1 Insignia NS-24ER310NA17 Infrared Sensor Replacement, Remove the base: 手順 1、 3の画像 2 Insignia NS-24ER310NA17 Infrared Sensor Replacement, Remove the base: 手順 1、 3の画像 3
    • Rest the TV on its top edge so you have access to the base.

    • Use a Phillips #2 screwdriver to take out the four screws on the bottom of the base.

    • Remove the base from the frame.

  2. Insignia NS-24ER310NA17 Infrared Sensor Replacement: 手順 2、 3の画像 1 Insignia NS-24ER310NA17 Infrared Sensor Replacement: 手順 2、 3の画像 2 Insignia NS-24ER310NA17 Infrared Sensor Replacement: 手順 2、 3の画像 3
    • Lay the TV face down.

    • Use the Phillips #00 screwdriver to remove all of the Phillips Head Screws from the the back of the TV.

  3. Insignia NS-24ER310NA17 Infrared Sensor Replacement, Pry the TV open: 手順 3、 1の画像 1
    • Stand the TV on its top edge.

    • Gently pry apart the front and back of the TV.

    • The two halves should pull apart easily since there are no longer any screws holding it together.

    • The two halves will still be connected by wires and cables that are taped to each side. Do not pull on these. We will remove them in the next step.

  4. Insignia NS-24ER310NA17 Infrared Sensor Replacement, Disconnect wires: 手順 4、 3の画像 1 Insignia NS-24ER310NA17 Infrared Sensor Replacement, Disconnect wires: 手順 4、 3の画像 2 Insignia NS-24ER310NA17 Infrared Sensor Replacement, Disconnect wires: 手順 4、 3の画像 3
    • As mentioned in the previous step, there are wires still connecting the two halves.

    • Remove all the pieces of tape to detach the wires from both sides.

    • You want to gently peel the tape off, without pulling on the wires.

  5. Insignia NS-24ER310NA17 Infrared Sensor Replacement: 手順 5、 1の画像 1
    • Spread apart your TV the rest of the way, but do not disconnect any of the wires.

    • You should have a clear view of the inside on both sides.

  6. Insignia NS-24ER310NA17 Infrared Sensor Replacement, Motherboard: 手順 6、 1の画像 1
    • Remove all strips of tape attached to the silver steel rectangular piece.

  7. Insignia NS-24ER310NA17 Infrared Sensor Replacement: 手順 7、 1の画像 1
    • Pull the red wire out from under the black plastic clip.

  8. Insignia NS-24ER310NA17 Infrared Sensor Replacement: 手順 8、 2の画像 1 Insignia NS-24ER310NA17 Infrared Sensor Replacement: 手順 8、 2の画像 2
    • Unscrew the four screws surrounding the steel rectangle with a Phillips 00 Screwdriver.

  9. Insignia NS-24ER310NA17 Infrared Sensor Replacement: 手順 9、 1の画像 1
    • Carefully lift the rectangular piece.

  10. Insignia NS-24ER310NA17 Infrared Sensor Replacement: 手順 10、 1の画像 1
    • The rectangular piece will still be attached to the motherboard beneath it with a strip of tape. Remove this strip of tape.

  11. Insignia NS-24ER310NA17 Infrared Sensor Replacement: 手順 11、 2の画像 1 Insignia NS-24ER310NA17 Infrared Sensor Replacement: 手順 11、 2の画像 2
    • Use a Phillips #00 screwdriver to remove the two screws on both sides of the motherboard.

  12. Insignia NS-24ER310NA17 Infrared Sensor Replacement: 手順 12、 1の画像 1
    • Carefully lift the motherboard away from the television.

    • Keep in mind that the motherboard is still attached by several thin wires and should not be tugged.

  13. Insignia NS-24ER310NA17 Infrared Sensor Replacement: 手順 13、 3の画像 1 Insignia NS-24ER310NA17 Infrared Sensor Replacement: 手順 13、 3の画像 2 Insignia NS-24ER310NA17 Infrared Sensor Replacement: 手順 13、 3の画像 3
    • There are 5 wires attached to the motherboard. Remove the two thicker white wires to the right of the red wire.

  14. Insignia NS-24ER310NA17 Infrared Sensor Replacement: 手順 14、 3の画像 1 Insignia NS-24ER310NA17 Infrared Sensor Replacement: 手順 14、 3の画像 2 Insignia NS-24ER310NA17 Infrared Sensor Replacement: 手順 14、 3の画像 3
    • Remove the remaining three wires from the mainboard.

  15. Insignia NS-24ER310NA17 Infrared Sensor Replacement: 手順 15、 1の画像 1
    • Carefully remove the mainboard from the television.

    • You have now successfully removed the mainboard.

  16. Insignia NS-24ER310NA17 Infrared Sensor Replacement, Infrared Sensor: 手順 16、 2の画像 1 Insignia NS-24ER310NA17 Infrared Sensor Replacement, Infrared Sensor: 手順 16、 2の画像 2
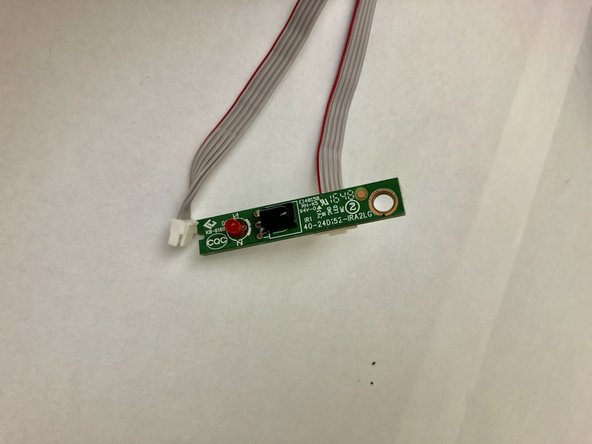
    • Unscrew single screw holding IR sensor and remove sensor with ribbon cable.

    • Place the new sensor where the old one was and replace the screw.

  17. Insignia NS-24ER310NA17 Infrared Sensor Replacement: 手順 17、 1の画像 1
    • Plug the new sensor's cable into the motherboard. Make sure to plug it into the correct location.

終わりに

To reassemble your device, follow these instructions in reverse order.

2 の人々がこのガイドを完成させました。

作成者

5人の作成者と共同で作成されました。

Joelle Hylton

メンバー登録日: 01/22/18

260 ポイント

1ガイドが承認済み

チーム

Cal Poly, Team S16-G2, Banghart Winter 2018 Cal Poly, Team S16-G2, Banghart Winter 2018人のメンバー

CPSU-BANGHART-W18S16G2

4 メンバー

6のガイドは作成済み

0 件のコメント

コメントを追加

統計データ:

過去 24時間: 6

過去 7 日: 13

過去 30 日: 48

今までの合計 4,013