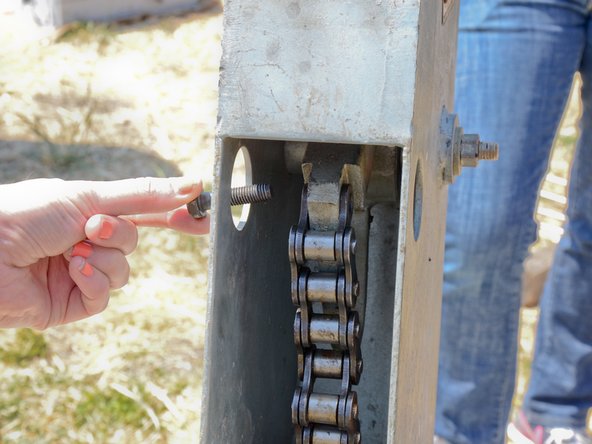
メインコンテンツにスキップ

India Mark III Head Replacement

必要な工具と部品

  1. India Mark III Head Replacement, Access Door: 手順 1、 2の画像 1 India Mark III Head Replacement, Access Door: 手順 1、 2の画像 2
    • Before performing any repairs, perform a water test on the pump by raising and lowering the handle a full 40 strokes. A properly performing pump will yield greater than 10 liters.

    • Remove the hex head bolt from the top of the access door on the pump head.

    • On reassembly, this bolt should be hand-tight.

  2. India Mark III Head Replacement: 手順 2、 3の画像 1 India Mark III Head Replacement: 手順 2、 3の画像 2 India Mark III Head Replacement: 手順 2、 3の画像 3
    • Pull the access door straight up off the pump head.

    • Store the access door in a sanitary place to prevent contamination.

  3. India Mark III Head Replacement: 手順 3、 2の画像 1 India Mark III Head Replacement: 手順 3、 2の画像 2
    • The access door has a tongue that fits into the base of the pump head.

    • The access door makes a convenient tray to hold nuts and bolts during the disassembly.

  4. India Mark III Head Replacement, Chain: 手順 4、 3の画像 1 India Mark III Head Replacement, Chain: 手順 4、 3の画像 2 India Mark III Head Replacement, Chain: 手順 4、 3の画像 3
    • Place the spacer collar around the pump rod below the raised chain, with the beveled side down, and the flat side facing up.

  5. India Mark III Head Replacement: 手順 5、 3の画像 1 India Mark III Head Replacement: 手順 5、 3の画像 2 India Mark III Head Replacement: 手順 5、 3の画像 3
    • The following procedure requires two people. If you attempt to do this alone, you risk injuring yourself and damaging the pump.

    • Lift the pump handle until the base of the chain comes to rest on the spacer collar, and the chain is slack. Hold the handle in this position while the chain is being detached.

  6. India Mark III Head Replacement: 手順 6、 3の画像 1 India Mark III Head Replacement: 手順 6、 3の画像 2 India Mark III Head Replacement: 手順 6、 3の画像 3
    • Using the two access holes, place an angled socket wrench on the bolt and nut attaching the chain to the pump handle.

  7. India Mark III Head Replacement: 手順 7、 3の画像 1 India Mark III Head Replacement: 手順 7、 3の画像 2 India Mark III Head Replacement: 手順 7、 3の画像 3
    • Hold the wrench on the bolt stationary.

    • Loosen the nut.

  8. India Mark III Head Replacement: 手順 8、 3の画像 1 India Mark III Head Replacement: 手順 8、 3の画像 2 India Mark III Head Replacement: 手順 8、 3の画像 3
    • Remove the nut from the chain bolt.

  9. India Mark III Head Replacement: 手順 9、 2の画像 1 India Mark III Head Replacement: 手順 9、 2の画像 2
    • Remove the washer from the chain bolt.

  10. India Mark III Head Replacement: 手順 10、 2の画像 1 India Mark III Head Replacement: 手順 10、 2の画像 2
    • Remove the chain bolt.

  11. India Mark III Head Replacement: 手順 11、 3の画像 1 India Mark III Head Replacement: 手順 11、 3の画像 2 India Mark III Head Replacement: 手順 11、 3の画像 3
    • Pull the top of the chain straight off of the pump handle.

  12. India Mark III Head Replacement, Head: 手順 12、 3の画像 1 India Mark III Head Replacement, Head: 手順 12、 3の画像 2 India Mark III Head Replacement, Head: 手順 12、 3の画像 3
    • Remove the two bolts from the handle side of the pump head.

    • Use one wrench on the bolt and another on the nut beneath. Hold the bolt stationary and loosen the nut.

  13. India Mark III Head Replacement: 手順 13、 3の画像 1 India Mark III Head Replacement: 手順 13、 3の画像 2 India Mark III Head Replacement: 手順 13、 3の画像 3
    • Remove the two bolts and nuts from the handle side.

  14. India Mark III Head Replacement: 手順 14、 2の画像 1 India Mark III Head Replacement: 手順 14、 2の画像 2
    • After removing the two handle side bolts, have your partner support the weight of the handle.

    • Remove the two remaining bolts in the same fashion.

  15. India Mark III Head Replacement: 手順 15、 3の画像 1 India Mark III Head Replacement: 手順 15、 3の画像 2 India Mark III Head Replacement: 手順 15、 3の画像 3
    • Lift and remove the pump head from the pump.

    • Store the pump head in a sanitary place, preferably above ground, to prevent contamination.

終わりに

To reassemble your device, follow these instructions in reverse order.

作成者

5人の作成者と共同で作成されました。

Andrew Optimus Goldheart

メンバー登録日: 10/17/09

502,332 ポイント

407のガイドは作成済み

チーム

iFixit iFixit人のメンバー

Staff

136 メンバー

16,573のガイドは作成済み

0 件のコメント

コメントを追加

統計データ:

過去 24時間: 0

過去 7 日: 0

過去 30 日: 1

今までの合計 179