メインコンテンツにスキップ

InFocus Screenplay 4805 Motherboard Replacement

必要な工具と部品

  1. InFocus Screenplay 4805 Motherboard Replacement, Top Panel: 手順 1、 3の画像 1 InFocus Screenplay 4805 Motherboard Replacement, Top Panel: 手順 1、 3の画像 2 InFocus Screenplay 4805 Motherboard Replacement, Top Panel: 手順 1、 3の画像 3
    • Flip the projector on its back.

    • Use the Phillips #2 screwdriver to remove the (4) four 2 cm gold screws.

    • Use the Phillips #2 screwdriver to remove the (3) three 1 cm silver screws.

  2. InFocus Screenplay 4805 Motherboard Replacement: 手順 2、 2の画像 1 InFocus Screenplay 4805 Motherboard Replacement: 手順 2、 2の画像 2
    • Turn the projector, facing the back cable board towards you.

    • Using the Phillips #0 screwdriver, remove the (3) three 1.0 cm silver screws on the back panel.

    • Gently take off back cable panel.

  3. InFocus Screenplay 4805 Motherboard Replacement: 手順 3、 3の画像 1 InFocus Screenplay 4805 Motherboard Replacement: 手順 3、 3の画像 2 InFocus Screenplay 4805 Motherboard Replacement: 手順 3、 3の画像 3
    • Turn the projector so the front side with the lens is facing you.

    • Gently pry the both of the grey lens rings using the metal spudger.

  4. InFocus Screenplay 4805 Motherboard Replacement: 手順 4、 1の画像 1
    • Now that the screws have been removed, proceed with the removal of the outer panel.

    • Gently remove the front lens panel.

    • Be forewarned, the panel will resist. Be careful not to break the lens.

  5. InFocus Screenplay 4805 Motherboard Replacement: 手順 5、 1の画像 1
    • Being careful not to pull the wires inside the projector, gently lift the top panel off the projector.

    • Rest the lid behind the projector so the insides are exposed and undamaged.

  6. InFocus Screenplay 4805 Motherboard Replacement, Motherboard: 手順 6、 3の画像 1 InFocus Screenplay 4805 Motherboard Replacement, Motherboard: 手順 6、 3の画像 2 InFocus Screenplay 4805 Motherboard Replacement, Motherboard: 手順 6、 3の画像 3
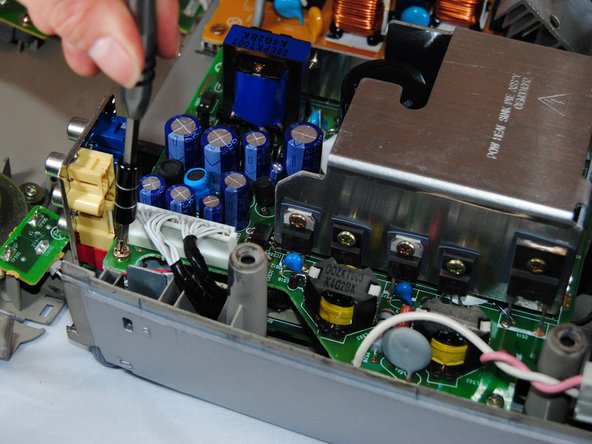
    • Using the Phillips #1 screwdriver, remove the (4) four 1.5 cm screws on each of the four corners of the motherboard cover.

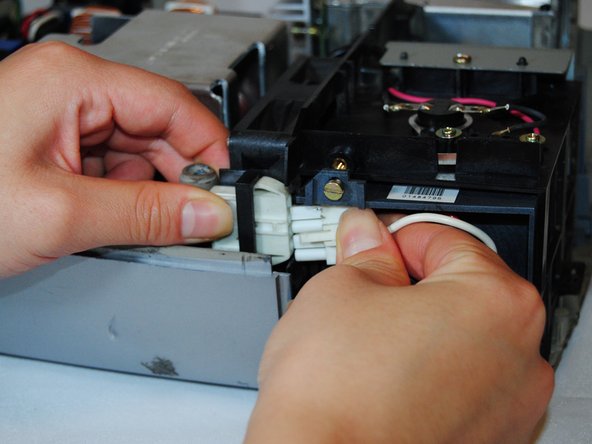
    • Remove the white tab connected to the light bulb.

  7. InFocus Screenplay 4805 Motherboard Replacement: 手順 7、 3の画像 1 InFocus Screenplay 4805 Motherboard Replacement: 手順 7、 3の画像 2 InFocus Screenplay 4805 Motherboard Replacement: 手順 7、 3の画像 3
    • Gently pull the white tab on the right side of the silver power housing by pinching each side of it.

    • Pinch the two black tabs on the inside of the cover to remove.

    • Gently pull on the long white tab to remove it.

終わりに

To reassemble your device, follow these instructions in reverse order.

作成者

3人の作成者と共同で作成されました。

Marilyn Urness

メンバー登録日: 09/28/17

671 ポイント

6のガイドは作成済み

チーム

Eastern Washington University, Team S2-G3, Crane Fall 2017 Eastern Washington University, Team S2-G3, Crane Fall 2017人のメンバー

EWU-CRANE-F17S2G3

5 メンバー

6のガイドは作成済み

0 件のコメント

コメントを追加

統計データ:

過去 24時間: 0

過去 7 日: 0

過去 30 日: 3

今までの合計 444