メインコンテンツにスキップ

IT-8800 Footrest Disassembly

必要な工具と部品

  1. IT-8800 Footrest Disassembly, IT-8800 Footrest Disassembly: 手順 1、 1の画像 1
    • Before starting this step you will need to remove the footrest from the chair. This is done by removing the 5 screws at the top and the 6 screws at the bottom. The plastic shroud will come off as one piece, however it has 2 pieces that slide into each other.

  2. IT-8800 Footrest Disassembly: 手順 2、 3の画像 1 IT-8800 Footrest Disassembly: 手順 2、 3の画像 2 IT-8800 Footrest Disassembly: 手順 2、 3の画像 3
    • You should be left with this. From here you will need to remove the 4 bolts on the upper part of the footrest: 2 on the right, and 2 on the left. From here the top should separate from the metal piece.

  3. IT-8800 Footrest Disassembly: 手順 3、 1の画像 1
    • Once separated be careful because the top is connected to the bottom by an air hose and wire. The top is zipped to the bottom. Please unzip before continuing to next step.

  4. IT-8800 Footrest Disassembly: 手順 4、 2の画像 1 IT-8800 Footrest Disassembly: 手順 4、 2の画像 2
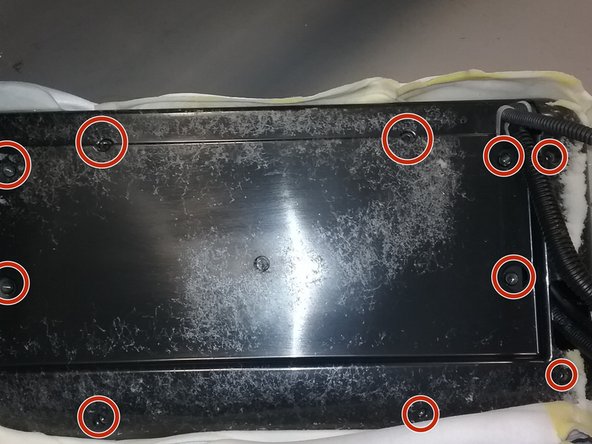
    • Next step is to unzip the leather from the bottom piece. Once unzipped you should be left with this. From here, just carefully pull back the foam to reveal the back cover and screws. Remove the back cover by unscrewing the 12 screws. Unfortunately, due to photo size limitations I'm unable to show all 12.

  5. IT-8800 Footrest Disassembly: 手順 5、 1の画像 1
    • Remove the back cover and this is what you are left with. Remove the 2 screws and that will free up the wire harness . Unplug the cable from the board and attach new cable. Upon re installation you will need spray adhesive.

終わりに

To reassemble follow the steps backwards. Be sure when attaching upper piece to lower piece that the hose is behind the leather zipper piece .

作成者

3人の作成者と共同で作成されました。

Nick

メンバー登録日: 05/30/17

2,737 ポイント

16のガイドは作成済み

0 件のコメント

コメントを追加

統計データ:

過去 24時間: 0

過去 7 日: 0

過去 30 日: 0

今までの合計 77