メインコンテンツにスキップ

この修理ガイドは変更されています。最新の未承認バージョンに切り替えます。

IBM Thinkpad T61 Keyboard Replacement

必要な工具と部品

  1. IBM Thinkpad T61 Keyboard Replacement, Battery: 手順 1、 1の画像 1
    • Ensure the laptop has been properly shut down and unplugged.

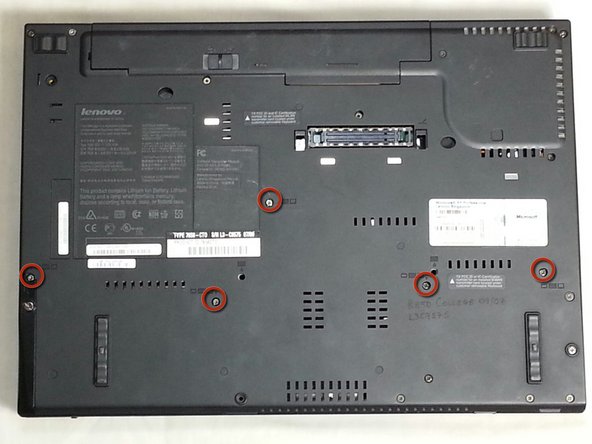
    • Turn the computer over so that you can see the battery release tab located near the top of the Thinkpad.

  2. IBM Thinkpad T61 Keyboard Replacement: 手順 2、 1の画像 1
    • Use your finger to slide the release tab to the unlocked symbol.

  3. IBM Thinkpad T61 Keyboard Replacement: 手順 3、 3の画像 1 IBM Thinkpad T61 Keyboard Replacement: 手順 3、 3の画像 2 IBM Thinkpad T61 Keyboard Replacement: 手順 3、 3の画像 3
    • Hold the tab in the unlocked position and push the battery away from the computer to remove it.

  4. IBM Thinkpad T61 Keyboard Replacement: 手順 4、 1の画像 1
    • Slide the new battery in until it clicks.

    • Ensure that the release tab is in the locked position.

  5. IBM Thinkpad T61 Keyboard Replacement, Keyboard: 手順 5、 1の画像 1
    • Use the PH1 bit screwdriver, remove five 17.0mm screws on the back of the computer.

    • These screws have a keyboard symbol next to them.

    • Make sure you keep the screws together and do not misplace any of them

  6. IBM Thinkpad T61 Keyboard Replacement: 手順 6、 1の画像 1
    • Turn the computer over so the keyboard is facing upwards, and open the Thinkpad.

    • Release the panel by lifting up on the outside edges just below the keyboard.

  7. IBM Thinkpad T61 Keyboard Replacement: 手順 7、 2の画像 1 IBM Thinkpad T61 Keyboard Replacement: 手順 7、 2の画像 2
    • Gently pull the panel away from the computer.

    • BE CAREFUL! The panel is still attached by the touchpad's data cable.

    • Detach the connecter by pulling up on the white tab.

  8. IBM Thinkpad T61 Keyboard Replacement: 手順 8、 2の画像 1 IBM Thinkpad T61 Keyboard Replacement: 手順 8、 2の画像 2
    • Using your fingers, lift the front edge of the keyboard until you can see the wire connecting it.

  9. IBM Thinkpad T61 Keyboard Replacement: 手順 9、 1の画像 1
    • Gently pull up on the connecter to disconnect the keyboard.

    • The keyboard will no longer be attached and can now be fully removed.

    • Take the replacement keyboard and push the new connector tab back into place.

  10. IBM Thinkpad T61 Keyboard Replacement: 手順 10、 2の画像 1 IBM Thinkpad T61 Keyboard Replacement: 手順 10、 2の画像 2
    • Line up keyboard and place back into the position, make sure it is lined up with the back first.

    • Lower the rest of the keyboard back into place so it lies flat against the computer's shell.

  11. IBM Thinkpad T61 Keyboard Replacement: 手順 11、 2の画像 1 IBM Thinkpad T61 Keyboard Replacement: 手順 11、 2の画像 2
    • Push in white tab to reconnect the touch pad panel.

  12. IBM Thinkpad T61 Keyboard Replacement: 手順 12、 2の画像 1 IBM Thinkpad T61 Keyboard Replacement: 手順 12、 2の画像 2
    • Push in touch pad panel back into place by lining it up starting from the bottom and pushing it down until it fits back into place.

  13. IBM Thinkpad T61 Keyboard Replacement: 手順 13、 1の画像 1
    • Close laptop.

  14. IBM Thinkpad T61 Keyboard Replacement: 手順 14、 1の画像 1
    • Flip the laptop over so that the side with the screws is facing up.

    • Put back all the screws, make sure they are in tightly.

    • The new keyboard is now in securely.

終わりに

Once these steps are completed, the keyboard will be fully replaced.

7 の人々がこのガイドを完成させました。

作成者

10人の作成者と共同で作成されました。

Michael Chapiro

メンバー登録日: 04/18/13

1 ポイント

1ガイドが承認済み

チーム

Cal Poly, Team 8-58, Johann Spring 2013 Cal Poly, Team 8-58, Johann Spring 2013人のメンバー

CPSU-JOHANN-S13S8G58

4 メンバー

10のガイドは作成済み

0 件のコメント

コメントを追加

統計データ:

過去 24時間: 3

過去 7 日: 5

過去 30 日: 10

今までの合計 3,224