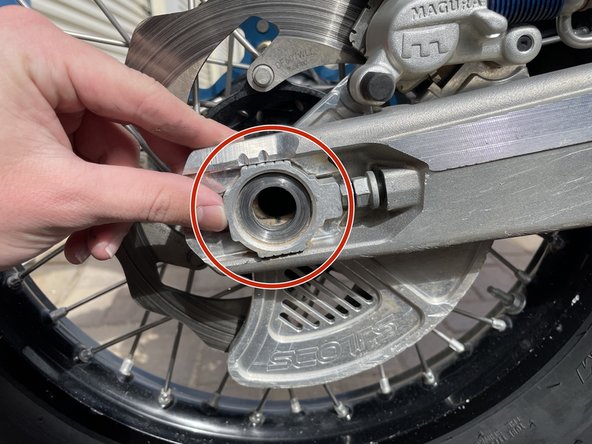
メインコンテンツにスキップ

Husqvarna FE 350 Rear Sprocket Replacement

必要な工具と部品

  1. Husqvarna FE 350 Rear Sprocket Replacement, Rear Sprocket: 手順 1、 1の画像 1
    • Place the motorcycle on a stand so that the rear tire is off the ground.

  2. Husqvarna FE 350 Rear Sprocket Replacement: 手順 2、 2の画像 1 Husqvarna FE 350 Rear Sprocket Replacement: 手順 2、 2の画像 2
    • Use the 27mm wrench to unscrew the nut that holds the axle together. This nut is located on the right side of the motorcycle at the end of the swing-arm.

  3. Husqvarna FE 350 Rear Sprocket Replacement: 手順 3、 3の画像 1 Husqvarna FE 350 Rear Sprocket Replacement: 手順 3、 3の画像 2 Husqvarna FE 350 Rear Sprocket Replacement: 手順 3、 3の画像 3
    • Move to the left side of the motorcycle and remove the axle by pulling it directly out.

    • Move back to the right side and remove the spacer shown in the third picture to ensure that is does not get lost.

  4. Husqvarna FE 350 Rear Sprocket Replacement: 手順 4、 2の画像 1 Husqvarna FE 350 Rear Sprocket Replacement: 手順 4、 2の画像 2
    • Pull up and back on the chain to free the tire.

  5. Husqvarna FE 350 Rear Sprocket Replacement: 手順 5、 1の画像 1
    • Lay the tire on a flat surface with with sprocket facing up.

    • Use the 6mm Torx wrench to unscrew the six bolts holding the sprocket on.

    • Replace the sprocket and screw the bolts back in.

  6. Husqvarna FE 350 Rear Sprocket Replacement: 手順 6、 1の画像 1
    • Be careful that the brake rotor fits in between the brake pads on the caliper.

  7. Husqvarna FE 350 Rear Sprocket Replacement: 手順 7、 1の画像 1
    • Put the chain back on. Start at the bottom and work the chain carefully over the top of the new sprocket.

  8. Husqvarna FE 350 Rear Sprocket Replacement: 手順 8、 3の画像 1 Husqvarna FE 350 Rear Sprocket Replacement: 手順 8、 3の画像 2 Husqvarna FE 350 Rear Sprocket Replacement: 手順 8、 3の画像 3
    • Push the axle back through the swing arm and the wheel.

    • Place the spacer back onto the axle with the square side pointing forward.

    • Thread the 27mm nut back onto the axle.

  9. Husqvarna FE 350 Rear Sprocket Replacement: 手順 9、 1の画像 1
    • Use the 27mm wrench to tighten the nut down.

ゴール

2 の人々がこのガイドを完成させました。

作成者

1人の作成者と共同作成されました。

Bryce Marking

メンバー登録日: 02/02/21

231 ポイント

1ガイドが承認済み

コメント 1 件

C'est bien. je veux apprendre à réparer les motos

Enoch DEMBELE - 返信

コメントを追加

統計データ:

過去 24時間: 2

過去 7 日: 16

過去 30 日: 75

今までの合計 1,191