メインコンテンツにスキップ

Huawei P9 Lite Display with Frame Replacement

必要な工具と部品

  1. Huawei P9 Lite Display with Frame Replacement, Back Cover: 手順 1、 2の画像 1 Huawei P9 Lite Display with Frame Replacement, Back Cover: 手順 1、 2の画像 2
    • Use an opening pick to unclip the rear cover, starting from the bottom corner.

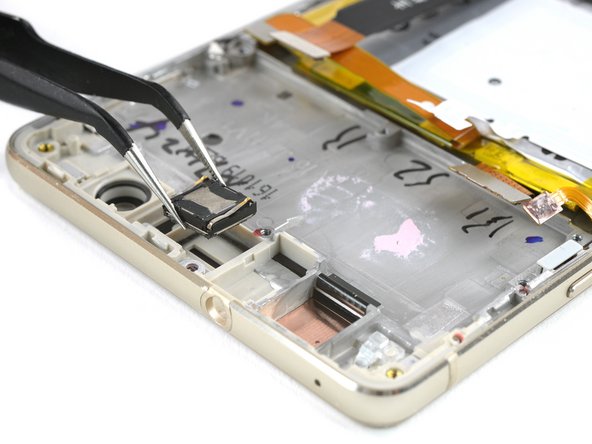
    • Work your way around counterclockwise and carefully pry the plastic tabs open one by one.

  2. Huawei P9 Lite Display with Frame Replacement: 手順 2、 1の画像 1
    • There is adhesive underneath the back cover that holds it to the battery and the metal plate at the top.

    • Be careful with the flex cable at the right hand side.

    • Twist the opening pick to lever the back cover away and loosen it from the adhesive.

  3. Huawei P9 Lite Display with Frame Replacement: 手順 3、 1の画像 1
    • When the back cover is freed from the adhesive you can pop it off by hand completely.

  4. Huawei P9 Lite Display with Frame Replacement, Motherboard Shield: 手順 4、 1の画像 1
    • Remove the nine Phillips #00 screws that secure the metal shield plate.

    • Some screws may be covered with tamper proof stickers. Remove them to ensure a proper seating for your driver.

  5. Huawei P9 Lite Display with Frame Replacement: 手順 5、 2の画像 1 Huawei P9 Lite Display with Frame Replacement: 手順 5、 2の画像 2
    • Do not remove the shield plate yet, it is attached by a connector and an adhered cable.

    • Use a spudger to disconnect the fingerprint sensor from the motherboard.

    • Peel the NFC antenna cable off of the metal plate.

  6. Huawei P9 Lite Display with Frame Replacement, Motherboard: 手順 6、 2の画像 1 Huawei P9 Lite Display with Frame Replacement, Motherboard: 手順 6、 2の画像 2
    • Remove the SIM card tray.

  7. Huawei P9 Lite Display with Frame Replacement: 手順 7、 3の画像 1 Huawei P9 Lite Display with Frame Replacement: 手順 7、 3の画像 2 Huawei P9 Lite Display with Frame Replacement: 手順 7、 3の画像 3
    • Disconnect the motherboard flex, the battery flex and the antenna cable.

  8. Huawei P9 Lite Display with Frame Replacement: 手順 8、 2の画像 1 Huawei P9 Lite Display with Frame Replacement: 手順 8、 2の画像 2
    • Disconnect the display flex and the power and volume button cable.

  9. Huawei P9 Lite Display with Frame Replacement: 手順 9、 2の画像 1 Huawei P9 Lite Display with Frame Replacement: 手順 9、 2の画像 2
    • Unplug the rear camera and the headphone jack.

  10. Huawei P9 Lite Display with Frame Replacement: 手順 10、 2の画像 1 Huawei P9 Lite Display with Frame Replacement: 手順 10、 2の画像 2
    • Take the camera and the headphone jack out of their recesses.

  11. Huawei P9 Lite Display with Frame Replacement: 手順 11、 3の画像 1 Huawei P9 Lite Display with Frame Replacement: 手順 11、 3の画像 2 Huawei P9 Lite Display with Frame Replacement: 手順 11、 3の画像 3
    • Use a spudger to lift the motherboard carefully.

    • Remove the motherboard assembly.

    • On the back of the motherboard there is a thermal pad (pink rubber-like gob) for heat dissipation. If you are about to replace the display assembly, and the thermal pad broke or is too dried out, you might want to replace it with a new one.

  12. Huawei P9 Lite Display with Frame Replacement, Display with Frame: 手順 12、 2の画像 1 Huawei P9 Lite Display with Frame Replacement, Display with Frame: 手順 12、 2の画像 2
    • Remove the rubber microphone cover and the earpiece speaker.

  13. Huawei P9 Lite Display with Frame Replacement: 手順 13、 1の画像 1
    • Remove the seven loudspeaker screws:

    • Three silver 2.9 mm Phillips #00

    • Four black 3.8 mm Phillips #00

  14. Huawei P9 Lite Display with Frame Replacement: 手順 14、 1の画像 1
    • Remove the loudspeaker.

  15. Huawei P9 Lite Display with Frame Replacement: 手順 15、 2の画像 1 Huawei P9 Lite Display with Frame Replacement: 手順 15、 2の画像 2
    • Unplug the motherboard flex cable and disconnect the antenna cable.

    • Put both cables aside.

  16. Huawei P9 Lite Display with Frame Replacement: 手順 16、 3の画像 1 Huawei P9 Lite Display with Frame Replacement: 手順 16、 3の画像 2 Huawei P9 Lite Display with Frame Replacement: 手順 16、 3の画像 3
    • Now remove the daughter board.

    • Carefully peel off the contact of the vibration motor and take it out.

    • Also remove the lower microphone housing.

  17. Huawei P9 Lite Display with Frame Replacement: 手順 17、 3の画像 1 Huawei P9 Lite Display with Frame Replacement: 手順 17、 3の画像 2 Huawei P9 Lite Display with Frame Replacement: 手順 17、 3の画像 3
    • Only pry along the SIM tray edge of the battery to protect the display flex cable that runs under the center of the battery.

    • Insert a spudger or thin prying tool at a shallow angle to avoid bending the battery and pry it up from its adhesive.

    • Compare the new and the old part for any small components that need to be transferred like buttons or gaskets.

    • Never reinstall a battery that has been bent or damaged during removal.

終わりに

To reassemble your device, follow these instructions in reverse order.

39 の人々がこのガイドを完成させました。

作成者

3人の作成者と共同で作成されました。

Tobias Isakeit

メンバー登録日: 03/31/14

117,588 ポイント

188のガイドは作成済み

チーム

Master Techs Master Techs人のメンバー

Community

322 メンバー

2,528のガイドは作成済み

7 件のコメント

I finished to replace the display yesterday and everything is perfect , thanks ifixit

husam faraj - 返信

i replaced the display but the touchscreen doesn’t work

Michele Rappazzo - 返信

You can try to reopen the phone and check if the flex cable is plugged in correctly or if any cable is ripped. If you can’t find any damage and all cables are plugged in correctly it’s possibly an issue with the replacement part.

Dominik Schnabelrauch -

Hi, could you show how to replace the power button flex cable for a P9 Lite 2017? I would be greatful.

szaszisti - 返信

my powerbutton connection is also missing…

lorenz_untersulzner -

コメントを追加

統計データ:

過去 24時間: 1

過去 7 日: 4

過去 30 日: 24

今までの合計 25,129