はじめに
このガイドを参照して、お持ちのHuawei P9 Liteのリアカメラを交換しましょう。
必要な工具と部品
-
-
開口ピックを捻って、バックカバーを持ち上げ、接着剤から剥がします。
Most of the adhesive is around the fingerprint cell and on the battery itself. You can slowly pull the back cover from its side but make sure not to break it. Push the mediator or a longer piece of plastic under the back cover to slowly destroy the adhesive.
Slowly, slowly wins the day. Nicolas is right and comes off a charm. The most nerve wracking part of this longish repair.
-
-
-
-
バックカバーの接着剤が剥がれたら、手で完全に取り外せます。
Hi! Im so sad! At the begginig of the operation i ve broken the white seal/connector that in one side is connected to the board and the other side is "glued" to the battery. Can someone help me? how can i solve this?? There is no image displayed on the screen. but there is vibration, sound, notifications... can someone help me please???
What you broke is handling the NFC, and doesn’t have anything to do with the display. You probably damaged the ribbon right below the battery, since that’s what links the display to the motherboard.
Polaris -
Oups ! L’antenne NFC était solidement collée à l’intérieur de la coque et j’ai donc déchiré sa nappe en ouvrant la coque. Heureusement, je n’utilise pas les fonctions NFC et, à part cela, tout a l’air de fonctionner normalement.
-
-
-
メタル製シールドプレートに留められた#00プラスネジを9本外します。
Qu’est ce qu’un “indicateur d’eau”?
Une petite pastille qui change de couleur au contact de l’eau. Les fabricants s’en servent pour nullifier la garantie : si ta pastille indique que de l’eau s’est infiltré, tu devra payer ta réparation.
Polaris -
Are all the screws the same size ?
yes they are
Adam M -
-
-
-
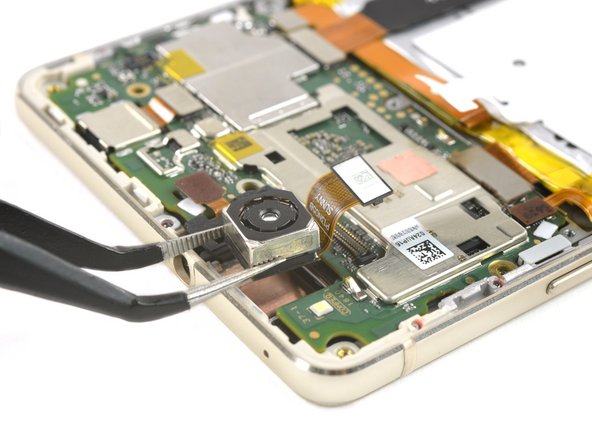
スパッジャーを使って、マザーボードから指紋センサーの接続を外します。
-
メタル製プレートからNFCアンテナケーブルを剥がします。
can we just remove NFC antenna and dont want to install int back?
Note there are two plastic tabs at the top of the shield plate. Unlock them with a mediator, the plate will come easily after that.
Buongiorno,
va sostituita l'intera piastra metallica contenente il sensore impronte e la fotocamera, oppure il sensore é estraibile dalla piastra?
Grazie
LUIGI
Yes, it is possible to remove just the fingerprint sensor from the motherboard shield. Remove the small metal plate on the inside of the shield covering the sensor and push the fingerprint sensor through from the other side.
-


デバイスを再度組み立てるには、この説明書の逆の順番で組み立ててください。
デバイスを再度組み立てるには、この説明書の逆の順番で組み立ててください。
6 の人々がこのガイドを完成させました。

チーム

2 件のコメント
So, i ordered some replacement parts for my huawei p9 lite(Main camera, front camera, usb board), Everything i replaced is working, except for the main camera, the new main camera isn’t working, because when i open my camera app it immediately closes, snapchat shows me an error that says: Snapchat was unable to open the camera app. I made sure that the new main camera isn’t working for some reason, because when i put my original camera back in, everything works, including the new front camera). Am i missing something, could it be a hardware problem or a software problem? Please help, i need advices quick. Thanks.
My mobile phon p9 lite camera removed without strip how to adjust camera in lens??
What could you use instead of an opening pick??
Alfredo - 返信
Like, could a guitar pick wor? Or anything else?
Alfredo - 返信
A guitar pick will also do.
Tobias Isakeit -
what can still be used besides guitar pick
Tarshia Thompson - 返信
I had a hard time to open the back cover by opening pick. Then I used little, really little knife at first, and I continue to opening back cover using opening pick.
Andy B - 返信
Heating up aroud the finger sensor to loosen the square adhesive tape ..
Hishamchohan - 返信
If you do not have any picks, You can also adapt an old credit or utility card by cutting it in to thirds. Then with some fine emery or sand paper, rub a sharp point on the one edge of the card. This will help you get access to the clips that hold the rear cover on. The one i did yesterday had quite a lot of adhesive around the edge & around the finger print sensor. Another tip with an old credit card is to cut it in to narrow strips to insert in to where you have separated the cover from the frame to stop it getting stuck to the adhesive again.
gazza667 - 返信