メインコンテンツにスキップ

Huawei P9 Earpiece Speaker Replacement

必要な工具と部品

  1. Huawei P9 Earpiece Speaker Replacement, Back Cover: 手順 1、 3の画像 1 Huawei P9 Earpiece Speaker Replacement, Back Cover: 手順 1、 3の画像 2 Huawei P9 Earpiece Speaker Replacement, Back Cover: 手順 1、 3の画像 3
    • First switch off your phone and remove the SIM card tray.

    • Unscrew the two Pentalobe P2 screws located at the bottom next to the device's USB C port.

    • If the screen is cracked you might want to use some tape to protect your eyes from glass shreds and get a better grip to open the phone.

  2. Huawei P9 Earpiece Speaker Replacement: 手順 2、 2の画像 1 Huawei P9 Earpiece Speaker Replacement: 手順 2、 2の画像 2
    • Avoid to lift only the display instead of the whole phone assembly as doing so may cause damage to the screen.

    • Use an iSclack or a suction handle to separate the phone assembly from the rear panel.

    • In case you can‘t manage to lift the phone assembly out of the rear panel you can insert the pointed end of a spudger in the headphone jack opening and press the phone assembly upwards until you create a gap between assembly and rear panel. Then use the spudger to lever the phone assembly out of the panel.

    • Don't remove the rear panel completely yet. There is a cable connected to it! It is running from the finger print sensor to the display unit.

  3. Huawei P9 Earpiece Speaker Replacement, Fingerprint sensor: 手順 3、 2の画像 1 Huawei P9 Earpiece Speaker Replacement, Fingerprint sensor: 手順 3、 2の画像 2
    • Disconnect the fingerprint sensor using a spudger.

  4. Huawei P9 Earpiece Speaker Replacement, Earpiece Speaker: 手順 4、 3の画像 1 Huawei P9 Earpiece Speaker Replacement, Earpiece Speaker: 手順 4、 3の画像 2 Huawei P9 Earpiece Speaker Replacement, Earpiece Speaker: 手順 4、 3の画像 3
    • Loosen the seven Phillips #00 screws on the motherboard.

    • On one of them might be a sticker. Remove it.

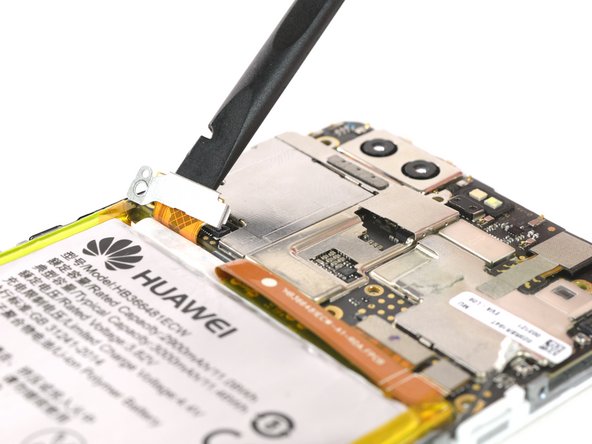
    • Unplug the antenna cable.

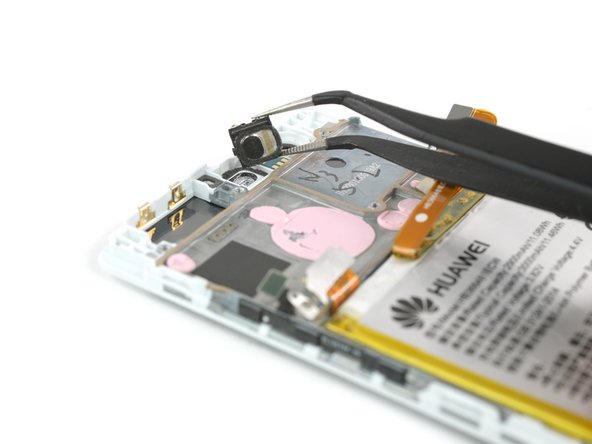
    • The metal plate covering the battery connector has two little hooks on each side. Use a tweezer to free them and unhinge the plate towards the top.

  5. Huawei P9 Earpiece Speaker Replacement: 手順 5、 2の画像 1 Huawei P9 Earpiece Speaker Replacement: 手順 5、 2の画像 2
    • Disconnect the volume button cable and the display cable …

  6. Huawei P9 Earpiece Speaker Replacement: 手順 6、 2の画像 1 Huawei P9 Earpiece Speaker Replacement: 手順 6、 2の画像 2
    • … as well as the battery connector and the cable running to the daughter board.

  7. Huawei P9 Earpiece Speaker Replacement: 手順 7、 2の画像 1 Huawei P9 Earpiece Speaker Replacement: 手順 7、 2の画像 2
    • Now you can lift out the motherboard to access the earpiece speaker.

    • Be careful with both cameras since they are still connected to the motherboard.

    • The earpiece speaker ist fixed with an adhesive foam gasket.

終わりに

To reassemble your device, follow these instructions in reverse order.

作成者

2人の作成者と共同で作成されました。

Dominik Schnabelrauch

メンバー登録日: 11/23/16

202,734 ポイント

682のガイドは作成済み

チーム

iFixit iFixit人のメンバー

Staff

135 メンバー

16,732のガイドは作成済み

0 件のコメント

コメントを追加

統計データ:

過去 24時間: 0

過去 7 日: 0

過去 30 日: 1

今までの合計 2,437