はじめに
このガイドを参照して、お持ちのHuawei P9スマートフォンのヘッドホンジャックを交換しましょう。
必要な工具と部品
-
-
iSclackや吸盤ハンドルを使って、リアパネルからディスプレイユニットを引き離します。
If you cant get suction because of cracks in the screen, use wide tape to create smooth surface.
If your screen is smashed, and nothing else will work (iSclack etc), you can get a thin blade between the casing and the screen assembly and the bottom. The screen assembly can then be pried out. I fought with mine before discovering this. Be careful of the broken glass.
I struggled to remove screen with suction cups due to damage to the back case. I used a jim to pry from bottom by usb c port, worked well.
Be very carrefull as it can open in one fell swoop !
On my model, I had 2 Little torx screws beside the USB port. If so, the screen won’t come out with them on.
Interesting, sure those were 6-starred (Torx) and not 5-starred (Pentalobe) like mentioned in step 1?
Are there any tips to help loosen the screen after taking the screws out? I brought in an extra person to help with the suction cup whilst I tried to pry the screen away with it still only moving at most 1mm (maybe less) and not enough to get any pry tools in. Ending up using quite a lot of force - far more than I think I should be to no success. As it stands I’m just ending up doing minor damage to the base of the screen/case.
Hey A Birch,
just for the case, I mention — it’s important to pull out the SIM card tray, otherwise, it will block the opening procedure and you’ll damage your phone. In case the frame is damaged or bent you’ll need more force to open the phone. In general, the opening procedure should be fairly easy.
On this step, I found it hard as the screen and the motherboard are attatched, but instead just the screen is coming up, any tips for getting under and lifting up the motherboard + battery. (Trying to do a battery replacement). The screen with that wire on Step 15 for some reference :)
Received my kit yesterday and now trying to remove the screen from the case with the suction tool. Having extreme difficulty and cannot even get a pick in to prise it off. Still trying…
Found it easy to remove screen from case using the sucker while holding the edge of the case down using the blue spudger that came with the kit. Came off in seconds…
If you have difficulty removing the display from the case, make sure to not just remove the screen. Apparently, if the case has received a knock or the motherboard is sticking to the case, it can be very, very difficult to move the motherboard as well as the screen.
However, the whole screen and motherboard assembly needs to come out. If only the screen moves, chances are the ribbon cable that attaches it to the motherboard may get pulled out of its socket or may even get damaged. I suggest to not use excessive force on the display and be very careful when attempting to pry it open. You need to get a purchase on the whole screen/motherboard unit, not just the screen.
Using a lever through the USB C port and the hole for the headphone jack may help to get the motherboard assembly moving. Be careful, though to not damage theses parts.
I think the guide should be amended to point out the possibility of moving the screen only and its associated dangers.
I found the screen/motherboard very difficult to move. I used the sucker (down near the USB/screw end) and the broad end of the spudger in the USB port (I was careful (I hope!) to not insert the spudger too far so I was just pressing against the case). It needed a lot of force and can away sunddenly but has left the fingerprint cable intact.
I have looked at other comments and I had removed the 2 screws next to the USB port and the sim tray, it was just plain sticky.
I couldn’t remove the screen cause I was afraid to break it!! Also using two suction caps it was impossible to lift. I tried with a thin blade but nothing to do. Is there any “trick” to release it? Why is it so strengthly stuck? Please somebody give some suggests…
Try to make sure to remove the SIM card tray and the screws at the bottom end of the phone before you try to lift the display, both block the display whilst removing the back cover. For the case that you’re using two suction cups instead of an iSclack, try to place them as close to the bottom edge as possible. For the case that the suction cups fall off easily, you can put a little water on them before pressing them on the phone. As you mentioned you can try using a blade/opening pick/jimmy as a lever during the removal procedure or you can use a tool like a spudger and insert it into the USB port to press the assembly out of the rear cover but take care to avoid damage to the port. The plastic clamps can sit really tight sometimes. In case the frame is damaged or bent you’ll need more force to open the phone.
PS I spent my money to buy battery and tool kit but if I can’t open it I wasted money believing in this “guide” that show all as a kind of easy DIY… actually it’s easier to make a damage bigger than repair!
Heating the aluminium back of the phone with a hairdryer to about 60C helps. Aluminium expands more than twice as much as the glass which anyway remains cool away from the hairdryer. Then the suction pliers and the spudger through the 3.5mm audio jack hole finally did the trick. I was about to give up!
J B Graham - 返信
I just replaced the battery of the Huawei p9. I had to open the phone using a thick, blunt needle using the headphone jack. After creating a gap, I carefully fulled the phone apart by my fingernails, with no problem whatsoever. No risk of damage doing it this way. Of course, you need to be carefull not to damage the contact pins inside the jack, but at least there is no risk of damaging the screen this way.
I don’t understand why the suction cups are the preferred method to open the case. They just popped of by applying a scaring amount of force…
Next time I will immediately use the headphone jack.
-
-
-
-
ネジの上部にあるウォーターインジケーターを取り外します。
-
#00プラスネジを2本外します。
-
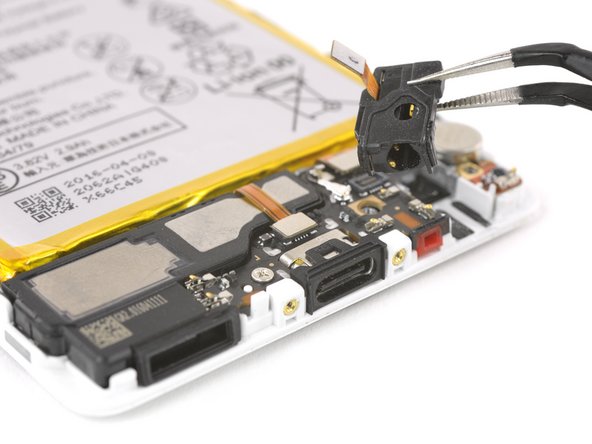
メタル製ブラケットを取り外します(下に留められた接着剤に注意してください)。
-


デバイスを再度組み立てるには、この説明書の逆の順番で組み立ててください。
デバイスを再度組み立てるには、この説明書の逆の順番で組み立ててください。
3 の人々がこのガイドを完成させました。
以下の翻訳者の皆さんにお礼を申し上げます:
100%

これらの翻訳者の方々は世界を修理する私たちのサポートをしてくれています。 あなたも貢献してみませんか?
翻訳を始める ›

チーム

your supply kit -IFIXIT does not have a screw driver bit small enough to unscrew the two Pentalobe P2 screws for my Huawei Mate P9 pro
phone. Where can I get help from ?
Vincent Leung - 返信
Hi Vincent!
Our Pentalobe P2 bits work perfectly in the Huawei P9. If you already have a driver handle that has a 4mm socket, you can use one of these bits in it and that should work fine. Otherwise, if you prefer the P2 screwdriver itself, you can find that tool here.
I hope this helps!
Kadan Sharpe -