メインコンテンツにスキップ

Huawei P8 Lite Vibrator Replacement

必要な工具と部品

  1. Huawei P8 Lite Vibrator Replacement, Back Cover: 手順 1、 2の画像 1 Huawei P8 Lite Vibrator Replacement, Back Cover: 手順 1、 2の画像 2
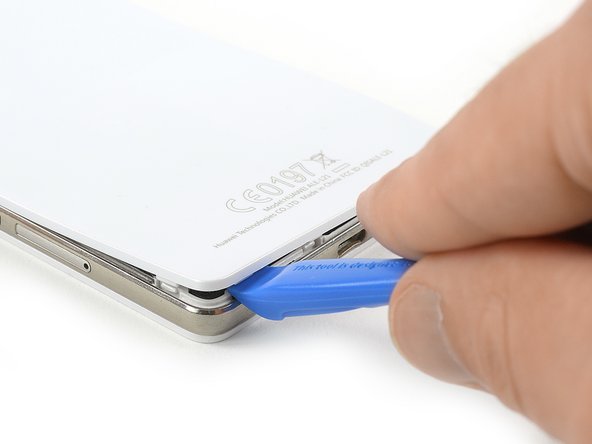
    • Use an Opening Tool and start to lever up the back cover of your Huawei P8 Lite at the bottom of your phone.

    El celular no tiene ese tipo de tapa es como sellada, que debo hacer para saber si es por la pila que no agarra carga porxa

    maguada1106 - 返信

    Wenn man langsam langsam arbeiten und vorsichtig ist, dann kein problem gibt es.Ich hätte keine Problemen zu öffnen.Das ist sehr leicht.

    Athanasios Georgopoulos - 返信

  2. Huawei P8 Lite Vibrator Replacement: 手順 2、 3の画像 1 Huawei P8 Lite Vibrator Replacement: 手順 2、 3の画像 2 Huawei P8 Lite Vibrator Replacement: 手順 2、 3の画像 3
    • There are clips around the whole mid frame, holding down the back cover. Open all of them with the Opening Tool.

    • When all clips are open, remove the back cover from the rest of the phone.

    • If the back cover doesn't come freely, there are probably some additional clips that need to be disconnected.

    The back panel is really really easy to brake, be careful :)

    romaingauthier - 返信

    In my mobile phone the back panel was kept in place also from 2 strips of bi-adhesive tape. Pull gently to detach it to remove the panel.

    beppe modolo - 返信

    right. it has 4 strips of adhesive tape

    Miguel Cretu -

    To facilitate the detachment of these double-sided tapes, I recommend heating with a hairdryer along the edges of the back cover, especially at the four corners.

    Nicola -

  3. Huawei P8 Lite Vibrator Replacement, Loudspeaker: 手順 3、 1の画像 1
    • Use a tweezer to remove the warranty sticker which sits on a screw in the bottom right of your phone.

    The 4 screws wich hold down the lower part of the loudspeaker are Torx screws for me. But it's a French Huawei, doin' nothing like the others :)

    Christopher Hourlier - 返信

    Die Wasserschadenindikatoren sitzen unter dem Mainboard. Bei den Aufklebern auf den TORX handelt es sich um Garantiesiegel.

    Andre Richter - 返信

    Danke für den Hinweis, wurde so übernommen.

    Dominik Schnabelrauch -

    pour dévisser les vis cruciformes, quel taille de tournevis faut il? svp

    blan - 返信

    Bonjour, il vous faut un tournevis ou un embout cruciforme #00 pour dévisser une vis cruciforme #00. Bonne réparation !

    Claire Miesch -

  4. Huawei P8 Lite Vibrator Replacement: 手順 4、 1の画像 1
    • Remove the 4 black Torx T5 screws which hold down the lower part of the loudspeaker.

    • Remove the three silver Phillips #00 screws which hold down the upper part of the loudspeaker.

  5. Huawei P8 Lite Vibrator Replacement: 手順 5、 1の画像 1
    • Remove the loudspeaker carefully.

  6. Huawei P8 Lite Vibrator Replacement, Motherboard: 手順 6、 3の画像 1 Huawei P8 Lite Vibrator Replacement, Motherboard: 手順 6、 3の画像 2 Huawei P8 Lite Vibrator Replacement, Motherboard: 手順 6、 3の画像 3
    • Remove the three Phillips #00 screws that hold the metal plate in place.

    • Remove the metal plate with a tweezer.

    • Unplug the battery flex connector with a spudger.

    Theese Screws are quite hard to remove…

    Jannik Peichl - 返信

  7. Huawei P8 Lite Vibrator Replacement: 手順 7、 1の画像 1
    • Remove the two Torx T5 screws.

    • If there is a tamper evident sticker over your screws remove them to properly seat your driver.

    • Remove the five Phillips #00 screws.

  8. Huawei P8 Lite Vibrator Replacement: 手順 8、 2の画像 1 Huawei P8 Lite Vibrator Replacement: 手順 8、 2の画像 2
    • Carefully pry off the plastic cover on the left side. The NFC antenna contacts might be slightly glued to the cover.

    • Then remove the top cover.

    An der Linken Plastikabdeckung sind die Kontakte dran geklebt!

    Luk_ S!lver - 返信

    EN: The lateral small plastic piece is sticked to the flex of the side buttons. Take care

    Miguel Cretu - 返信

  9. Huawei P8 Lite Vibrator Replacement: 手順 9、 3の画像 1 Huawei P8 Lite Vibrator Replacement: 手順 9、 3の画像 2 Huawei P8 Lite Vibrator Replacement: 手順 9、 3の画像 3
    • Remove the SIM card and SD card trays.

    • Disconnect the three plug connectors and one ZIF connector.

    • Unlock the ZIF connector by lifting the small black plastic lever.

  10. Huawei P8 Lite Vibrator Replacement: 手順 10、 3の画像 1 Huawei P8 Lite Vibrator Replacement: 手順 10、 3の画像 2 Huawei P8 Lite Vibrator Replacement: 手順 10、 3の画像 3
    • Remove the volume and power button cable.

    • Take out the motherboard by lifting the bottom part first.

    • Pay attention to the cables, so they don't rip when staying stuck to the motherboard.

    • On the back of the motherboard there is a thermal pad (pink rubber-like gob) for heat dissipation. If this thermal pad broke or is too dried out you might want to replace it with a new one.

  11. Huawei P8 Lite Vibrator Replacement, Vibrator: 手順 11、 2の画像 1 Huawei P8 Lite Vibrator Replacement, Vibrator: 手順 11、 2の画像 2
    • Pry off the vibrator using a plastic opening tool.

    Il motore di vibrazione era incollato, ma telaio nuovo non era dotato di adesivo, cosa che ora non lo fa restare aderente.

    ancora - 返信

終わりに

To reassemble your device, follow these instructions in reverse order.

ある他の人がこのガイドを完成しました。

Tobias Isakeit

メンバー登録日: 03/31/14

117,598 ポイント

188のガイドは作成済み

チーム

Master Techs Master Techs人のメンバー

Community

322 メンバー

2,535のガイドは作成済み

コメント 1 件

Doğrusu Güzel Anlatılmış Ve Ben Her Zaman Elektronık Tüm Parçalarda KEndi İşimi Kendım Yaparım Araba Bır Ütü Belkı Bir Mekanık Parça Bu Seferde Titreşim Motorumu Deyiştirmek İstedim Ve Bu Resimler Sayesınde Kötü tornavaıdalarla Bile yarım saatte İşlem Tamam Teşekkur Edıyorum Emegi Geçipte Burada Bunu Paylaşan Herkesten

orcun adana - 返信

コメントを追加

統計データ:

過去 24時間: 0

過去 7 日: 0

過去 30 日: 2

今までの合計 1,519