メインコンテンツにスキップ

Huawei P8 Lite Display Replacement

必要な工具と部品

  1. Huawei P8 Lite Display Replacement, Back Cover: 手順 1、 2の画像 1 Huawei P8 Lite Display Replacement, Back Cover: 手順 1、 2の画像 2
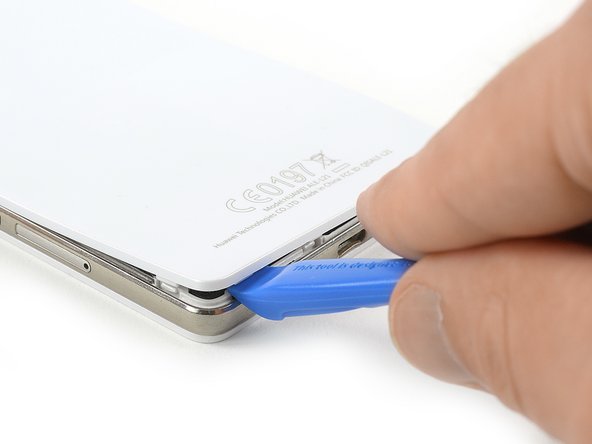
    • Use an Opening Tool and start to lever up the back cover of your Huawei P8 Lite at the bottom of your phone.

  2. Huawei P8 Lite Display Replacement: 手順 2、 3の画像 1 Huawei P8 Lite Display Replacement: 手順 2、 3の画像 2 Huawei P8 Lite Display Replacement: 手順 2、 3の画像 3
    • There are clips around the whole mid frame, holding down the back cover. Open all of them with the Opening Tool.

    • When all clips are open, remove the back cover from the rest of the phone.

    • If the back cover doesn't come freely, there are probably some additional clips that need to be disconnected.

  3. Huawei P8 Lite Display Replacement, Loudspeaker: 手順 3、 1の画像 1
    • Use a tweezer to remove the warranty sticker which sits on a screw in the bottom right of your phone.

  4. Huawei P8 Lite Display Replacement: 手順 4、 1の画像 1
    • Remove the 4 black Torx T5 screws which hold down the lower part of the loudspeaker.

    • Remove the three silver Phillips #00 screws which hold down the upper part of the loudspeaker.

  5. Huawei P8 Lite Display Replacement: 手順 5、 1の画像 1
    • Remove the loudspeaker carefully.

  6. Huawei P8 Lite Display Replacement, Motherboard: 手順 6、 3の画像 1 Huawei P8 Lite Display Replacement, Motherboard: 手順 6、 3の画像 2 Huawei P8 Lite Display Replacement, Motherboard: 手順 6、 3の画像 3
    • Remove the three Phillips #00 screws that hold the metal plate in place.

    • Remove the metal plate with a tweezer.

    • Unplug the battery flex connector with a spudger.

  7. Huawei P8 Lite Display Replacement: 手順 7、 1の画像 1
    • Remove the two Torx T5 screws.

    • If there is a tamper evident sticker over your screws remove them to properly seat your driver.

    • Remove the five Phillips #00 screws.

  8. Huawei P8 Lite Display Replacement: 手順 8、 2の画像 1 Huawei P8 Lite Display Replacement: 手順 8、 2の画像 2
    • Carefully pry off the plastic cover on the left side. The NFC antenna contacts might be slightly glued to the cover.

    • Then remove the top cover.

  9. Huawei P8 Lite Display Replacement: 手順 9、 3の画像 1 Huawei P8 Lite Display Replacement: 手順 9、 3の画像 2 Huawei P8 Lite Display Replacement: 手順 9、 3の画像 3
    • Remove the SIM card and SD card trays.

    • Disconnect the three plug connectors and one ZIF connector.

    • Unlock the ZIF connector by lifting the small black plastic lever.

  10. Huawei P8 Lite Display Replacement: 手順 10、 3の画像 1 Huawei P8 Lite Display Replacement: 手順 10、 3の画像 2 Huawei P8 Lite Display Replacement: 手順 10、 3の画像 3
    • Remove the volume and power button cable.

    • Take out the motherboard by lifting the bottom part first.

    • Pay attention to the cables, so they don't rip when staying stuck to the motherboard.

    • On the back of the motherboard there is a thermal pad (pink rubber-like gob) for heat dissipation. If this thermal pad broke or is too dried out you might want to replace it with a new one.

  11. Huawei P8 Lite Display Replacement, Display: 手順 11、 3の画像 1 Huawei P8 Lite Display Replacement, Display: 手順 11、 3の画像 2 Huawei P8 Lite Display Replacement, Display: 手順 11、 3の画像 3
    この手順で使用する道具:
    Plastic Cards
    $2.99
    購入する
    • Changing the display can be done without removing the battery. But for safety reasons we recommend removing it as seen in the battery guide by pulling the adhesive tab and prying it out with a plastic card.

    • Heat up the top, bottom and both sides of the display with an iOpener to soften the adhesive.

  12. Huawei P8 Lite Display Replacement: 手順 12、 3の画像 1 Huawei P8 Lite Display Replacement: 手順 12、 3の画像 2 Huawei P8 Lite Display Replacement: 手順 12、 3の画像 3
    • Use an opening pick to get underneath the top right part of the display and loosen the adhesive.

    • Only with the very tip of the opening pick slide along the side of the display towards the bottom.

    • Loosen the adhesive underneath the complete lower part of the display.

  13. Huawei P8 Lite Display Replacement: 手順 13、 3の画像 1 Huawei P8 Lite Display Replacement: 手順 13、 3の画像 2 Huawei P8 Lite Display Replacement: 手順 13、 3の画像 3
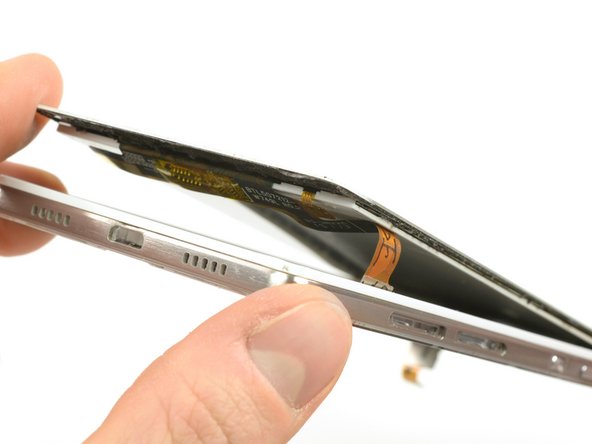
    • Slowly but constantly lift the bottom part of the display to get underneath the screen and further loosen the adhesive.

    • Thread the cable through the midframe.

    • Open the display all the way and remove it from the midframe.

    • Make sure to test the new display and remove any old residue from the adhesive before reassembly.

終わりに

To reassemble your device, follow these instructions in reverse order. Make sure to test the new display and remove any old residue from the adhesive.

31 の人々がこのガイドを完成させました。
作成者

2人の作成者と共同で作成されました。

Tobias Isakeit

メンバー登録日: 03/31/14

117,588 ポイント

188のガイドは作成済み

チーム

Master Techs Master Techs人のメンバー

Community

322 メンバー

2,528のガイドは作成済み

0 件のコメント

コメントを追加

統計データ:

過去 24時間: 3

過去 7 日: 14

過去 30 日: 43

今までの合計 23,796