メインコンテンツにスキップ

Huawei P10 Lite Rear Camera Replacement

必要な工具と部品

  1. Huawei P10 Lite Rear Camera Replacement, Back cover: 手順 1、 3の画像 1 Huawei P10 Lite Rear Camera Replacement, Back cover: 手順 1、 3の画像 2 Huawei P10 Lite Rear Camera Replacement, Back cover: 手順 1、 3の画像 3
    • Insert the tip of an opening pick between the back cover and the mid frame and slide it around the phone, to cut the adhesive.

    • Using a suction handle to lift the back cover may help to get an initial gap for the opening pick to put in.

    • If the adhesive is hard to cut, use an iOpener to loosen it.

  2. Huawei P10 Lite Rear Camera Replacement: 手順 2、 3の画像 1 Huawei P10 Lite Rear Camera Replacement: 手順 2、 3の画像 2 Huawei P10 Lite Rear Camera Replacement: 手順 2、 3の画像 3
    • After you cut the adhesive on every edge, twist your opening pick, to separate the rear cover from the phone.

    • Flip the rear cover over to the right side of the phone.

  3. Huawei P10 Lite Rear Camera Replacement: 手順 3、 2の画像 1 Huawei P10 Lite Rear Camera Replacement: 手順 3、 2の画像 2
    • Use a pair of tweezers to remove the sticker.

    • Remove the two Phillips #00 screws.

    • Remove the four 2.5 mm Phillips #00 screws.

  4. Huawei P10 Lite Rear Camera Replacement: 手順 4、 2の画像 1 Huawei P10 Lite Rear Camera Replacement: 手順 4、 2の画像 2
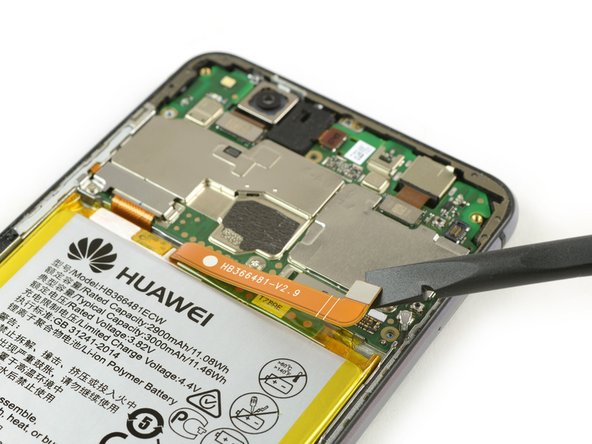
    • Use tweezers to remove the mainboard shield.

    • Use the flat end of a spudger to disconnect the finger print sensor flex cable.

    • When reassembling apply new adhesive where it is necessary.

  5. Huawei P10 Lite Rear Camera Replacement, Battery Disconnection: 手順 5、 3の画像 1 Huawei P10 Lite Rear Camera Replacement, Battery Disconnection: 手順 5、 3の画像 2 Huawei P10 Lite Rear Camera Replacement, Battery Disconnection: 手順 5、 3の画像 3
    • Remove the Phillips screw holding the battery connector plate in place.

    • Remove the battery connector plate.

    • Use the flat end of a spudger to disconnect the battery flex cable.

  6. Huawei P10 Lite Rear Camera Replacement, Rear Camera: 手順 6、 2の画像 1 Huawei P10 Lite Rear Camera Replacement, Rear Camera: 手順 6、 2の画像 2
    • Use the flat end of a spudger to disconnect the rear camera flex cable.

    • Remove the rear camera.

終わりに

To reassemble your device, follow these instructions in reverse order. When reassembling your phone apply new adhesive where it is necessary.

ある他の人がこのガイドを完成しました。

作成者

1人の作成者と共同作成されました。

Dominik Schnabelrauch

メンバー登録日: 11/23/16

202,758 ポイント

682のガイドは作成済み

チーム

iFixit iFixit人のメンバー

Staff

135 メンバー

16,732のガイドは作成済み

0 件のコメント

コメントを追加

統計データ:

過去 24時間: 0

過去 7 日: 2

過去 30 日: 5

今までの合計 2,125