メインコンテンツにスキップ

Huawei P10 Lite Charging Board Replacement

必要な工具と部品

  1. Huawei P10 Lite Charging Board Replacement, Back cover: 手順 1、 3の画像 1 Huawei P10 Lite Charging Board Replacement, Back cover: 手順 1、 3の画像 2 Huawei P10 Lite Charging Board Replacement, Back cover: 手順 1、 3の画像 3
    • Insert the tip of an opening pick between the back cover and the mid frame and slide it around the phone, to cut the adhesive.

    • Using a suction handle to lift the back cover may help to get an initial gap for the opening pick to put in.

    • If the adhesive is hard to cut, use an iOpener to loosen it.

  2. Huawei P10 Lite Charging Board Replacement: 手順 2、 3の画像 1 Huawei P10 Lite Charging Board Replacement: 手順 2、 3の画像 2 Huawei P10 Lite Charging Board Replacement: 手順 2、 3の画像 3
    • After you cut the adhesive on every edge, twist your opening pick, to separate the rear cover from the phone.

    • Flip the rear cover over to the right side of the phone.

  3. Huawei P10 Lite Charging Board Replacement: 手順 3、 2の画像 1 Huawei P10 Lite Charging Board Replacement: 手順 3、 2の画像 2
    • Use a pair of tweezers to remove the sticker.

    • Remove the two Phillips #00 screws.

    • Remove the four 2.5 mm Phillips #00 screws.

  4. Huawei P10 Lite Charging Board Replacement: 手順 4、 2の画像 1 Huawei P10 Lite Charging Board Replacement: 手順 4、 2の画像 2
    • Use tweezers to remove the mainboard shield.

    • Use the flat end of a spudger to disconnect the finger print sensor flex cable.

    • When reassembling apply new adhesive where it is necessary.

  5. Huawei P10 Lite Charging Board Replacement, Battery Disconnection: 手順 5、 3の画像 1 Huawei P10 Lite Charging Board Replacement, Battery Disconnection: 手順 5、 3の画像 2 Huawei P10 Lite Charging Board Replacement, Battery Disconnection: 手順 5、 3の画像 3
    • Remove the Phillips screw holding the battery connector plate in place.

    • Remove the battery connector plate.

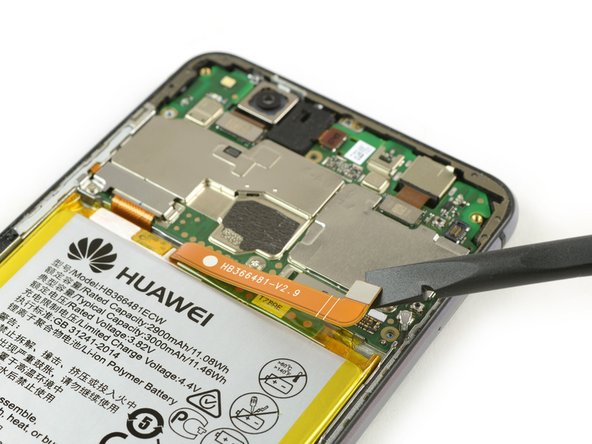
    • Use the flat end of a spudger to disconnect the battery flex cable.

  6. Huawei P10 Lite Charging Board Replacement, Loudspeaker / Vibration Motor: 手順 6、 1の画像 1
    • Remove the seven Philipps #000 screws.

  7. Huawei P10 Lite Charging Board Replacement: 手順 7、 3の画像 1 Huawei P10 Lite Charging Board Replacement: 手順 7、 3の画像 2 Huawei P10 Lite Charging Board Replacement: 手順 7、 3の画像 3
    • Insert an opening pick under the right edge of the loudspeaker unit and lever it up.

    • Grab the loudspeaker unit and remove it.

  8. Huawei P10 Lite Charging Board Replacement: 手順 8、 2の画像 1 Huawei P10 Lite Charging Board Replacement: 手順 8、 2の画像 2
    • Use an iOpener to loosen the glue under the vibration motor.

    • Remove the vibration motor.

  9. Huawei P10 Lite Charging Board Replacement, Charging Board: 手順 9、 2の画像 1 Huawei P10 Lite Charging Board Replacement, Charging Board: 手順 9、 2の画像 2
    • Use the flat end of a spudger to disconnect the interconnect cable.

    • Use tweezers to disconnect the antenna cable.

  10. Huawei P10 Lite Charging Board Replacement: 手順 10、 2の画像 1 Huawei P10 Lite Charging Board Replacement: 手順 10、 2の画像 2
    • Use an iOpener to loosen the adhesive under the charging board.

    • Remove the charging board.

終わりに

To reassemble your device, follow these instructions in reverse order. When reassembling your phone apply new adhesive where it is necessary.

5 の人々がこのガイドを完成させました。

作成者

1人の作成者と共同作成されました。

Dominik Schnabelrauch

メンバー登録日: 11/23/16

203,220 ポイント

682のガイドは作成済み

チーム

iFixit iFixit人のメンバー

Staff

135 メンバー

16,816のガイドは作成済み

3 件のコメント

thanks and very nice

mj41574 - 返信

thanks to all team

mj41574 - 返信

p10 lite charging ic change daigram

mj41574 - 返信

コメントを追加

統計データ:

過去 24時間: 0

過去 7 日: 9

過去 30 日: 53

今までの合計 9,724