メインコンテンツにスキップ

Huawei Ascend G7 Display Assembly Replacement

必要な工具と部品

  1. Huawei Ascend G7 Display Assembly Replacement, Remove upper frame casing: 手順 1、 3の画像 1 Huawei Ascend G7 Display Assembly Replacement, Remove upper frame casing: 手順 1、 3の画像 2 Huawei Ascend G7 Display Assembly Replacement, Remove upper frame casing: 手順 1、 3の画像 3
    • Under the top frame there are 3 screws. The frame is glued. Heat without exaggerating the frame and lever to disengage.

  2. Huawei Ascend G7 Display Assembly Replacement, Remove the 3 screws: 手順 2、 1の画像 1
    • Remove the 3 screws

  3. Huawei Ascend G7 Display Assembly Replacement, Removing lower frame casing: 手順 3、 3の画像 1 Huawei Ascend G7 Display Assembly Replacement, Removing lower frame casing: 手順 3、 3の画像 2 Huawei Ascend G7 Display Assembly Replacement, Removing lower frame casing: 手順 3、 3の画像 3
    • Under the Lower frame there are three screws. The frame is glued. Heat without exaggerating the frame and lever to disengage.

    • This is the same as removing as removing the upper frame casing

  4. Huawei Ascend G7 Display Assembly Replacement, Removing the screws of the lower casing: 手順 4、 1の画像 1
    • Removing the 3 screws

  5. Huawei Ascend G7 Display Assembly Replacement, Remove the sim and sd card: 手順 5、 1の画像 1
    • Remove the door of Sim

    • Remove the cover of the SD Card.

  6. Huawei Ascend G7 Display Assembly Replacement, Removing the bottom: 手順 6、 3の画像 1 Huawei Ascend G7 Display Assembly Replacement, Removing the bottom: 手順 6、 3の画像 2 Huawei Ascend G7 Display Assembly Replacement, Removing the bottom: 手順 6、 3の画像 3
    • Use a prying tool to pry the display away from the back case.

    • Be careful not to lose the volume buttons and the power button.

  7. Huawei Ascend G7 Display Assembly Replacement: 手順 7、 1の画像 1
    • The disassembled smartphone with the aluminum back removed

  8. Huawei Ascend G7 Display Assembly Replacement, Removal Of Battery: 手順 8、 2の画像 1 Huawei Ascend G7 Display Assembly Replacement, Removal Of Battery: 手順 8、 2の画像 2
    • Disconnect the battery connector.

    • If The battery is stuck, remove it very carefully.

  9. Huawei Ascend G7 Display Assembly Replacement, Disconnect video connector: 手順 9、 2の画像 1 Huawei Ascend G7 Display Assembly Replacement, Disconnect video connector: 手順 9、 2の画像 2
    • Disconnect the video connector gently.

  10. Huawei Ascend G7 Display Assembly Replacement, Headphone Connector: 手順 10、 1の画像 1
    • Gently unplug the headphone connector.

  11. Huawei Ascend G7 Display Assembly Replacement, Remove screw: 手順 11、 2の画像 1 Huawei Ascend G7 Display Assembly Replacement, Remove screw: 手順 11、 2の画像 2
    • Remove the screw at the bottom.

  12. Huawei Ascend G7 Display Assembly Replacement, Remove the screw: 手順 12、 2の画像 1 Huawei Ascend G7 Display Assembly Replacement, Remove the screw: 手順 12、 2の画像 2
    • Remove screw from the top

  13. Huawei Ascend G7 Display Assembly Replacement, Remove the screw: 手順 13、 2の画像 1 Huawei Ascend G7 Display Assembly Replacement, Remove the screw: 手順 13、 2の画像 2
    • Remove the screw next to the video connector.

    • Your almost to the finish line! Just 3 more steps to go.

  14. Huawei Ascend G7 Display Assembly Replacement, Mainboard: 手順 14、 1の画像 1
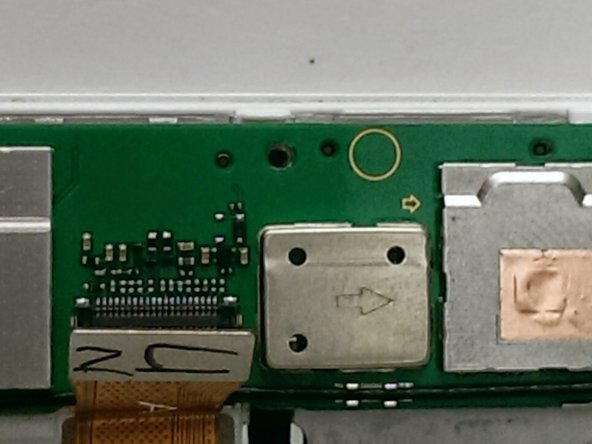
    • Gently rotate outside the motherboard, making sure not to break the little indicated connector

  15. Huawei Ascend G7 Display Assembly Replacement, Connector: 手順 15、 2の画像 1 Huawei Ascend G7 Display Assembly Replacement, Connector: 手順 15、 2の画像 2
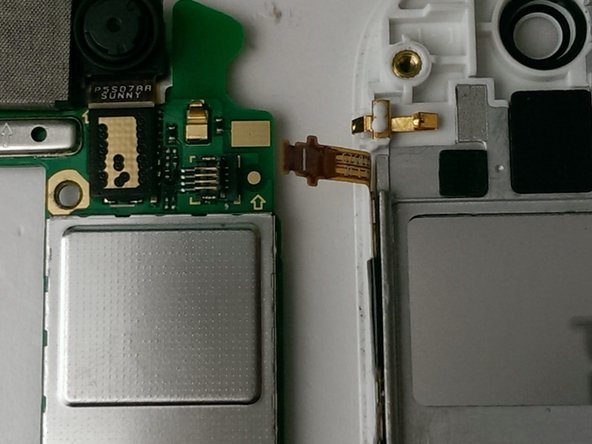
    • If your new display assembly comes with this ribbon cable already installed, disconnect the old one now.

    • If not, separate this part from the old display and transfer it to the new one.

  16. Huawei Ascend G7 Display Assembly Replacement, Removal of the display and the touch screen: 手順 16、 2の画像 1 Huawei Ascend G7 Display Assembly Replacement, Removal of the display and the touch screen: 手順 16、 2の画像 2
    • Heat the front.

    • Using a plastic tool to separate the lock display / touch screen from the main body.

    i need huawei screen

    Chand Mahammad - 返信

    Step 8 - yes, the battery stuck very much. It is very thin and it was difficult removing it without risk of bending it (what I estimate this very dangerous). I inserted a credit card between the battery and casing to detach the battery carefully from the casing.

    Step 15 - “this part” means the black flat ribbon with the three buttons ;-)

    Step 16 - of course when assembling again, a thin film of glue is required as there was no more adhesion from the previous display.

    The good thing is that there are only two type of screws (the black and the silver ones) in opposite to iPhone where all screws have different lengths!

    Thank you for this tutorial, the Huawey works again!

    pacman0 - 返信

  17. Huawei Ascend G7 Display Assembly Replacement: 手順 17、 1の画像 1
    • You have completed the repair.

終わりに

To reassemble your device, follow these instructions in reverse order.

36 の人々がこのガイドを完成させました。

作成者

9人の作成者と共同で作成されました。

Andrea Murinu

メンバー登録日: 04/07/15

948 ポイント

1ガイドが承認済み

4 件のコメント

donde puedo conseguir el remplazo de la pantalla completa, LCD + touch?

mnemcf95 - 返信

Hi , thanks this info is great . My G7 has a broken touch screen but works fine . I have seen replacement screens and units which include the digiboard ? So do I need to still remove the pcb or just the frame to get to the edge of the touch screen ? is it easy to replace the touch sreen alone ? look forward to your reply . Regards Carl.

carl anthony - 返信

Step 8 - the battery stock very much, I inserted a credit card in between the casing and the battery to detach it. I guess that bending the battery is very dangerous!

Step 15 - This part means the black flat cable with the three buttons ;-)

Step 16 - The new display needed a small film of glue

pacman0 - 返信

Hi, the power on connector on my main board has the plastic clip missing is there a way I can connect them together, they seem too small for soldering.

Andrina - 返信

コメントを追加

統計データ:

過去 24時間: 2

過去 7 日: 4

過去 30 日: 20

今までの合計 21,423