メインコンテンツにスキップ

How to fix a G432 Logitech headset loose microphone arm

必要な工具と部品

  1. How to fix a G432 Logitech headset loose microphone arm, How to fix a G432 Logitech headset loose microphone arm: 手順 1、 3の画像 1 How to fix a G432 Logitech headset loose microphone arm, How to fix a G432 Logitech headset loose microphone arm: 手順 1、 3の画像 2 How to fix a G432 Logitech headset loose microphone arm, How to fix a G432 Logitech headset loose microphone arm: 手順 1、 3の画像 3
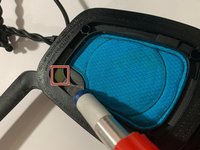
    • Remove the ear pads by gently lifting them from the headset. They are easy to take off, so no need to be rough.

  2. How to fix a G432 Logitech headset loose microphone arm: 手順 2、 2の画像 1 How to fix a G432 Logitech headset loose microphone arm: 手順 2、 2の画像 2
    • First, unscrew the three visible screws. Use a size #1 Phillips screwdriver to remove the 1.2 mm screws.

    • There are four screws, one in each corner, and you should only be able to see three for now. The fourth one is hidden and can be dealt with later.

  3. How to fix a G432 Logitech headset loose microphone arm: 手順 3、 3の画像 1 How to fix a G432 Logitech headset loose microphone arm: 手順 3、 3の画像 2 How to fix a G432 Logitech headset loose microphone arm: 手順 3、 3の画像 3
    • After finishing with the three visible screws, look for the fourth screw. This one should be hidden behind a black sticker near the microphone arm.

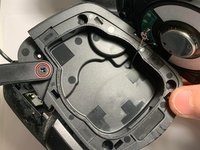
    • Remove the sticker, and it is recommended to use a small tool that can peel the sticker off from underneath.

    • After removing the sticker, you can Remove the fourth and final screw, which is similar to the other three screws. Then open the headset cautiously, as the wires inside are short and sensitive.

  4. How to fix a G432 Logitech headset loose microphone arm: 手順 4、 2の画像 1 How to fix a G432 Logitech headset loose microphone arm: 手順 4、 2の画像 2
    • Take out the headphone part to continue to this step. While doing this, be meticulous to not have any rough movements that could potentially damage the wires.

    • There are four clips, one on every corner. Push these clips so they unclip and open the outer part of the headset.

  5. How to fix a G432 Logitech headset loose microphone arm: 手順 5、 3の画像 1 How to fix a G432 Logitech headset loose microphone arm: 手順 5、 3の画像 2 How to fix a G432 Logitech headset loose microphone arm: 手順 5、 3の画像 3
    • Similar to the previous step, opening the outer part of the headset will reveal even more wiring. Again, be careful with your hands to make sure the wires don't get harmed.

    • After pushing the clips, open the outside of the headset to see the microphone arm screw.

    • Screw the microphone arm screw and make it tighter so it won't be so loose. Use a size #3 Phillips screwdriver to take the screw out.

    • Be careful to not make the microphone arm too tight as that will completely restrict its movement.

  6. How to fix a G432 Logitech headset loose microphone arm: 手順 6、 3の画像 1 How to fix a G432 Logitech headset loose microphone arm: 手順 6、 3の画像 2 How to fix a G432 Logitech headset loose microphone arm: 手順 6、 3の画像 3
    • After fixing the microphone arm, put everything back together.

    • Simply line up the outer part of the headset and push it in so the clips can reconnect once again.

  7. How to fix a G432 Logitech headset loose microphone arm: 手順 7、 3の画像 1 How to fix a G432 Logitech headset loose microphone arm: 手順 7、 3の画像 2 How to fix a G432 Logitech headset loose microphone arm: 手順 7、 3の画像 3
    • Simply screw back the four screws from earlier and put back the earpads, and it should be good to go!

ゴール

ある他の人がこのガイドを完成しました。

作成者

2人の作成者と共同で作成されました。

Huu

メンバー登録日: 04/13/22

177 ポイント

1ガイドが承認済み

チーム

CSU Los Angeles, Team 1-1, Harris Spring 2022 CSU Los Angeles, Team 1-1, Harris Spring 2022人のメンバー

CSULA-HARRIS-S22S1G1

1 メンバー

2のガイドは作成済み

0 件のコメント

コメントを追加

統計データ:

過去 24時間: 3

過去 7 日: 25

過去 30 日: 103

今までの合計 2,659